Manual
This manual will take you through the functions of your Ray Console.
This manual will take you through the functions of your Ray Console.
This manual contains an exhaustive description of all functions in the Ray Console. It spans the hardware, software and webshop functionality as well as providing introductions to various technical aspects of stage lighting. It is intended as a reference, where any part can be read independtly of the whole. The manual will be updated continuously as the Ray Console Software is modularly extended. If you notice any problems or room for improvment, please don't hessitate to contact us.
Throughout this Manual the following conventions are used:
Colour - Buttons on the touch screen are written in bold
[Delete] - Mechanical buttons and faders are written in square brackets and in bold
Help Overlay - Dialogues on the touch screen are written in italics
Light / Colour / Picker - Locations on the touch screen are written as series of buttons separated by slashes
# - Hashes are used to indicate an unknown number
Ray Console has been designed to control any kind of lighting technology via DMX signal, ArtNet and sACN, e.g. conventional lamps, moving lights, LEDs, videos or other media.
Any other use is not intended and may result in property damage or personal injury.
PXM Trade GmbH accepts no liability for any damage caused by the use of the console not intended.
When Ray Console arrives, please check the packaging for damage. Then unpack Ray Console and check for transport damage. If you notice any transport damage, contact the carrier or retailer immediately and make the necessary claims.
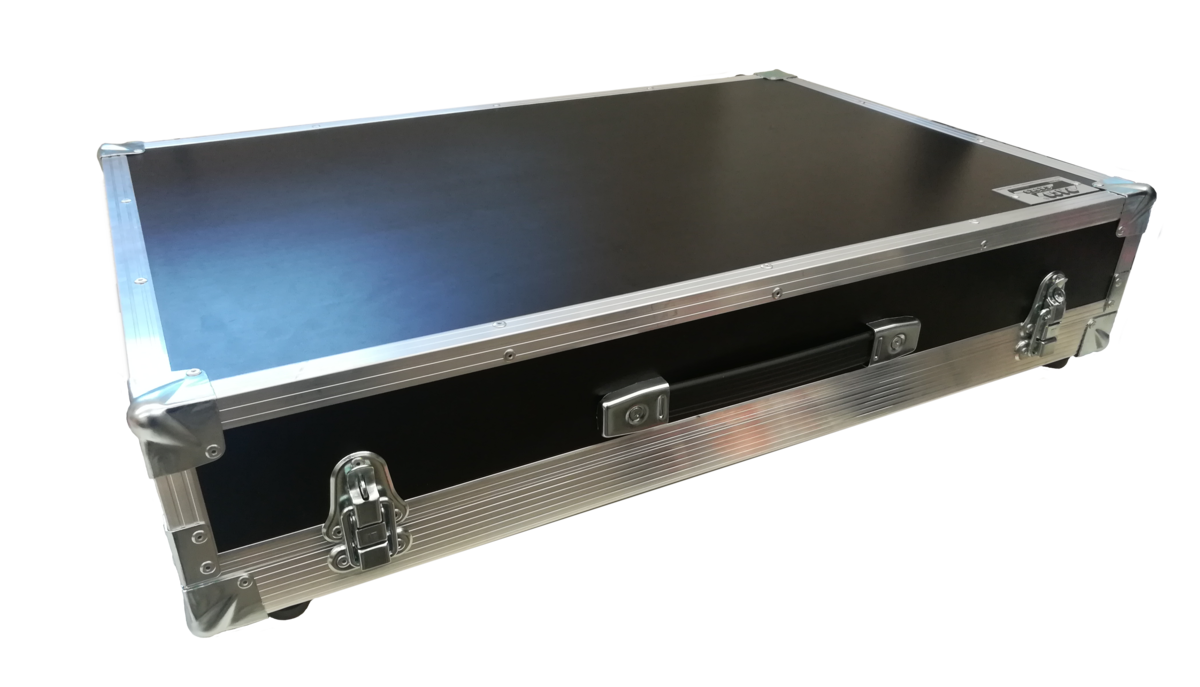
Your new Ray Console will be delivered with the following items. Please ensure they are all present and undamaged:
Q-Ray Console
Power Supply
Flight Case
Desk Lamp (Littlite)
Dust Cover
Quick-Start Manual
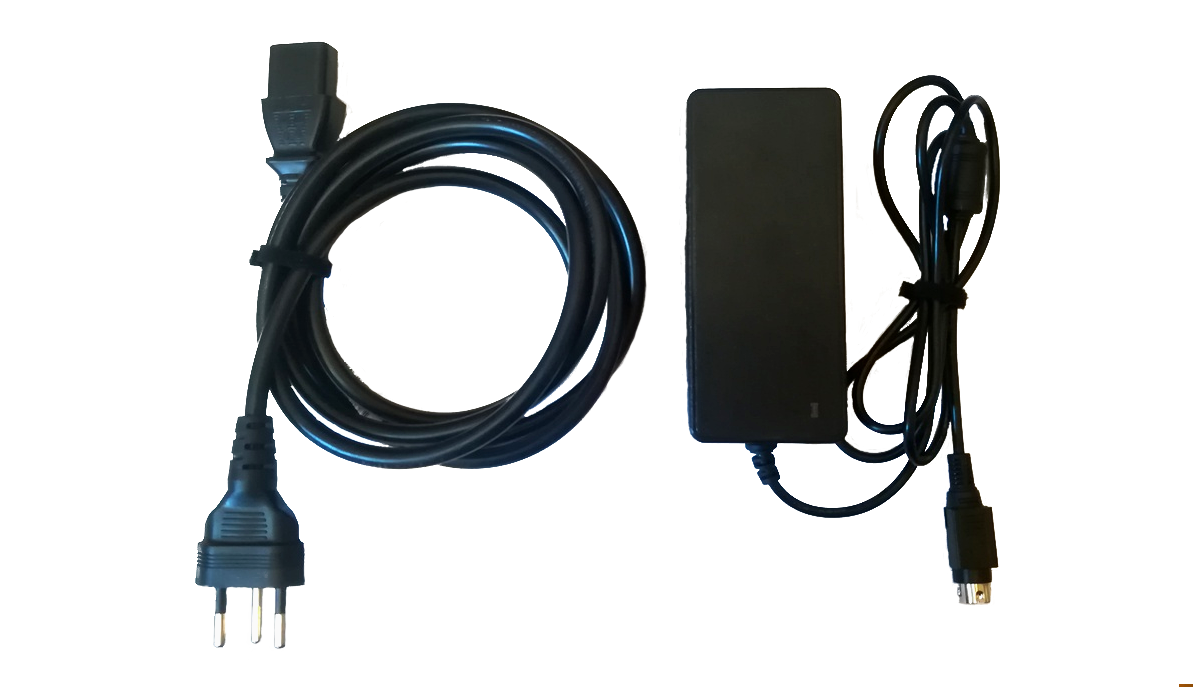
The console has a universal power supply that can be operated with voltages between 100 and 240 volts in a frequency range from 50 to 60 Hz. Before connecting the power supply unit to the power supply, check that the voltage is within the specified ranges.
THIS SYSTEM MUST BE CONNECTED TO A PROTECTIVE EARTH CONDUCTOR.
Note: All connections should be made when the system components are switched off, otherwise system components could be damaged.
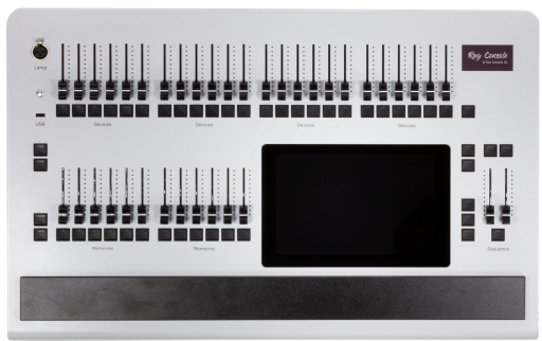
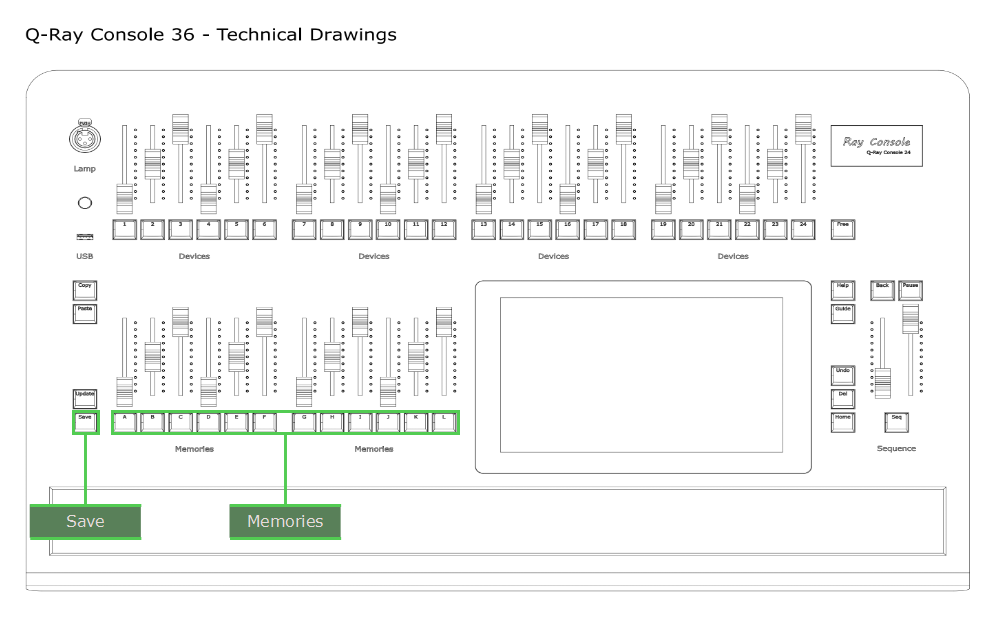
There are two different console versions for Ray Console: Q-Ray Console 24 and Q-Ray Console 36. In this manual we will refer to the Q-Ray Console 36 and mention any differences in the Q-Ray Console 24. Below is given an overview of the main difference between the two consoles:
Q-Ray Console 36
24 Device Faders
12 Memory faders
Q-Ray Console 24
18 Device Faders
6 Memory Faders
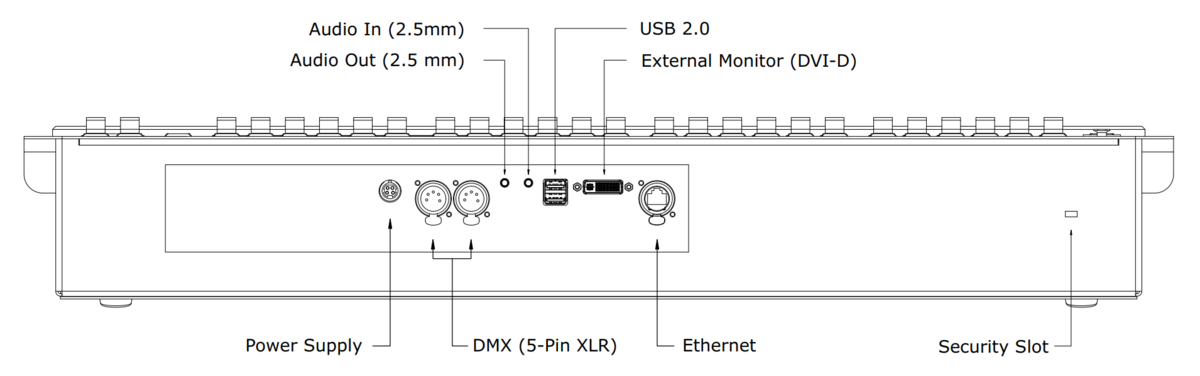
The same connectors can be found on the back of the Q-Ray Console 24 and the Q-Ray Console 36. The table below shows each connector, the standard of the connector, the specific form factor of the connector and what the connector is needed for.
| Power Supply | 12V, 5A | 4 Pin Power DIN | Provides power for the console to operated |
| DMX 1 | DMX512 | 5 Pin XLR | Transmits control messages to devices |
| DMX 2 | DMX512 | 5 Pin XLR | Transmits control messages to devices |
| Audio In | TRS | 3.5mm | Sending audio to the console for sound to light functions |
| Audio Out | TRS | 3.5mm | Playing audio tracks directly from the console |
| USB (top) | USB 2.0, 0.5A | Type A | Connecting external hardware to the console |
| USB (back) | USB 2.0, 1.0A | Type A | Connecting external hardware to the console |
| External Monitor | DVI | DVI-D | Viewing extra information or playing a video |
| Ethernet | Internet, IP, ArtNet, sACN | RJ45 | Connecting to the internet or ip based lighting control networks |
| Lock | Kingston | Security Slot | Securing the console so that it cannot be moved |

Devices: Each patched device is assigned a device button, e.g. [3], and fader. The fader controls the device's intensity while the button is used to select the device for editing attributes such as colour, position....
Memories: Each saved memory is assigned a memory button, e.g. [C], and fader. The fader proportionally controls the intensity of the saved device intensities while the button is used to select the memory for review or editing
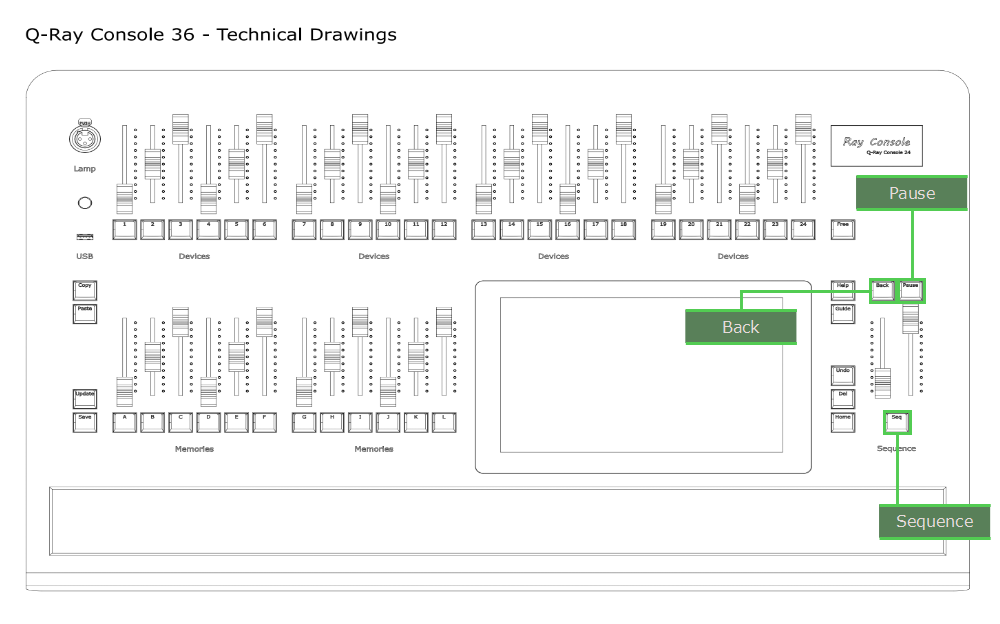
Sequence: The left hand fader removes intensity of devices in the current step while the right hand fader adds intensity of devices in the next step. The [Seq] button can run fades automatically, which [Pause] then pauses and [Back] runs the fade backwards
Function Buttons: The following buttons have specific actions:
[Copy] - Copy a device's attributes, a memory, a step, etc...
[Paste] - Paste previously copied device attributes to a device, previously copied memory to a new memory or step, etc...
[Save] - Save the current look on the stage as a memory or sequence step
[Update] - Update an existing memory or sequence step by changing the attributes of shining devices
[Free] - Return the intensity of devices, who's intensity has been overridden by the device fader, to highest takes precedence
[Help] - Display brief and helpful information about the current view or dialogue on the touchscreen
[Guide] - Display in depth information about the current view or dialogue on the touchscreen
[Undo] - Jump to the Options view where there is a list of last actions and press undo to reverse the last action taken
[Del] - Return all attributes of a device to their default, delete a memory, remove a step, etc....
[Home] - Go back one screen on the touch screen or long-press to return to the Light view
The status of each device fader (the top row of faders) gives you useful information about the fader and devices. The device faders status is show on the physical button below the fader and in the top left corner of the device symbol where the fader is shown. The device fader states are:
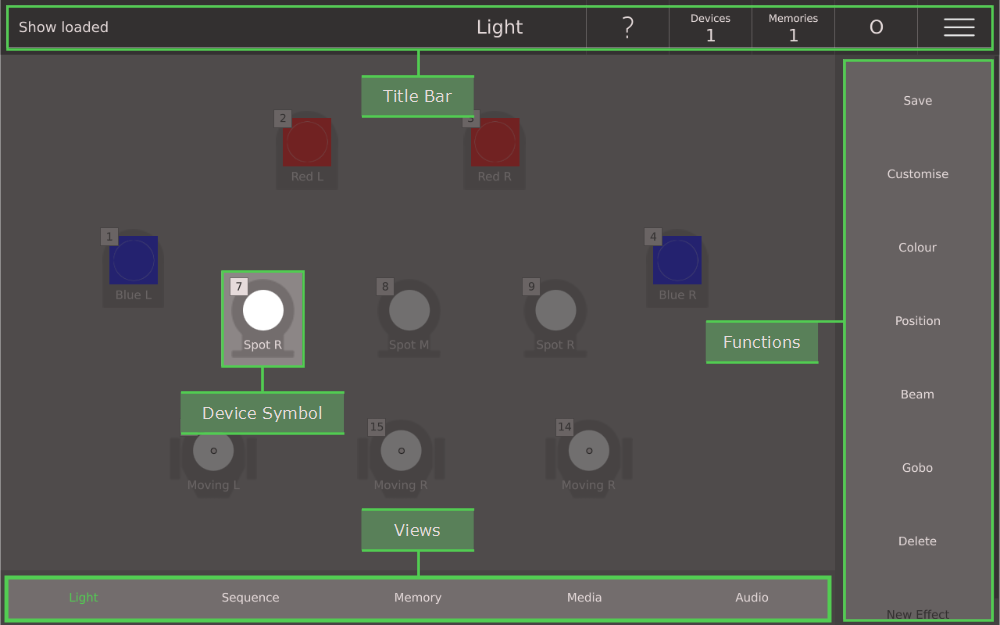
The Light, Sequence, Memory, Media, Audio and Settings view in the Ray Console software has the same general layout. This layout contains:
View Layout
Title Bar - Gives access to options and settings as well as dropdowns to change fader pages
Device Symbols - Includes name, type and attributes of one patched device on the current device page
Functions - Opens dialogues or performs actions specific to the current view. Please note: long press on the Delete button triggers a reset all devices' parameters on current device page. This need to be confirmed on a Dialogue.
Views - Select another view
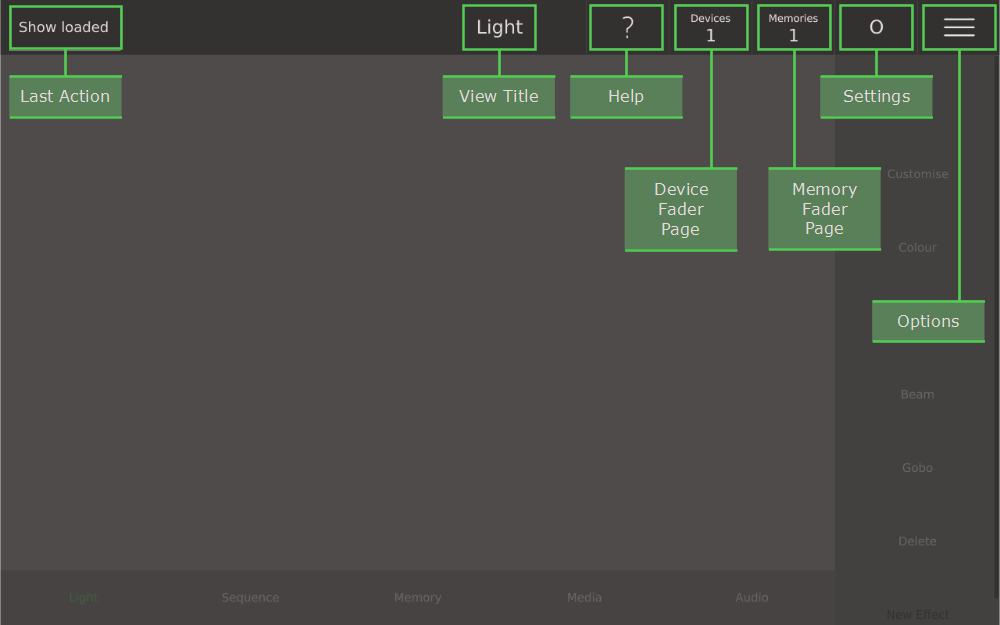
View Title Bar
Last Action - Displays the last action done on the console. A complete list is in the Options View
View Title - Displays the name of the current view (also highlighted in green at the bottom)
Help - Displays the help overlay giving general information about how to use the view
Devices Page - Changes which page of devices is controlled by the top row of faders (only shown if more than one device page exists)
Memories Page - Changes which page of memories is controlled by the bottom row of faders
Settings - Quick settings access and lock settings (only shown if the settings is unlocked)
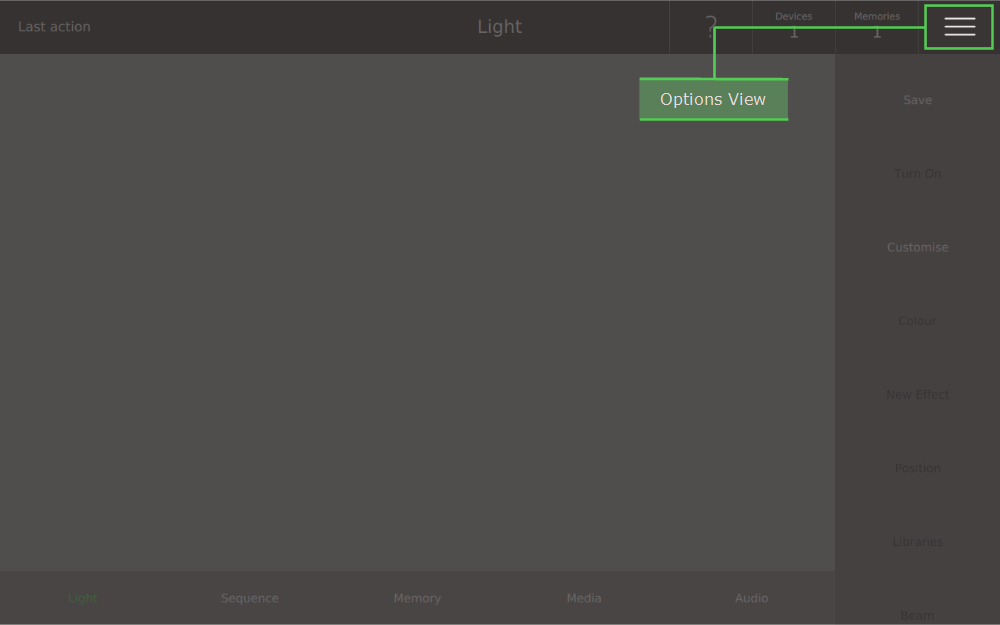
Options - Displays the options view with functions: Save Show, Light Layout, Desk Brightness, Flash, Go etc....
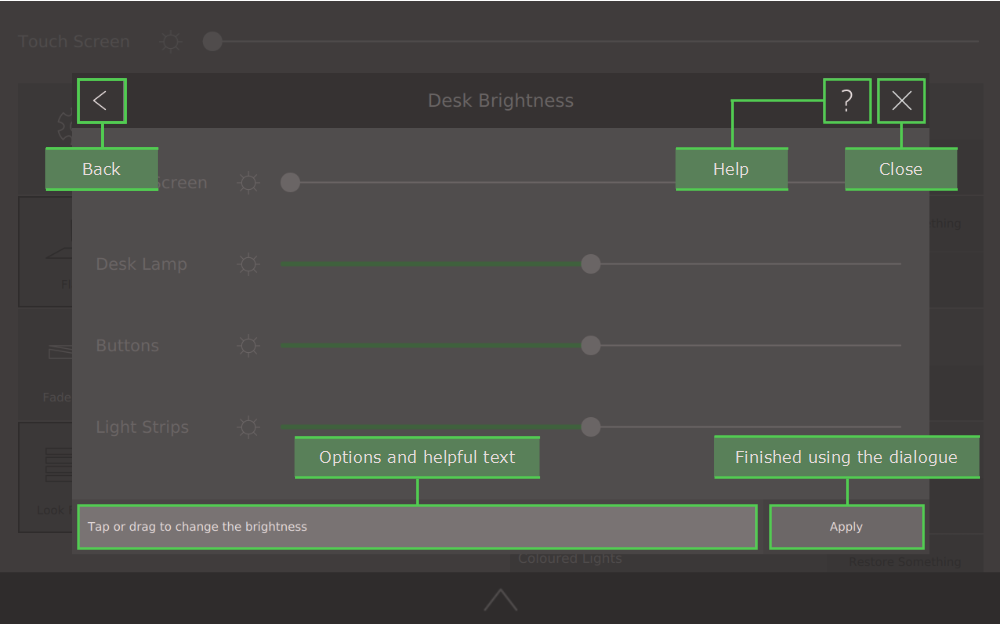
Every dialogue in the Ray Console software has the same general layout, although some dialogues have more or less standard buttons. Here is an overview of that layout:
Back - Goes back to the previous dialogue, or if there is no previous dialogue, closes the dialogue
Help - Displays the help overlay giving general information about how to use the dialogue
Close - Closes the dialogue and all previous dialogues to go back to the view
Information - A brief tip about how to use the dialogue
Finished Using Dialogue - Usually either Apply or Close button for when you have finished using the dialogue

Ray Console has the help you need, when and where you need it. To quickly get started on a specific view or dialogue press the ? on the screen or press the [Help] button and this will display an overlay with some key starting tips. To get specific but a little more in-depth information, press the [Guide] button which will show you a few pages of information including some background technical information. If you need more extensive information please look in this manual.
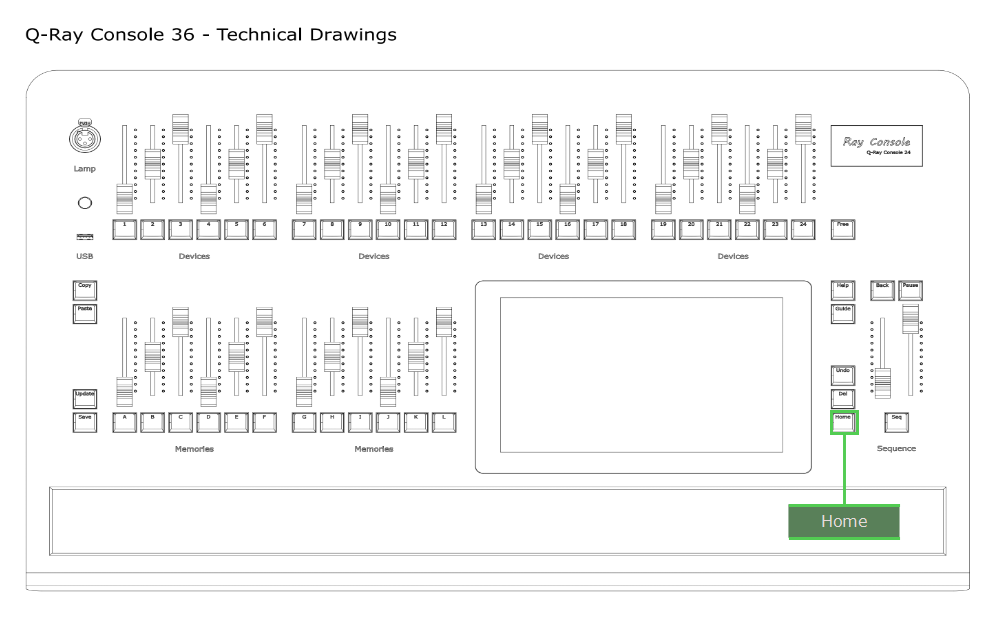
If you get lost somewhere in the software or are unsure how to close a dialogue simply press the [Home] button. Each time you press the [Home] button a dialogue will be close or page changed. To get back to the Light View, just press the [Home] button until you are back on the Light View.
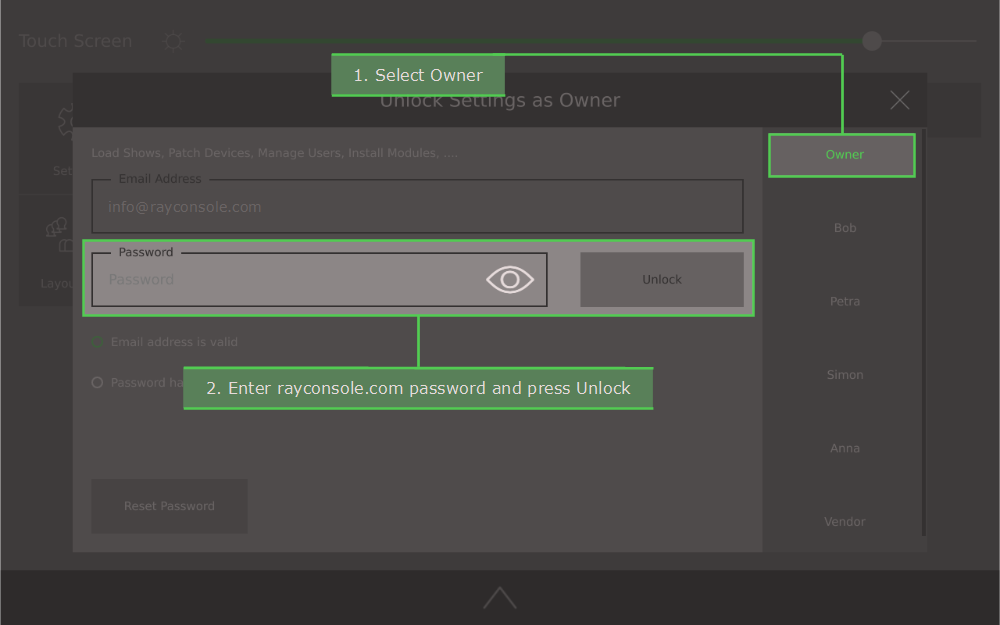
To access the console settings you need to connect or create a customer account. Select the three lines on the top left to go to Options View then select the Settings button. You should then see the Sign In dialogue. If you already have a rayconsole.com customer account, sign in with your email address and password.
The owner of the console can create user accounts on the console. Each user account has a name, password, and access profile. There are four standard access profiles.
Ray Console allows some special settings for every user on the console.
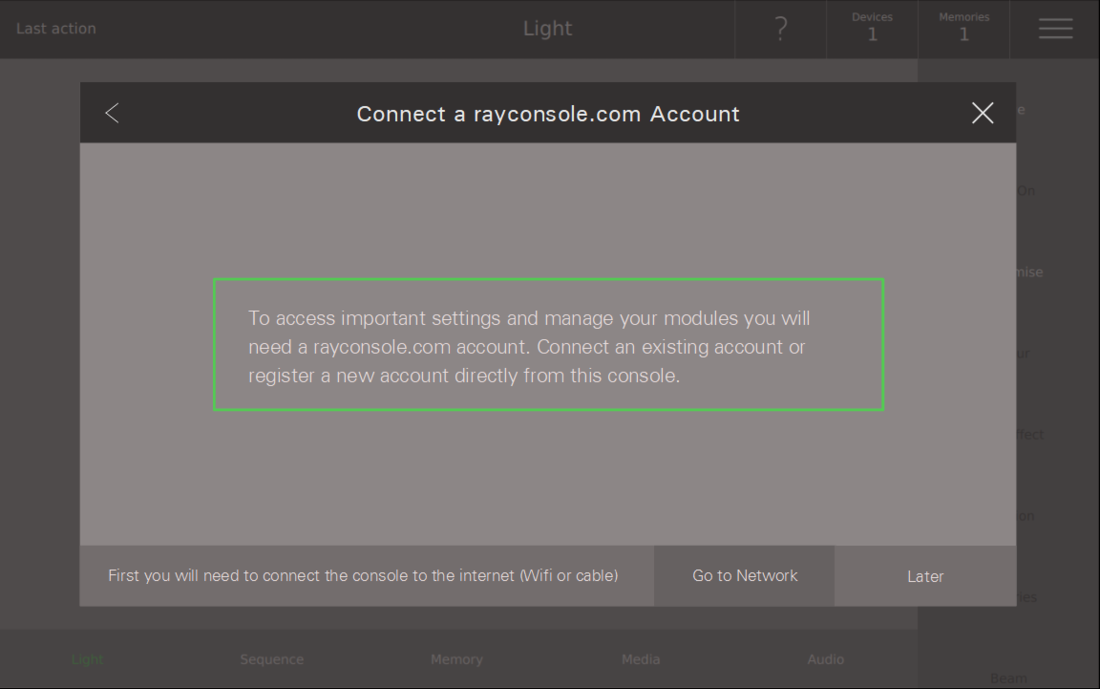
If you are not connected to the internet when starting up or while creating or connecting your customer account, you will be notified to go to the Network dialogue by pressing Go to Network. One solution is to connect a physical Ethernet cable to the console. Alternatively select Go to Network and then select WiFi and then select a network from the list, enter your network password and connect. For more details see Network
Your rayconsole.com account allows you to manage all your consoles and their modules in one place. Learn more here.
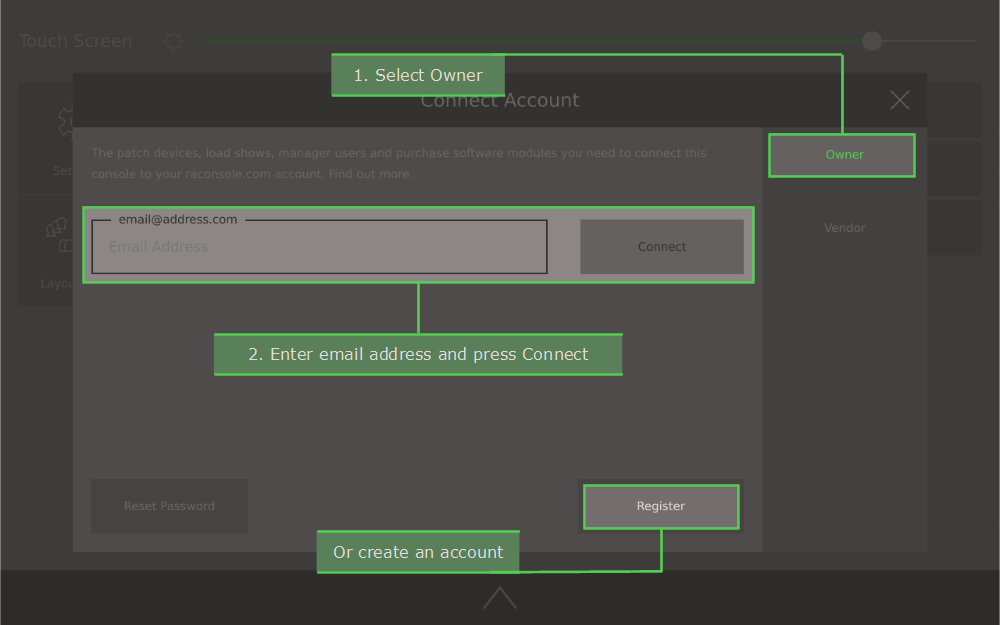
If you have a rayconsole.com account, just enter the email address used to create the account and press Connect. This will automatically connect your console to your account.
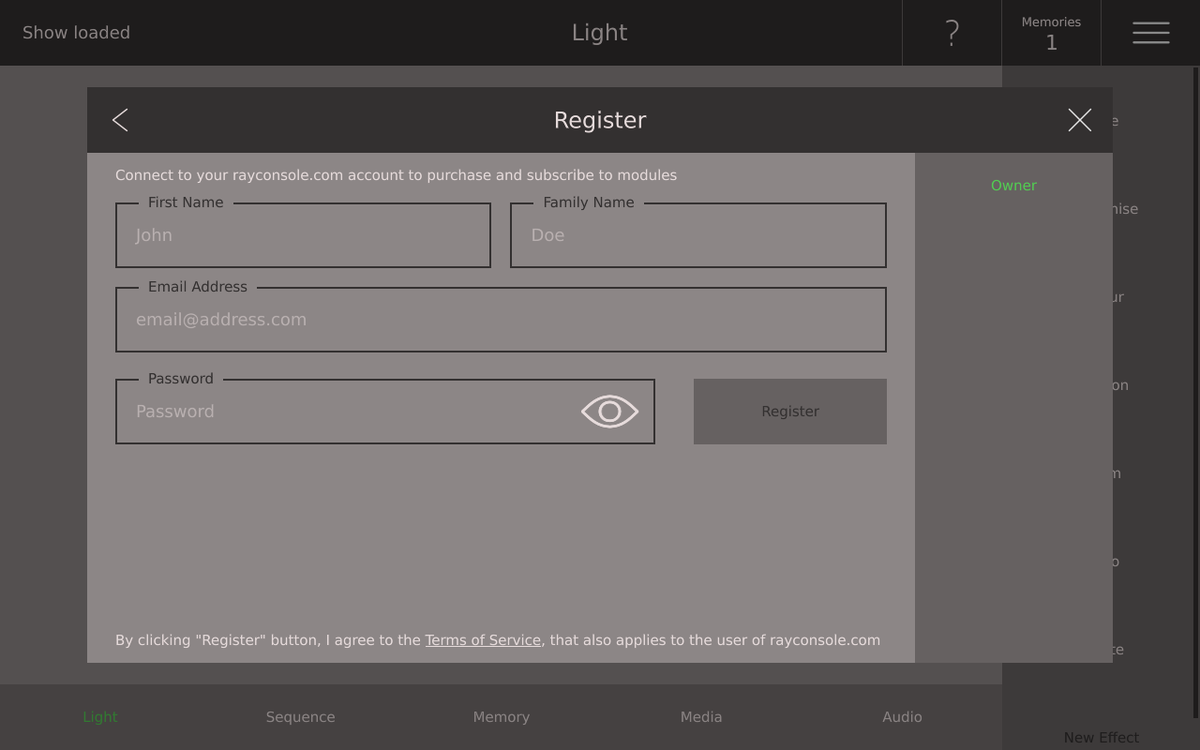
If you do not have a rayconsole.com account, select the Register button on the bottom right. You will then be able to register a new rayconsole.com account directly on the console.
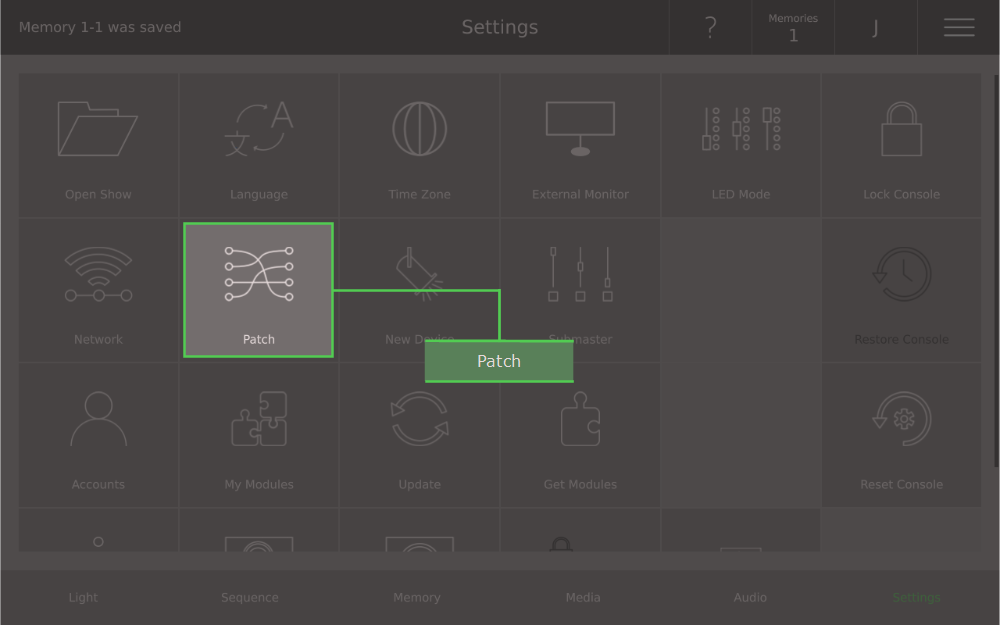
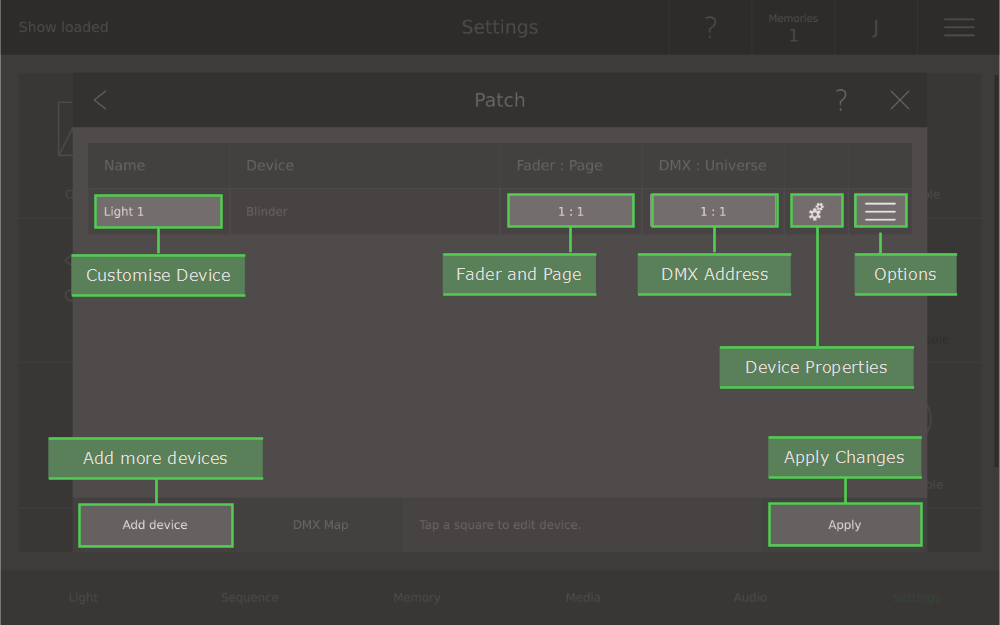
To patch a device, follow these steps:
1. Select Options
2. Select Settings
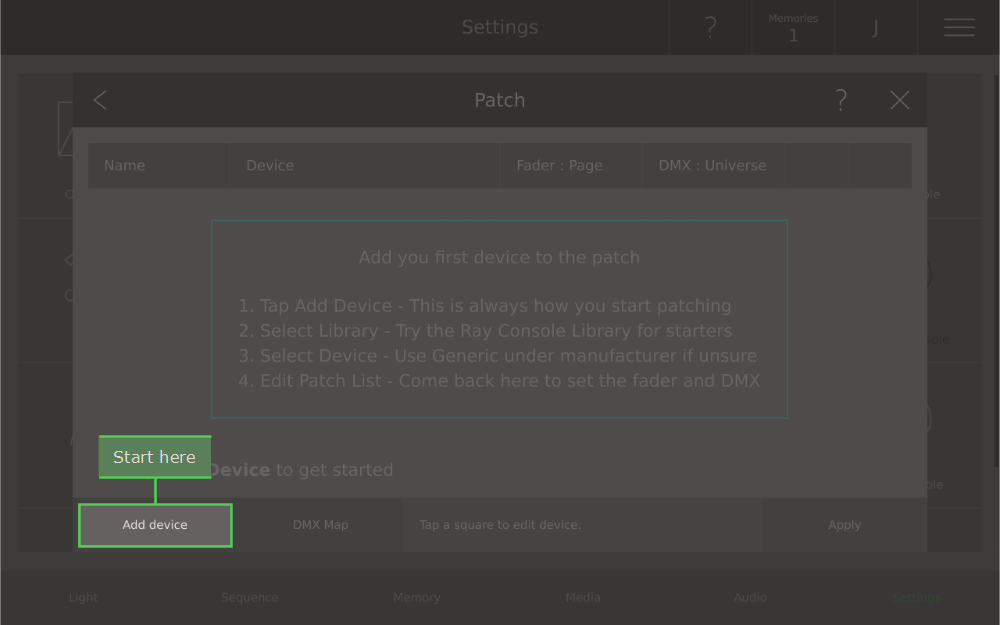
3. Select Patch
4. Tap the Add Device button
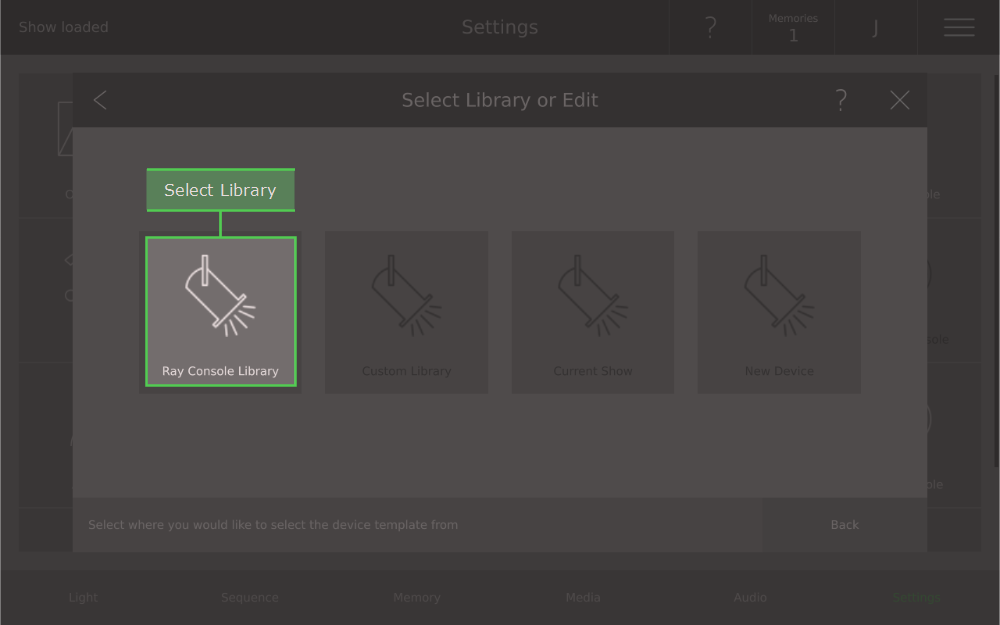
5. Select the library from which you want to add a device. If you are unsure, select the Ray Console library
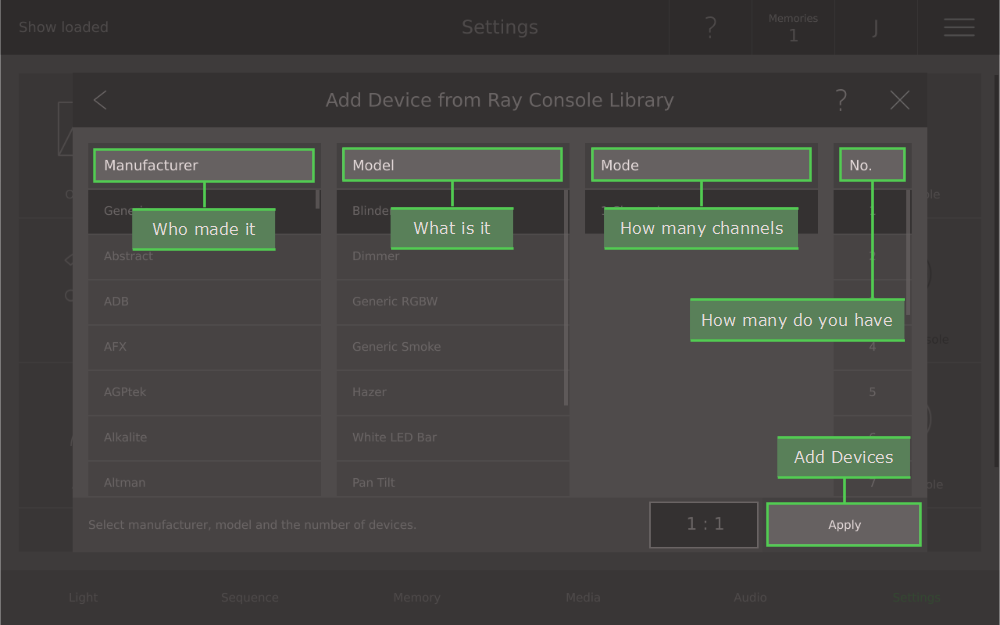
6. Next select the device you wish to patch, the device is defined by:
7. Select apply to add the devices
8. Press [Home] 3 times to return to the Light View
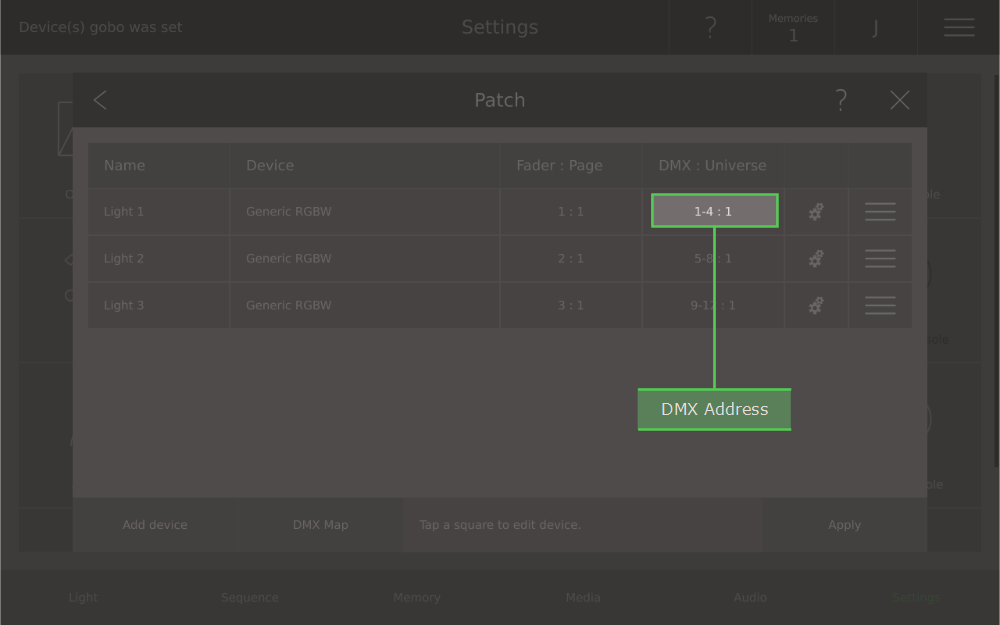

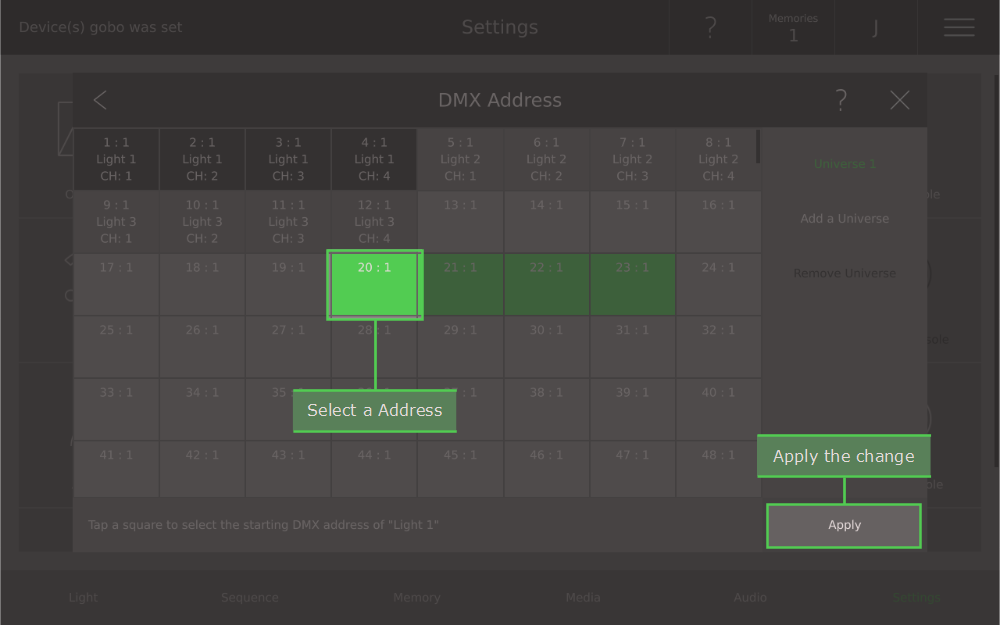
DMX 512 is the communication standard used to control stage lighting systems. Each universe of DMX has 512 channels of control. These channels are used by Ray Console to control attributes of a device (intensity, pan, strobe, haze, etc... ) by sending a value between 0 and 255. A device can use one or more DMX channels however all a device’s channels must be on one universe. The first channel of a device is the starting address, and must be set on the device (see your devices manual).
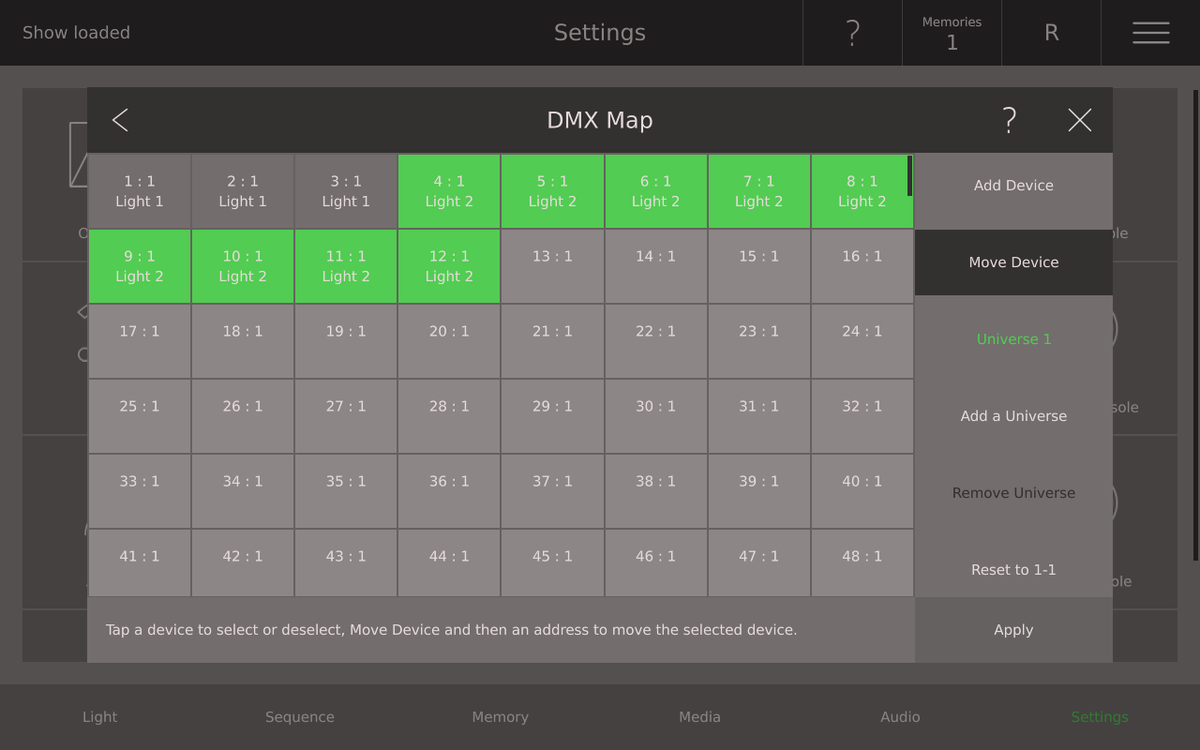
To change the DMX-address simply select the DMX : Universe cell for the device you want to edit and then the new starting position. The old position is shown in black, the new position in green, and any conflicts are shown in red. Press Apply to confirm a valid new DMX address. If you wish to move multiple devices at once, use the more advanced DMX Map dialogue.
What is universe? The DMX protocol defines 512 channels per universe of DMX. In order to control many devices, especially if the each have a lot of channels, Ray Console can send out DMX on multiple universes. Simply press Add a Universe. If you have reviously added a universe that is empty and you no longer need, simply select Remove Universe. The last universe in the list will always be remove first.
It is standard professional practice to group devices by type and/or location cross the DMX universes. This makes it possible to add a couple of devices, without repatching your entire theatre. Some rules of thumb are:
The dimmer should be patched to DMX address 1
Hazer / Smoke machine should be at the end of the universe (512)
Start each new block of devices at each 50th or 100th address
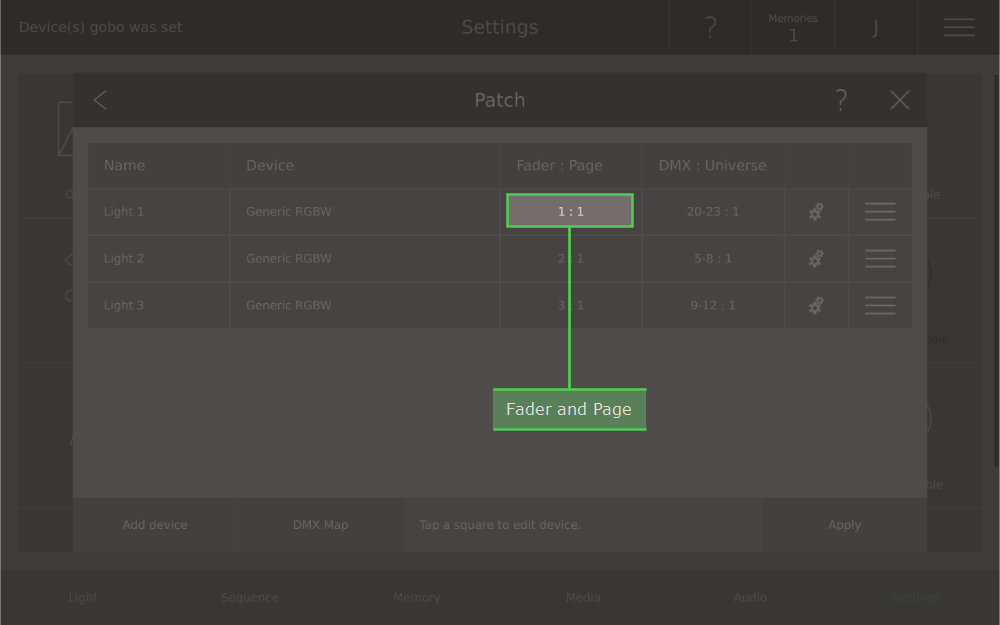

The Patch list is simple yet flexible. You can change the fader that controls the device, change the DMX address by which the device is controlled and even change the device template without loosing any information from your saved memories or sequence steps. The top row of faders on the Ray Console are exclusively device faders and are used only for selecting device and controlling their intensities. In the Fader and Page dialogue you can change the fader of a device.
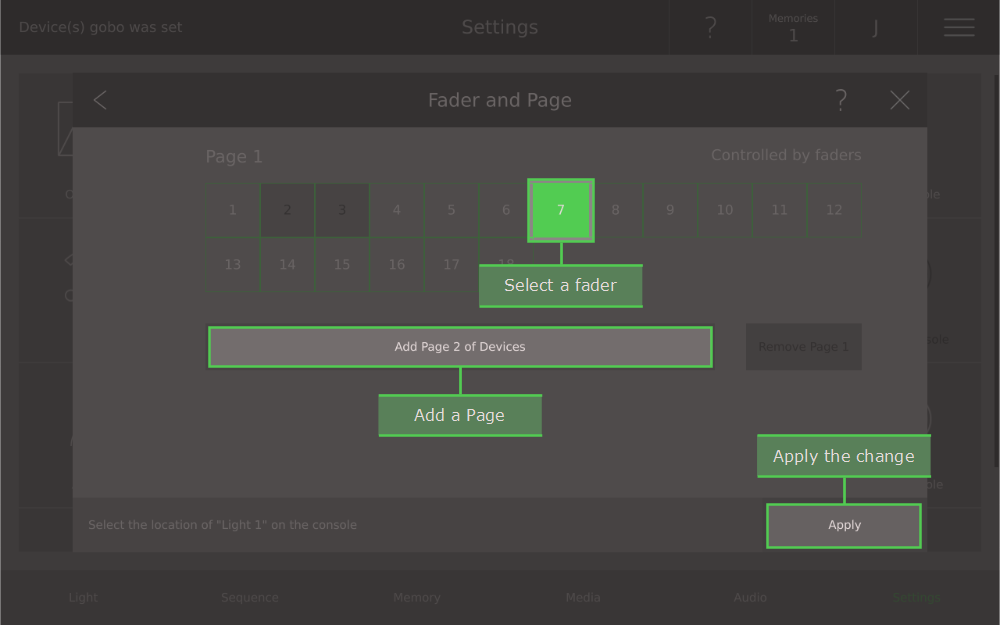
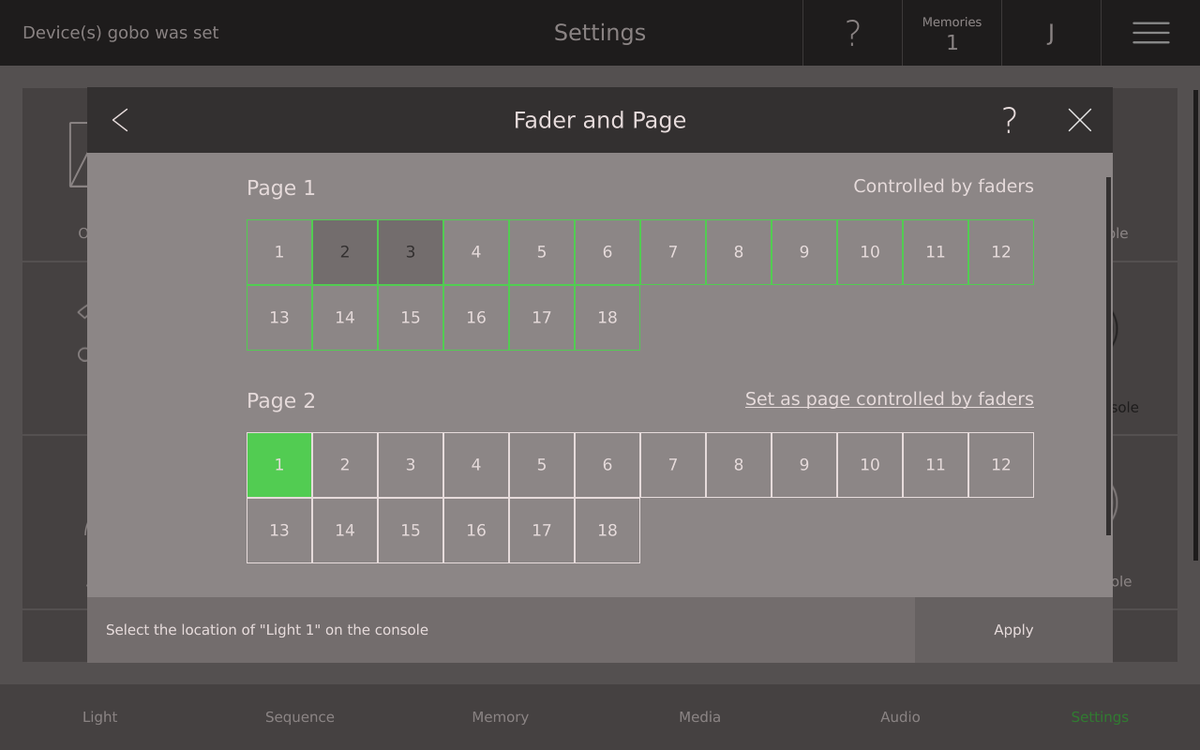
To change the fader of a device, tap the Fader : Page cell for the device you want to edit. The dialogue to change page shows which faders are free (light grey), which are already taken (dark grey) and the currently selected fader (green).
It is also possible to add a page of device faders. Simple select Add Page # of Devices. You can also remove the last page of device faders, if that page is empty, by selecting Remove Page #.
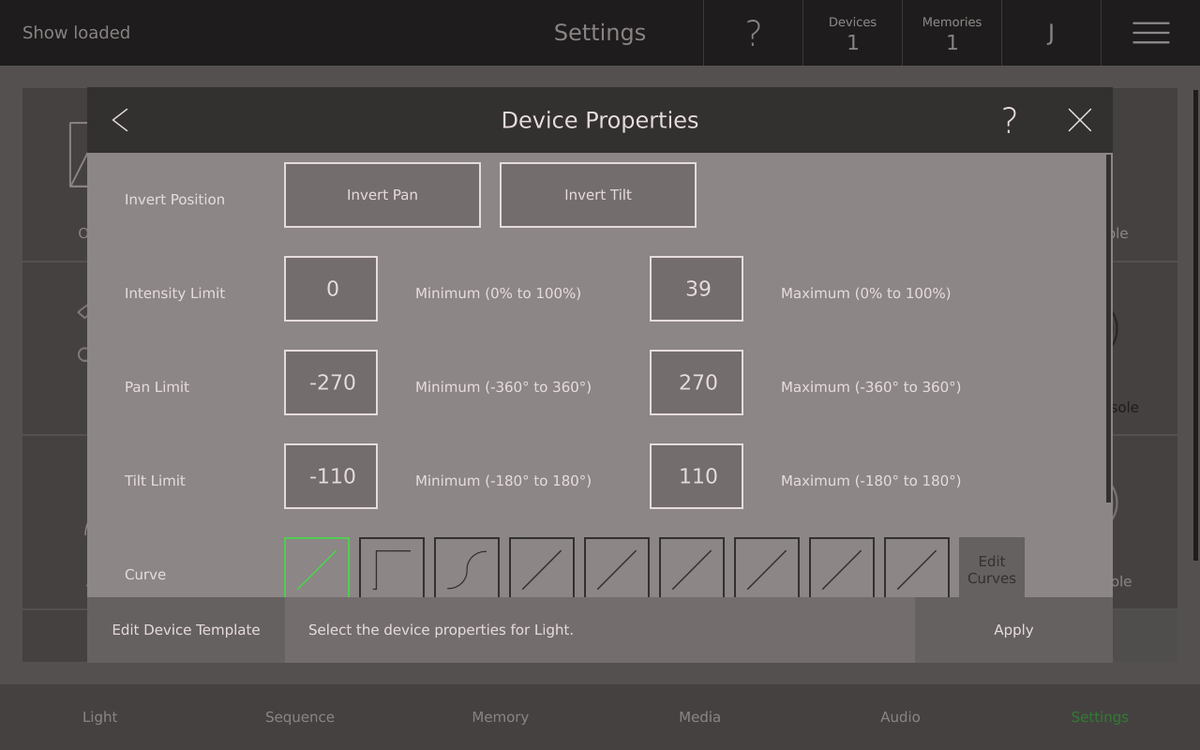
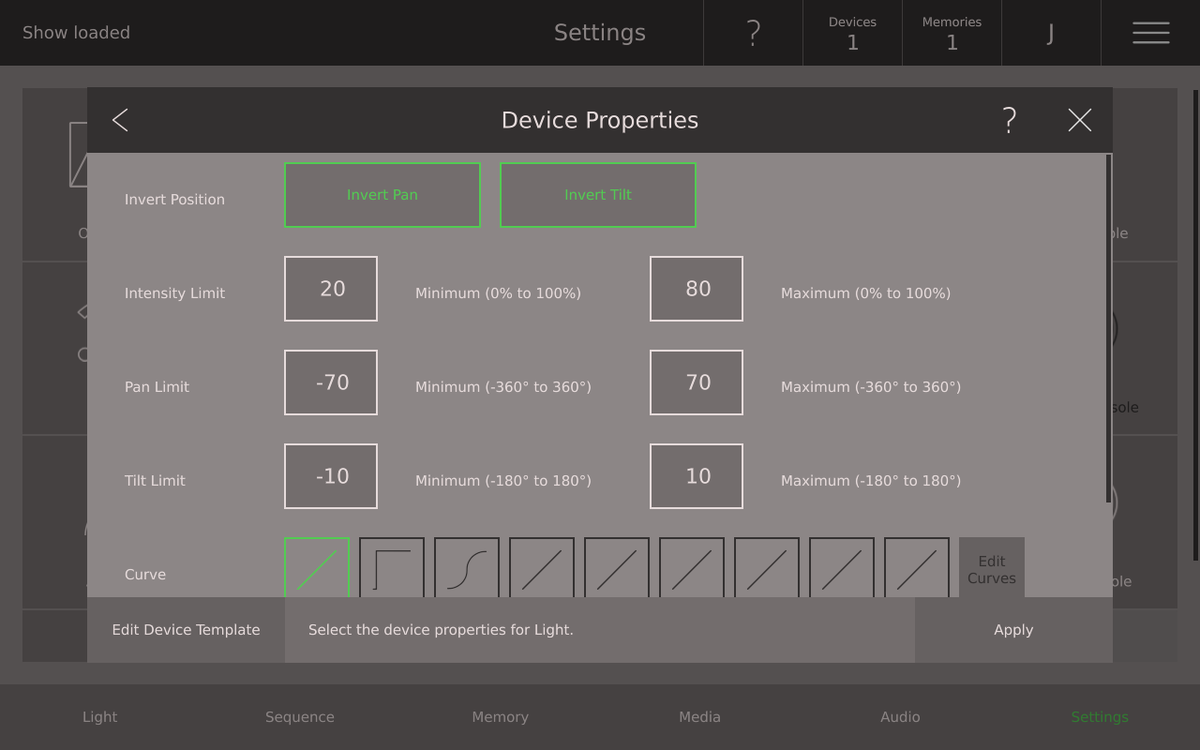
Selecting the cog icon in Settings View / Patch opens the Device Properties dialogue. On the Device Properties dialogue you can set certain key settings to do with how your device operates.
Invert Pan and Invert Tilt
Pan is the ability for your device to rotate around in a circle. Tilt is the ability for your device to swing forwards and backwards. Depending on how you positioned your device on the stage or in the rigging, the pan and tilt will appear to work in different directions. Inverting the pan allows you to reverse how devices respond when using the Position Picker and Position Joystick dialogue. It is recommended that all devices of the same model have the same settings here.
Intensity Limit
If one of your lights is much brighter than the others, you can limit its brightness. If you want to pre-heat some lights, you can set a minimum intensity here. Limiting the intensity does not change and saved intensities, it just restricts the devices intensities. If an intensity above the maximum is saved, the device will only go to the maximum. Simply enter a value between 0 and 100. Note that the minimum must be lower than the maximum.
Pan Limit and Tilt Limit
Perhaps you want limit the movement of a device to 360° tilt only or stop your device shining in certain areas of the hall. Limiting the pan and tilt does not change and saved positions, it just restricts the devices range of movement. If a position beyond the maximum is saved, the device will only go to the maximum. Simply enter a value between the two values indicated. Note that the minimum must lower than the maximum.
Curve
This can also be set on the device or dimmer.
Park
Park freezes a devices current output values. This is useful if something has gone wrong with a device.


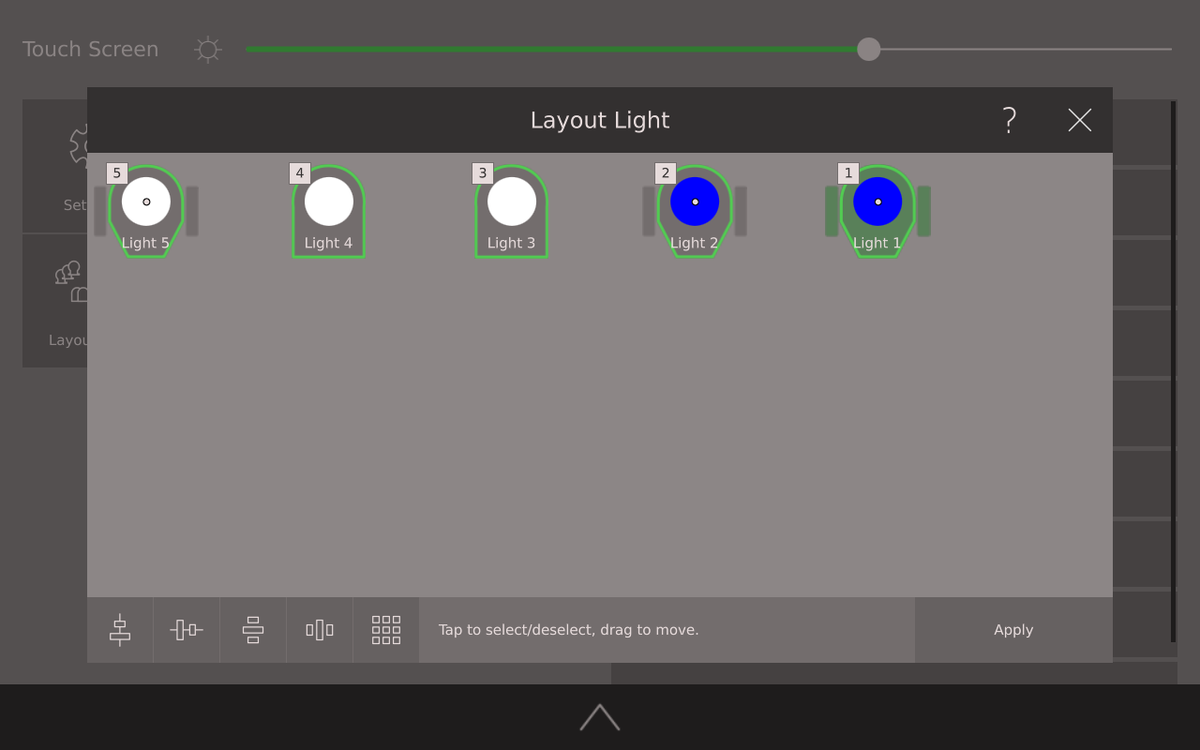
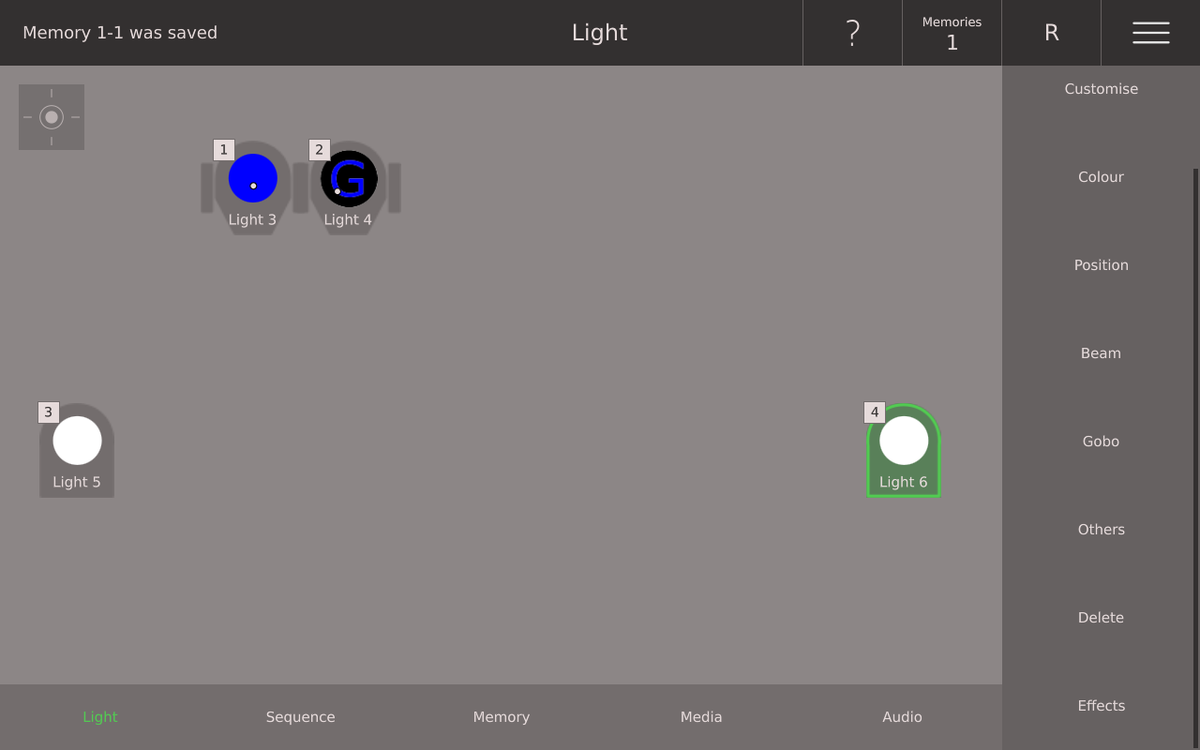
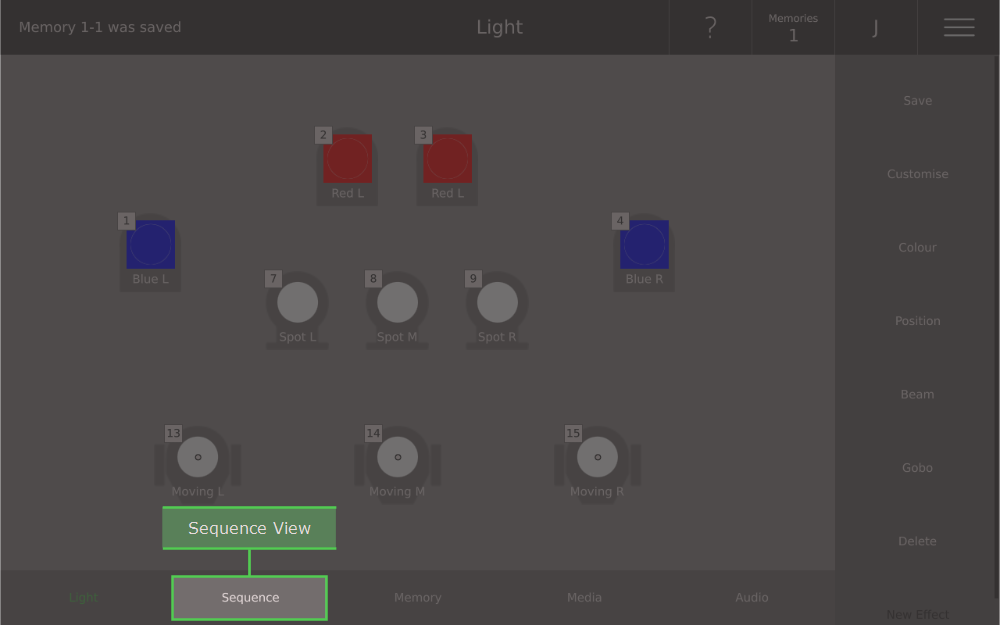
The desktop on the Ray Console is the Light View. This view shows you what is happening on stage right now. In the Light Layout dialogue you can spatially organise your patched devices on the Light View. Double tap the title bar to make the dialogue full screen.
The Light Layout dialogue can be found under Options View / Light Layout. To organise devices:
Drag devices to change their position
Select device by tapping them
Deselect all devices by tapping the background twice
Align devices to the last selected device by tapping an option in the bottom left of the screen
Space devices evenly by tapping an option in the bottom left of the screen
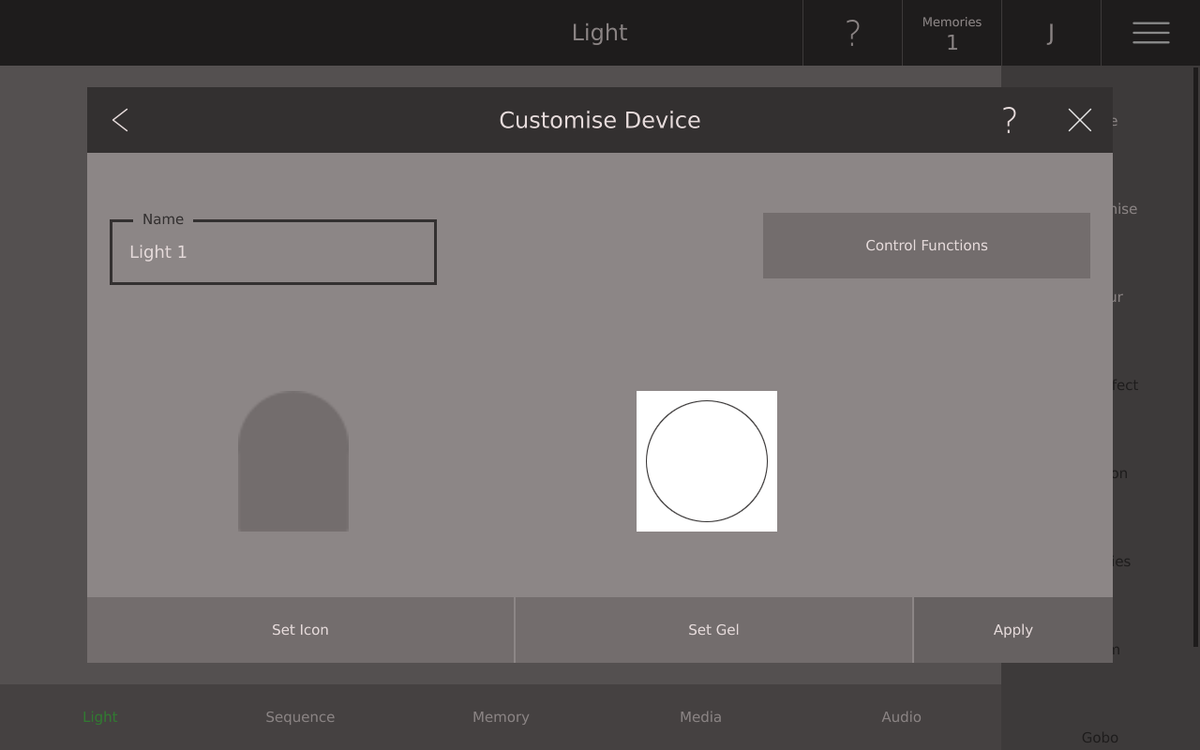
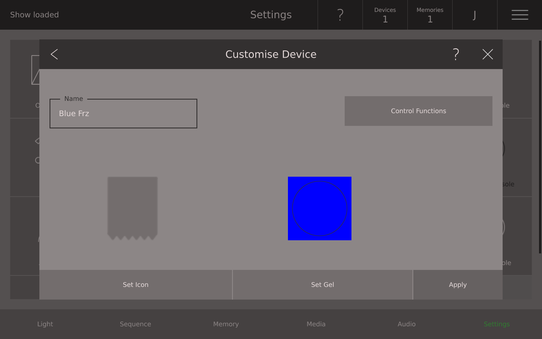
Customise Device allows you to configure the Device Symbol. The Device Symbol gives you an overview of the state of the device. To customise device go to Light View / Customise or Settings View / Patch / Name. In Customise Device you can set:
Name
This is the name of the device displayed on the Device Symbol. It can be maximum 8 characters long.
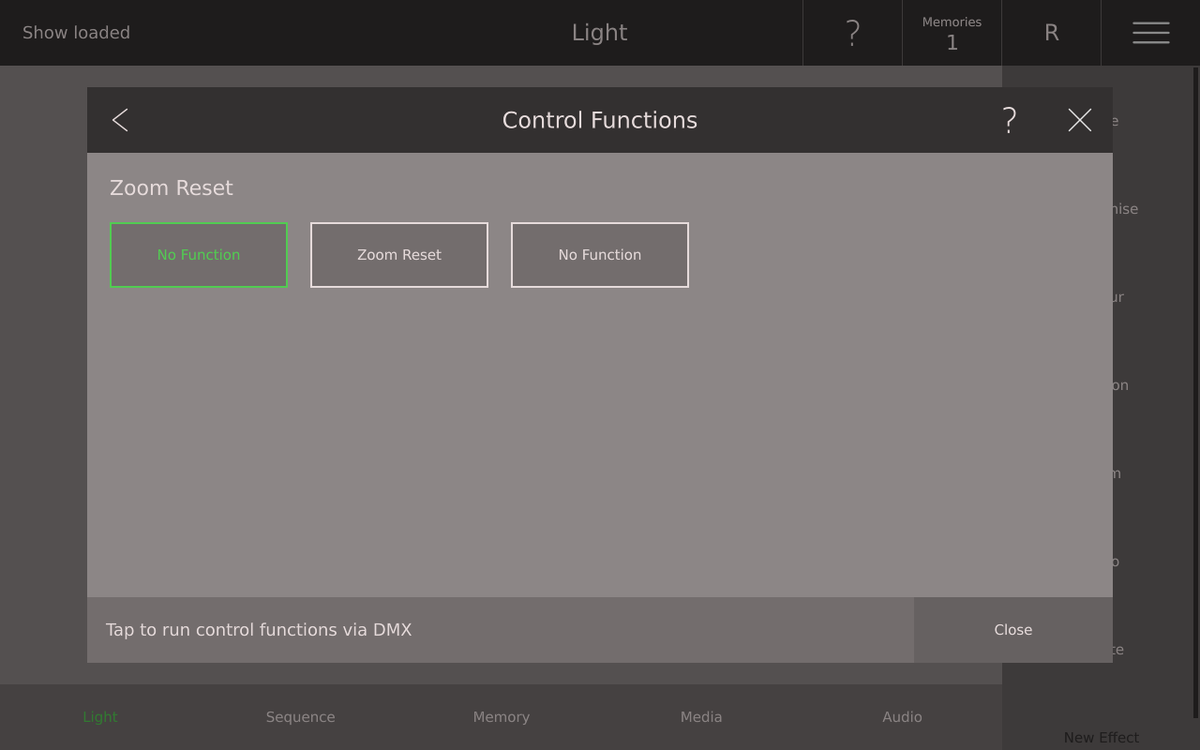
Control Functions
These are special functions on the device such as a device reset or turning the lamp on remotely using DMX.
Set Icon
There is a range of device icons to choose from that will help you quickly recognise devices.
Set Gel
If you have put a physical gel in front of your device, this is the place to set it. This makes it easier to recognise and select the correct device
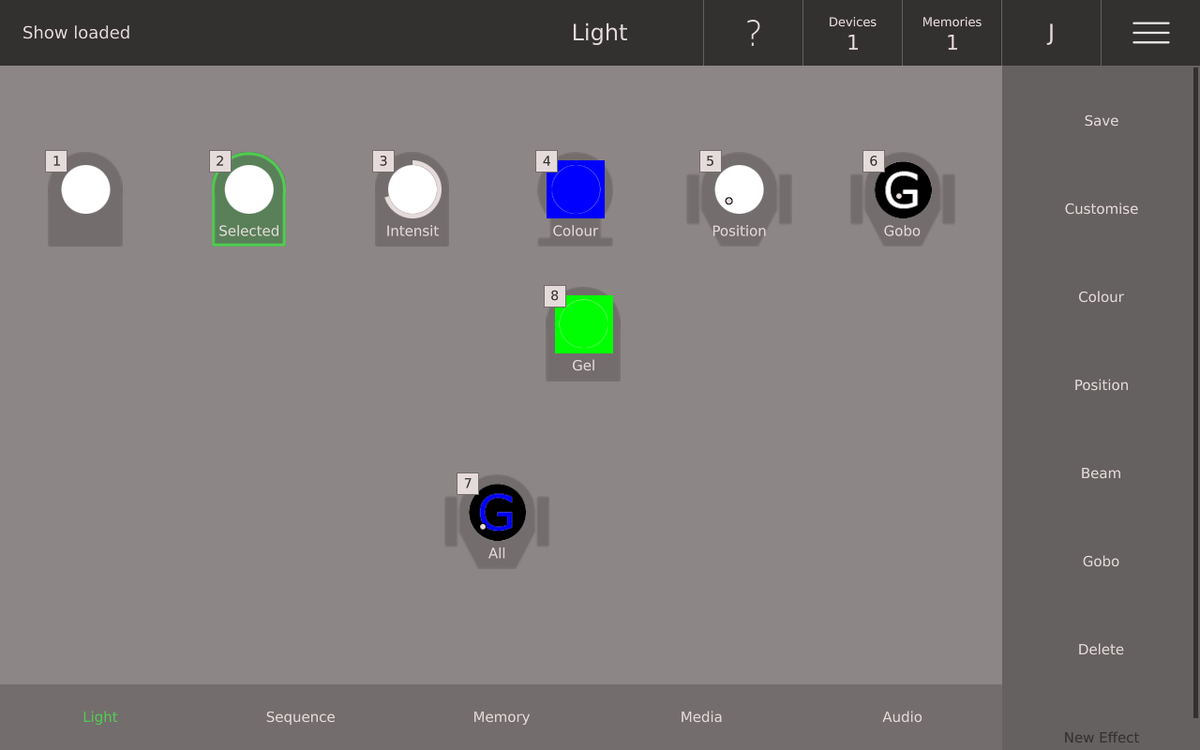
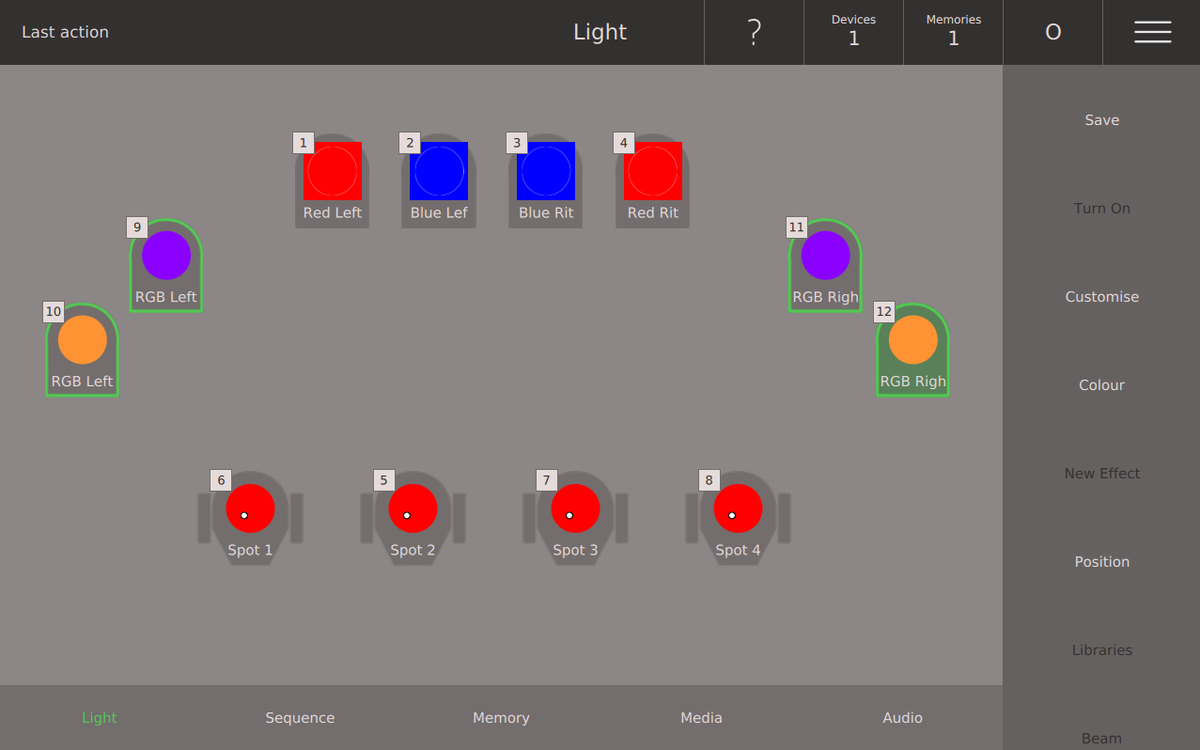
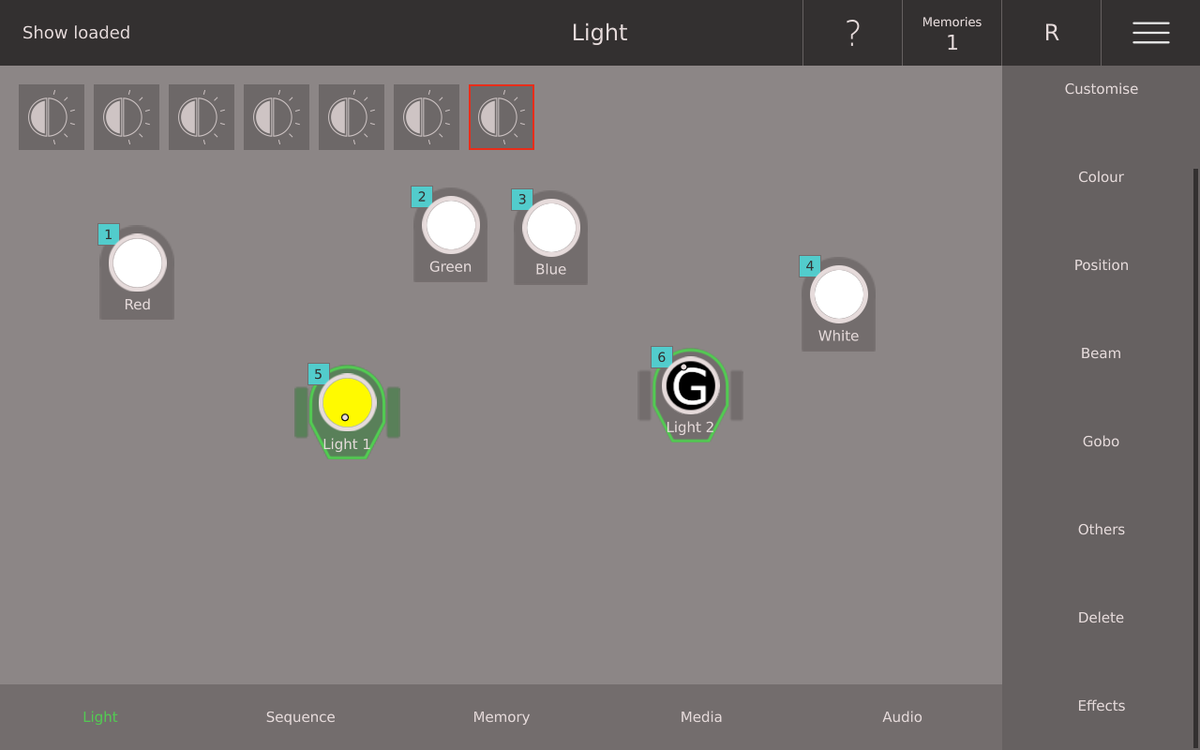
The Device Symbol can be seen on the Light View, Memory View and many other places in the Ray Console Software. The Device Symbol gives you a helpful overview of the state of the device:
Device Name
This is a customisable up to 8 character name. Go to Light View / Customise to change it.
Device Type
This is the general background shape of the device symbol. Use this to help tell your devices appart. Go to Light View / Customise to change it.
Device Gel
Set this if you have put a physical gel in front of your device to colour the light. Go to Light View / Customise to change it. See device 8.
Device Selected
If you tap a Device Symbol or press a device's button, it becomes selected. Selected devices have a green outline. The most recently selected device has a green outline and a green background. See device 2.
Fader Number
In the top left corner of the device symbol you can see the devices fader number. Look along the top row of faders to find the fader that controls the device's intensity.
Fader State
The box in the top left corner also shows the device's state. This is always the same as the device buttons colour. Find out more here about device states.
Device Intensity
Around the circle in the middle of the Device Symbol there is a band showing the current device intensity (how brightly it is shining). Move the device's fader to change this. See device 3.
Device Colour
The circle in the middle of the Device Symbol shows the device's colour. Tap the Device Symbol to select this and then press Colour on the right (you must be on light view, press [Home] to get there). See device 4.
Device Position
A small dot in the middle of the Device Symbol gives a rough indication of the devices position. Tap the Device Symbol to select this and then press Position on the right (you must be on light view, press [Home] to get there). There will only be a dot if the console is capable of changing the devices position (if it is a moving head). See device 5.
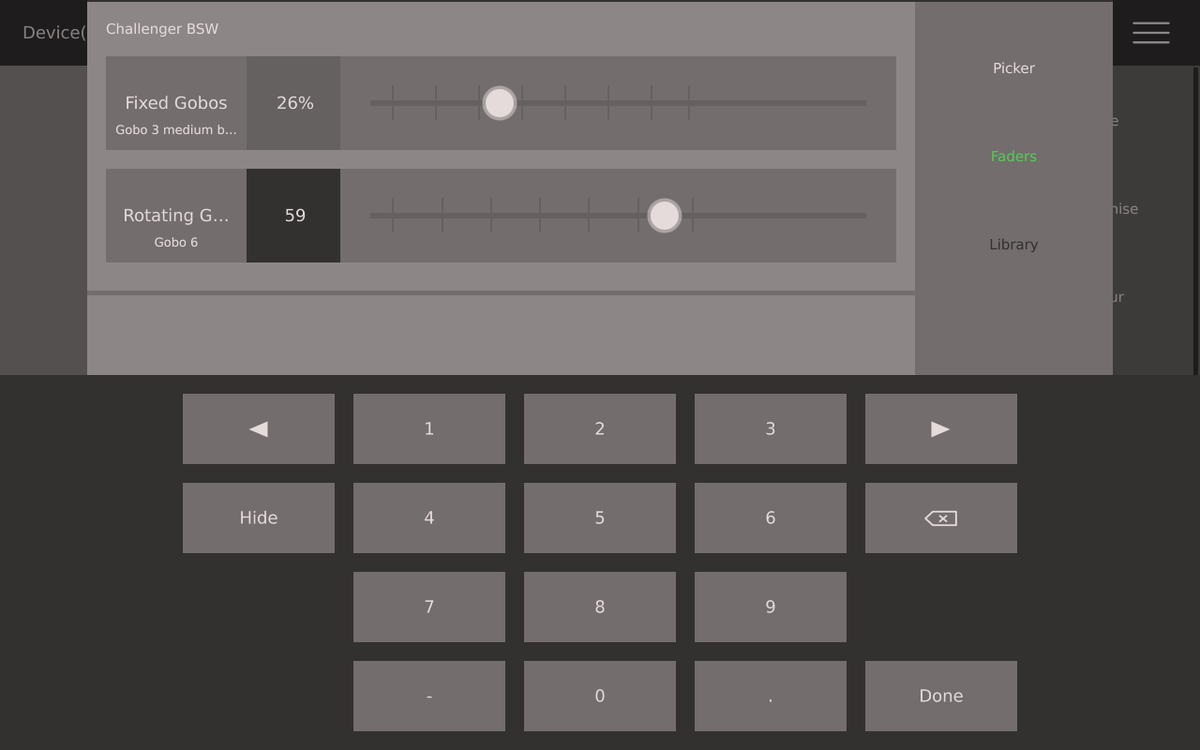
Device Gobo
If a Gobo is set, then a G will be visible in the center of the Device Symbol. Tap the Device Symbol to select this and then press Gobo on the right (you must be on light view, press [Home] to get there). See device 6.
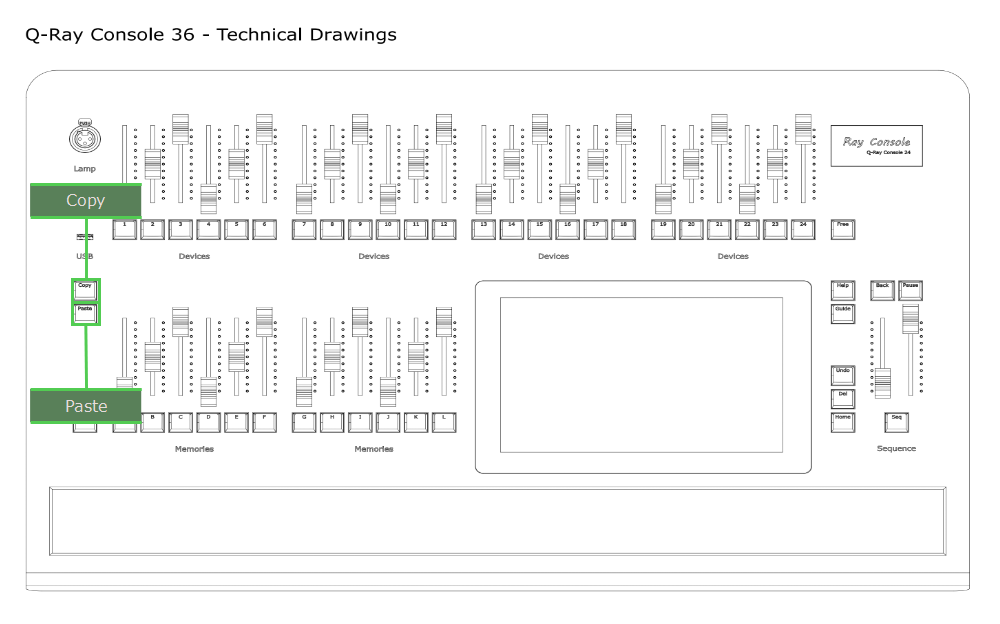
The hardware buttons [Copy] and [Paste] can be used in many different situations when programming your show. They work in a similar way to the classic ctrl+C and ctrl+V on a PC keyboard. First select the [Copy] or [Paste] button and then what you want to copy or paste. Here are some ways these buttons can be used:
To set the colour of a device:
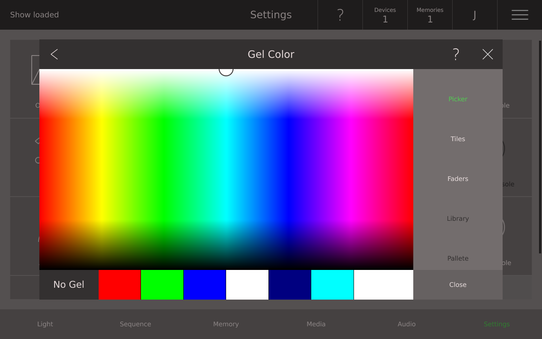
The Colour dialogue includes Colour Picker, Colour Tiles and Colour Faders dialogues. Using these dialogues you can control colour attributes of your devices regardless if they are generated by RGB, Colour Wheel, CMY mixing, etc... The different type of colour generation are:
Fixed Gel - This is a physical piece of coloured plastic that is placed in front of the device. This cannot be changed dynamically via Colour, but can set in Light View / Customise Device / Gel
Colour Scroller - This works like a roman scroll with two rotating tubes on which a plastic with various colours is held. This is be controlled using Colour Tiles.
Colour Wheel - This is a wheel containing small windows, each with a different coloured plastic film. As the wheel is rotated, different colours are put in front of the light source. This is best controlled using Colour Tiles.
RGB - This is when the light source itself consits of a red, green and blue light source. Changing the amount of each creates a wide range of colours. This is best controlled using Colour Picker.
RGBW - This is the same as RGB but with the addition of a white light source, which makes it possible to achieve clearer white colours. This is best controlled using Colour Picker.
CMY - This is when the the amount of cyan, magento and yellow light being emitted from the device can be reduced to create a wide range of colours. This is best controlled using Colour Picker.
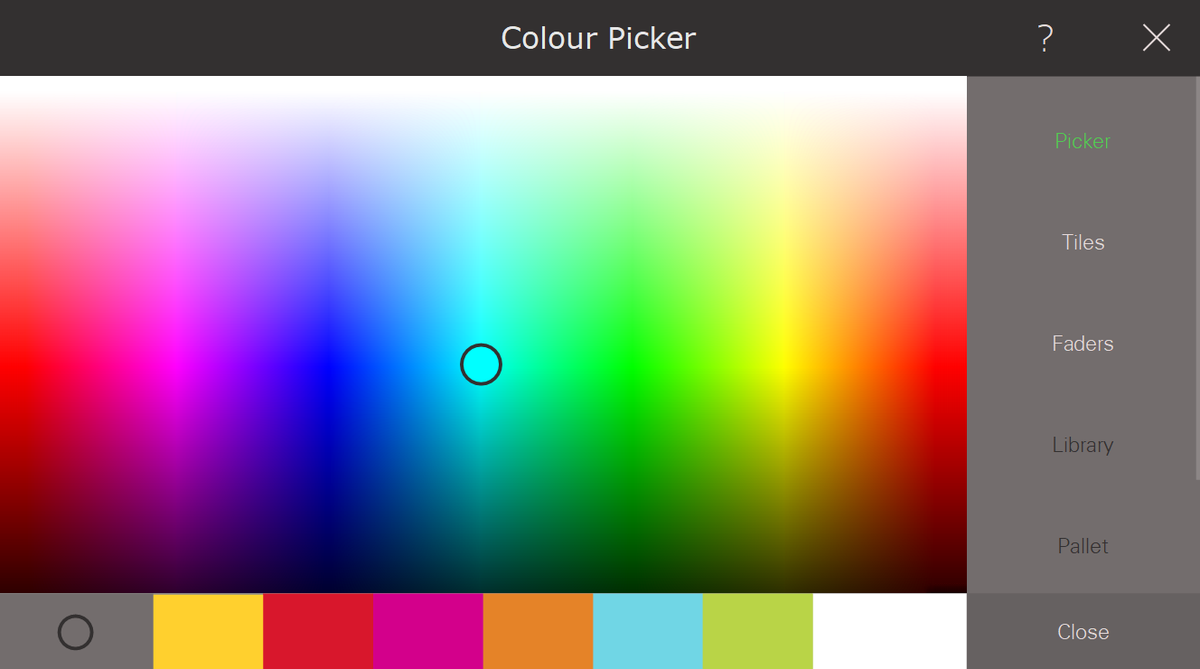
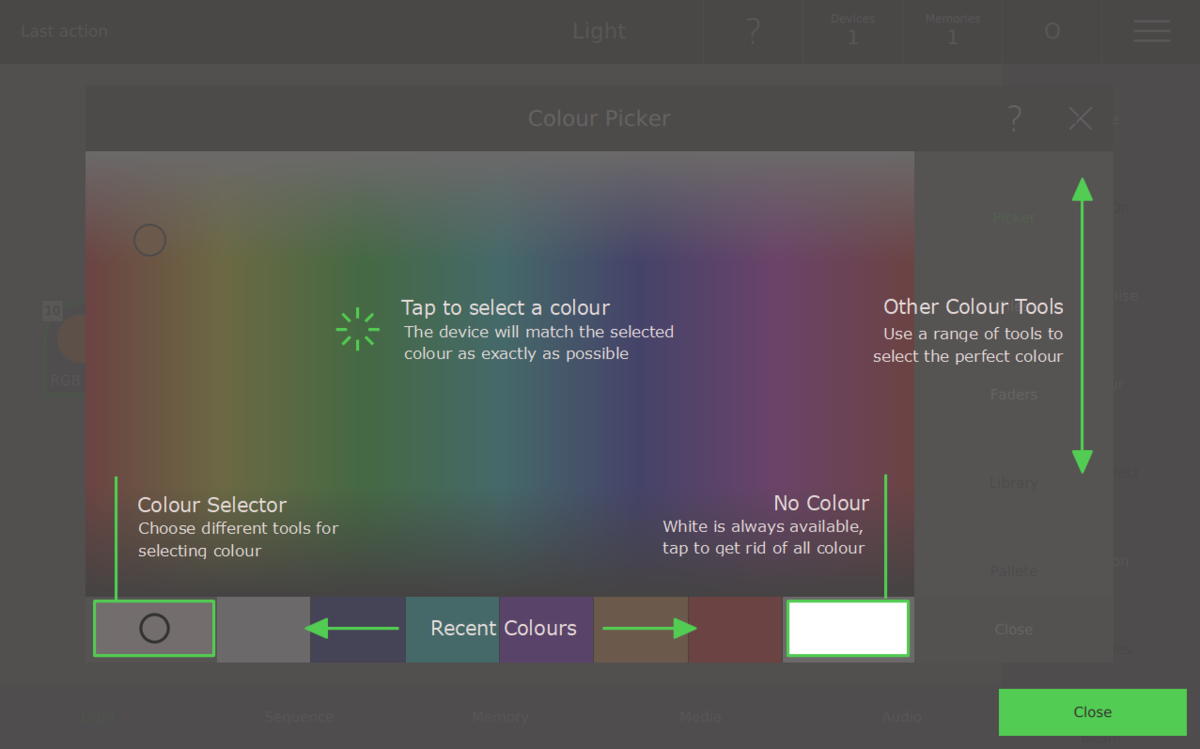
The colour picker is used to select the colour attribute of the selected devices. Tap anywhere on the Colour Picker field to select a colour. You can also drag your finger across the colour field to dynamically select a colour. Ray Console intelligently estimates the colour regardless if you are using a device with RGB, CMY, Colour Wheel or Colour Scroller.
The colour picker also includes a list of recent colours that updates every time you select a colour. Tap on any recent colour to set it for the selected devices. You can always return to the default colour (white) by selecting the permanent white button on the bottom bar.
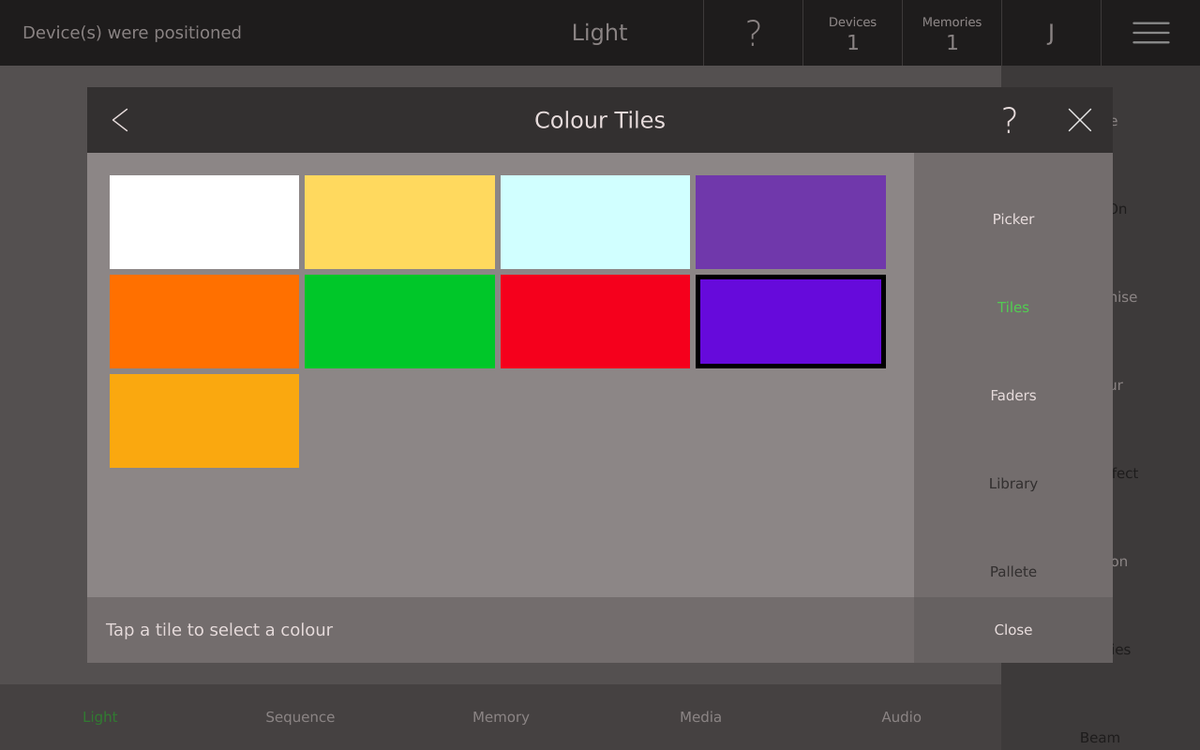
Tap a tile to choose that colour for the selected devices. The tile with the black border is selected. Ray Console intelligently selects what colour tiles to show, based on the device you have selected. For example, if a device with a colour wheel is shown, the colours on that colour wheel will be shown as tiles. Ray Console intelligently estimates the colour if a RGB, RGW or CMY device is selected.


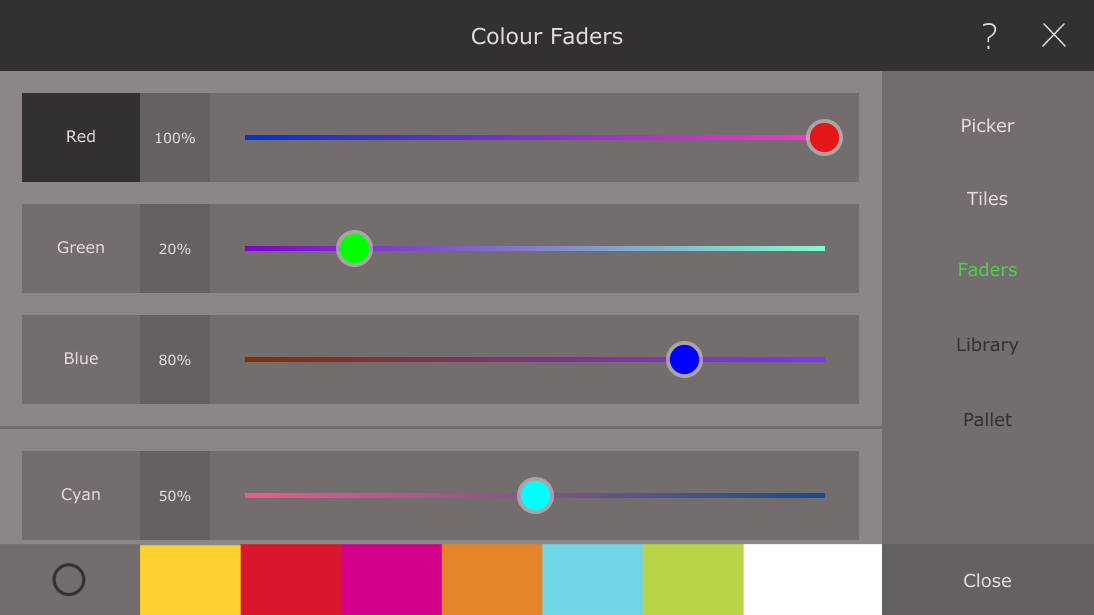
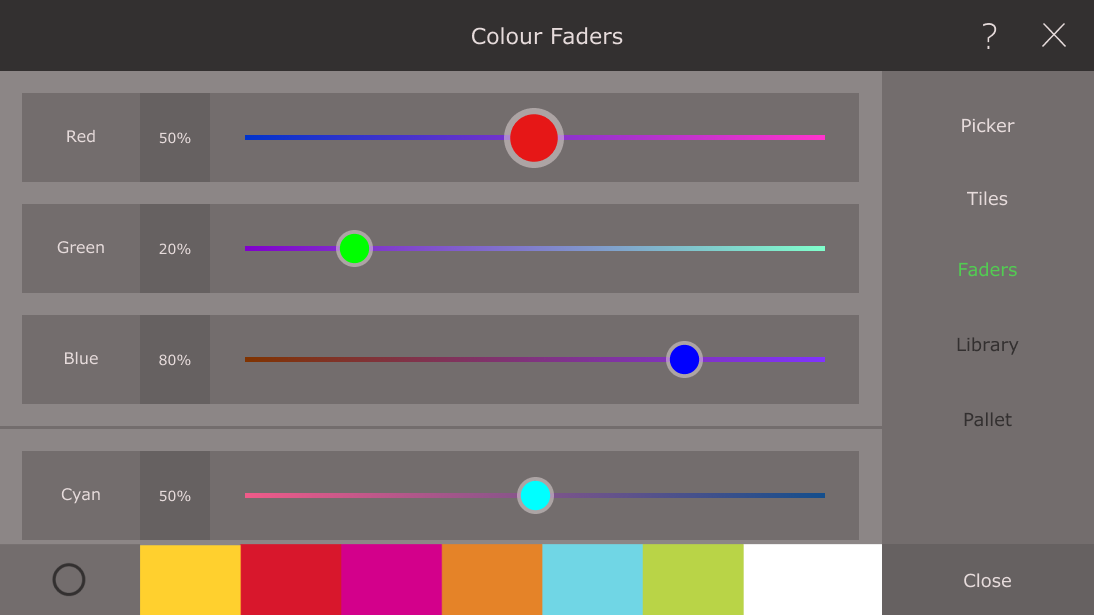
The Colour Fader is used to set the colour intensity of RGB devices.
The Colour Fader shows:
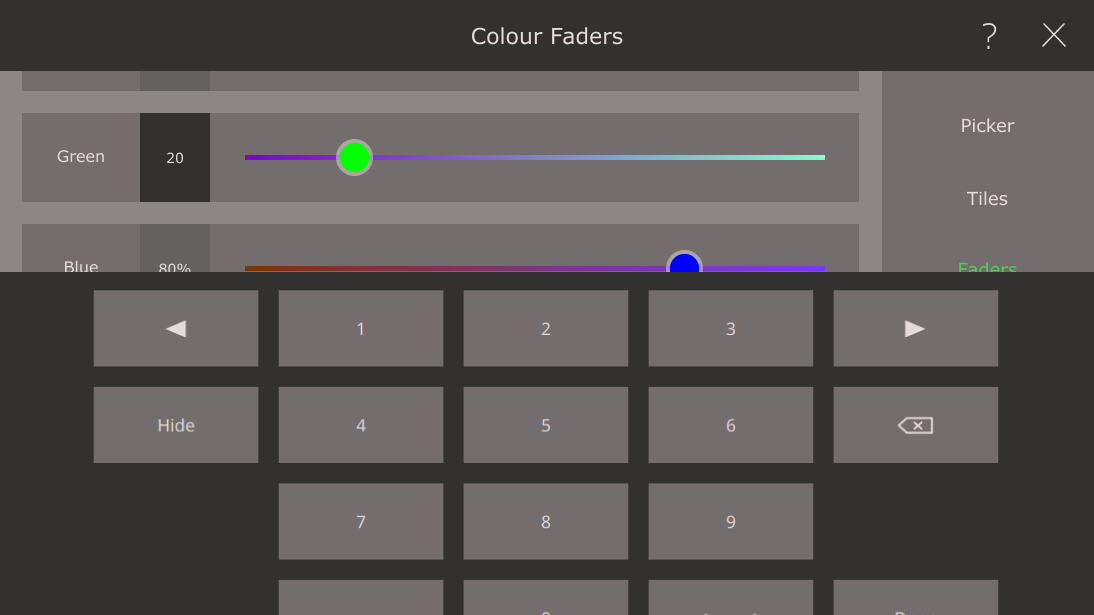
The Faders can be dragged to new position on the screen. You can tap anywhere on the bar, this will change the value of the fader. Taping on the name of the fader changes the value in three steps: first to 50%, then to 100%, then to 0% and so on. If the current fader is already above 50% then the value is to 100%. For changing the value in percentage you tap on the number of percentage, the numeric keyboard opens, now enter a percentage (accurate to 2 decimal places).
If the selected device has a colour wheel or colour scroller, then you will also have an extra on screen fader to control it. Tap the name of the fader to cycle through the available colours or use the scroll bar to select the colour you want.
Not all devices can go the same colour. Devices with a fixed set of colours, e.g. colour wheels, can only change to the colours available. Devices with an RGB colour source are more restricted than those with a RGBW colour source. Ray console changes the device to the nearest possible colour to the colour you select on the colour picker. For this reason, the colour the device actually goes could be somewhat different from the colour chosen on the Colour Picker. This also means that if you select different devices at the same time and select a colour, it could be that they do not output exactly the same colour. Avoid these problems by always editing the colour of one type of device at a time and using the Colour Tiles dialogue for devices with a fixed set of colours.
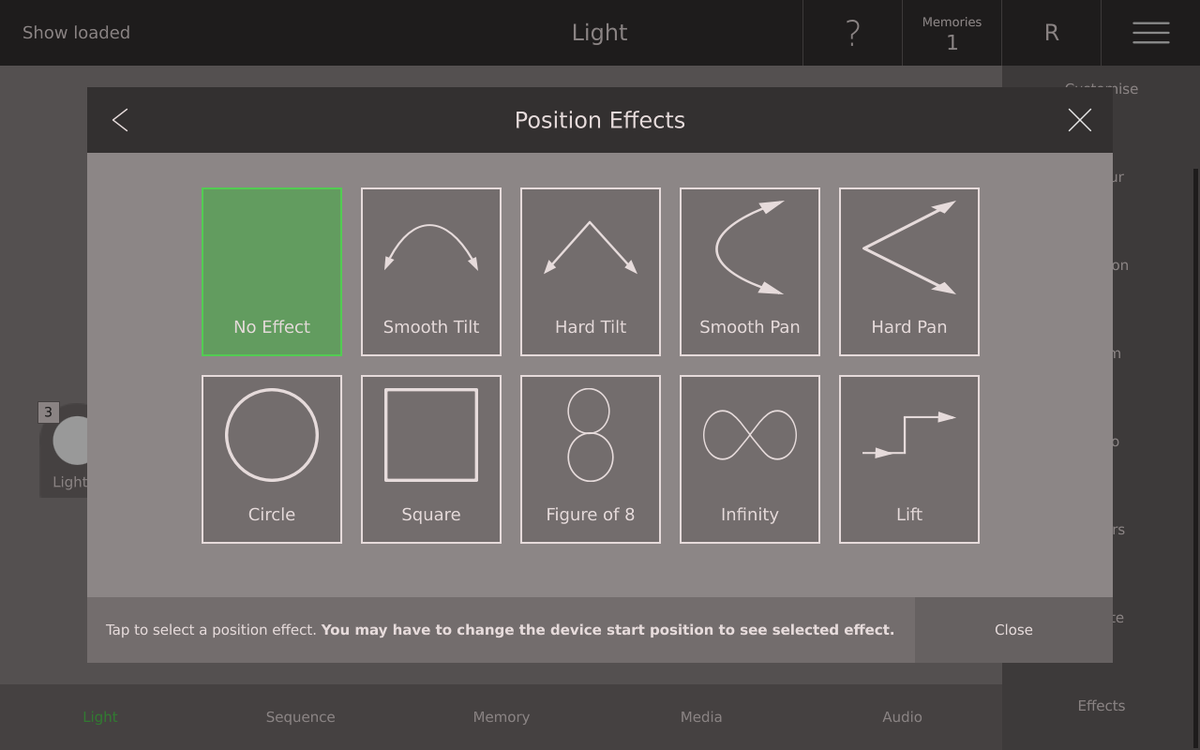
To set the position of a device:
To make the pan and tilt controls more intuitive go to Settings View / Patch / Device Properties. Select Invert Pan and/or Invert Tilt to make the Position Picker and Position Joystick more intuitive.
Some more advanced lights have the ability to move. These devices are often called Moving Lights. Most Moving Lights have two controls for position called Pan and Tilt. Pan is the amount in degrees that a device is rotated around its base from its home position. Tilt is the amount in degrees that a device is sloped away from its vertical position.
On the Ray Console you control degrees, not DMX-values, which means that if you have two devices with different ranges of movement, they will cleverly move in sync with each other.
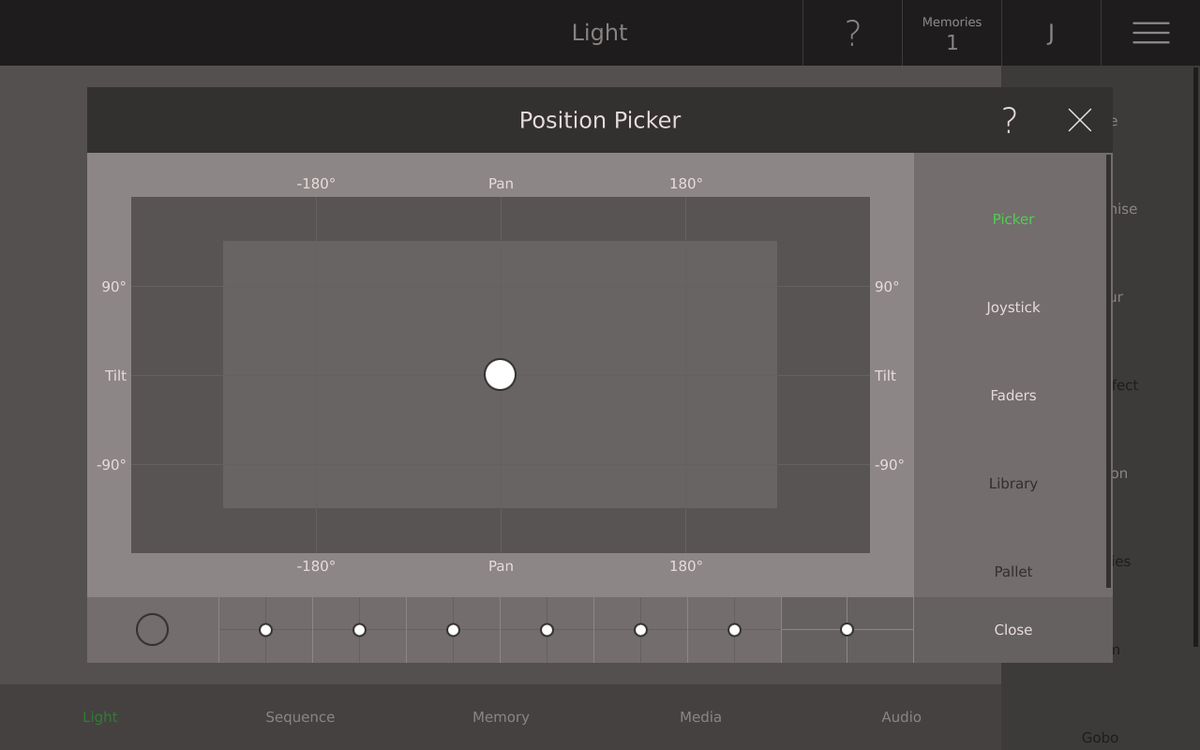
The position picker is the tool for controlling your Moving Heads by panning (rotating) and tilting your devices. The x-axis controls the pan parameter. The y-axis controls the tilt parameter. On the console the positions that all selected devices can achieve are highlighted. Along the bottom of the dialogue is a list of recently selected positions.
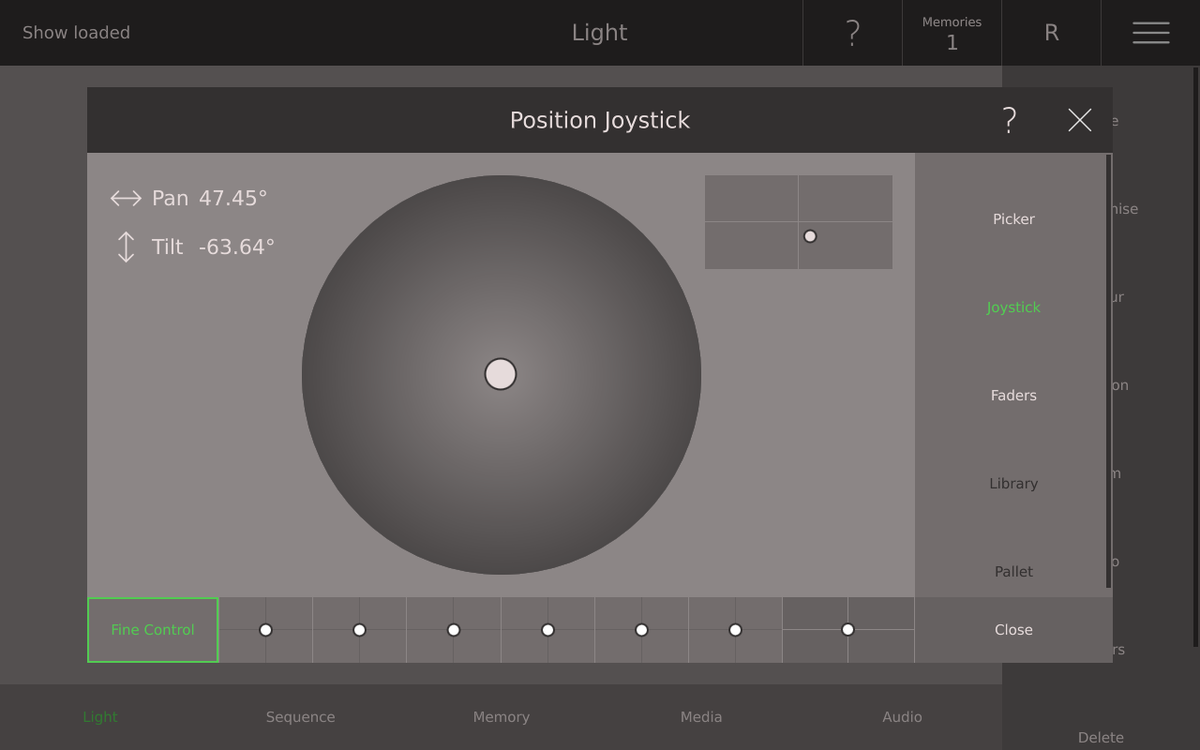
The Position joystick is for fine-tuning the position of your device. Drag the dot in the direction you want to move pan and tilt. The further from the centre you drag the dot, the faster the device will move. The calculated pan and tilt values are shown in degrees as well as a small graphic. To get the very last little adjustment perfect use the fine control.
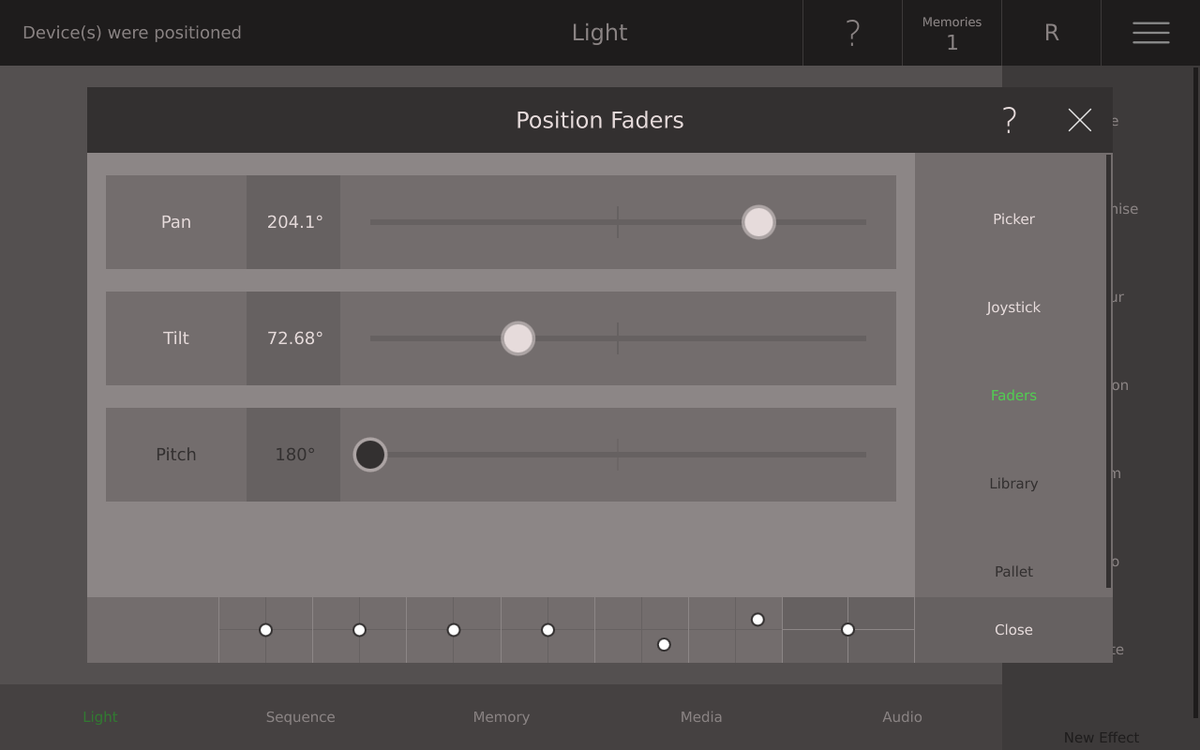
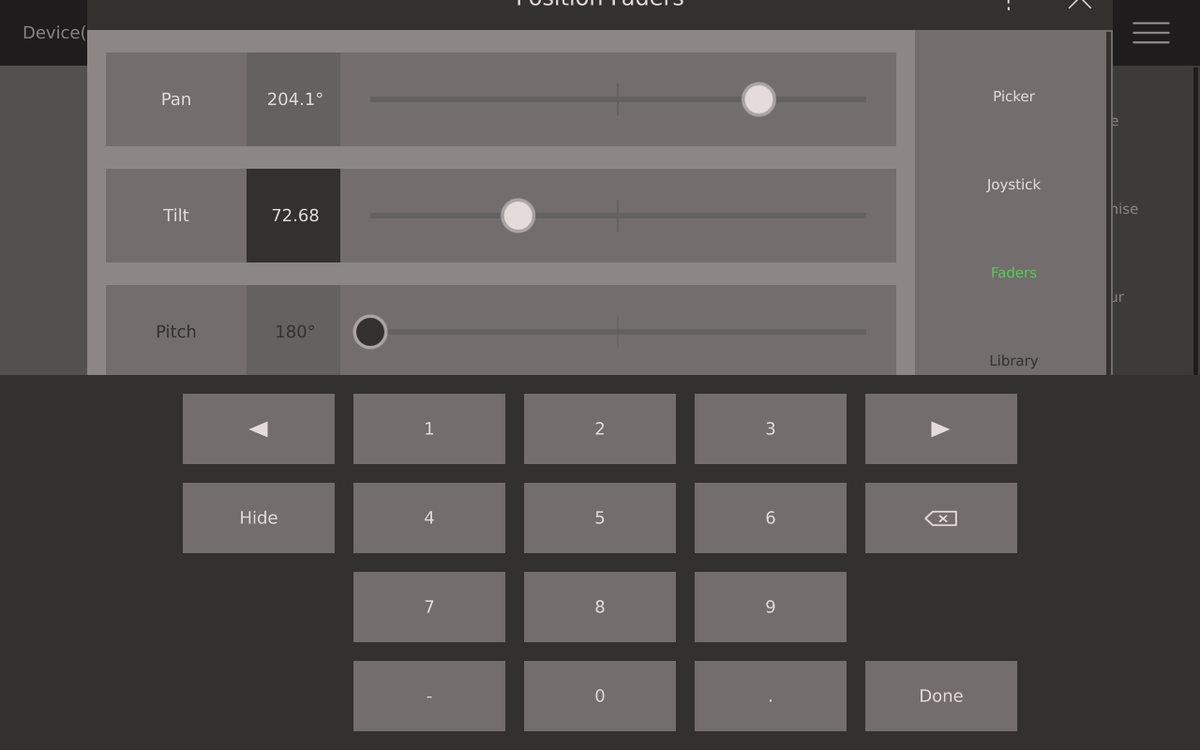
The Position Fader is used to set the Pan and Tilt Attributes of a Moving Head.
The Position Fader shows:
The Faders can be dragged to new position on the screen. You can tap anywhere on the bar, this will change the value of the fader. Taping on the name of the fader changes the value in three steps: first to 50%, then to 100%, then to 0% and so on. If the current fader is already above 50% then the value is to 100%. To change the value in percentage you tap on the number of percentage, the numeric keyboard opens, now enter a percentage (accurate to 2 decimal places).
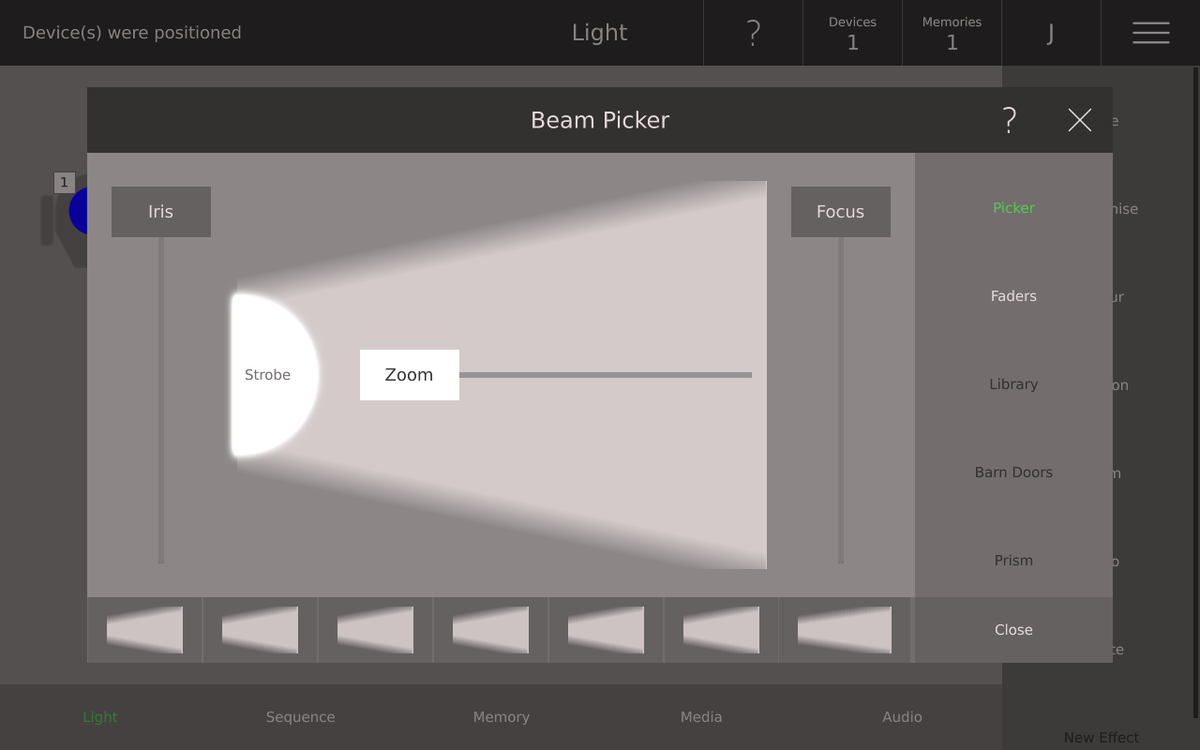
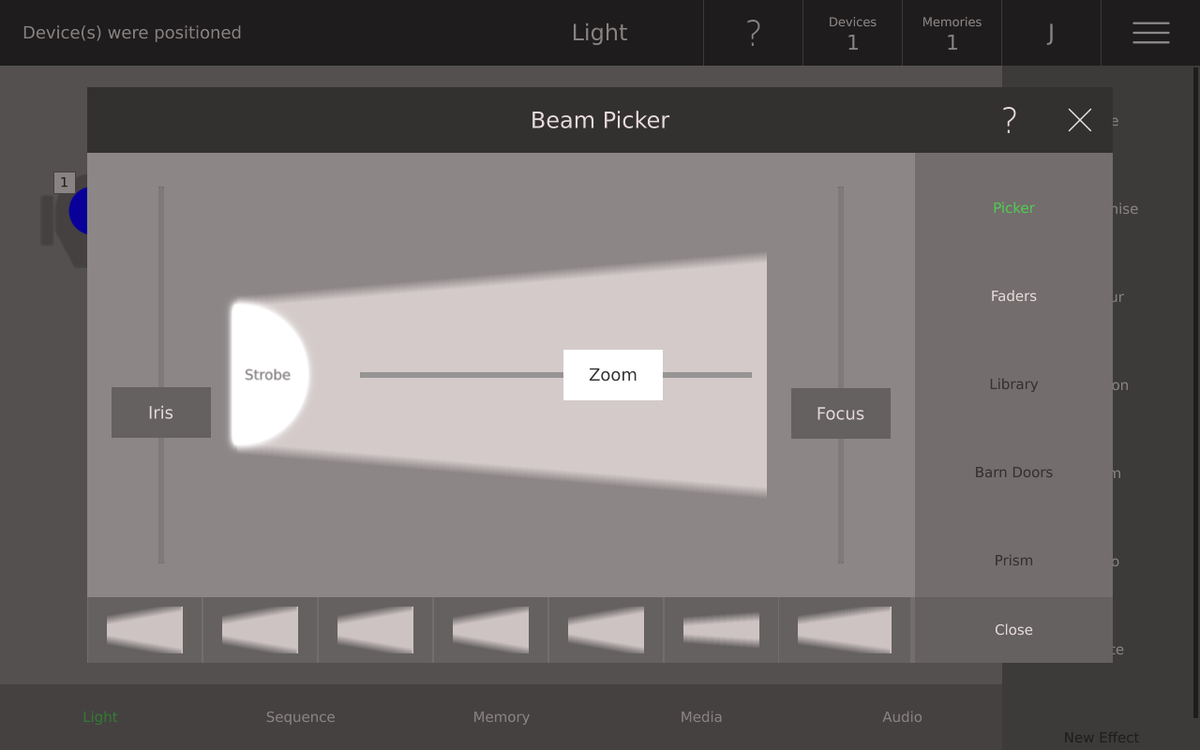
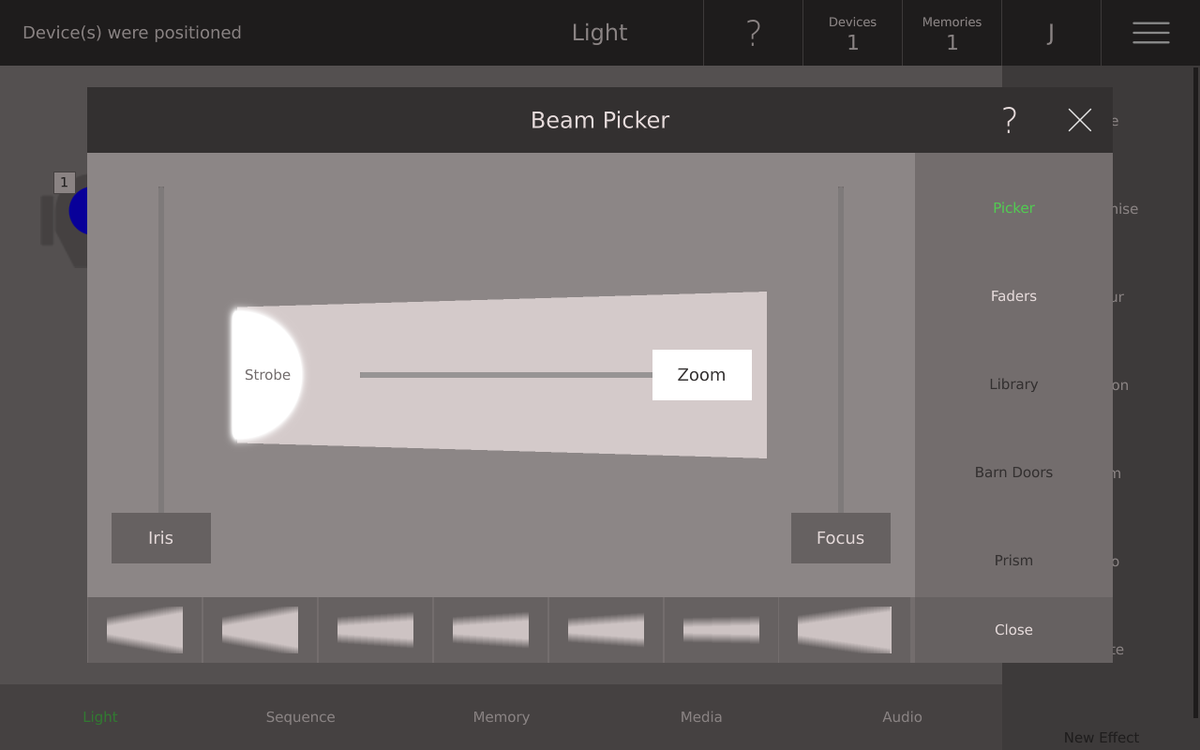
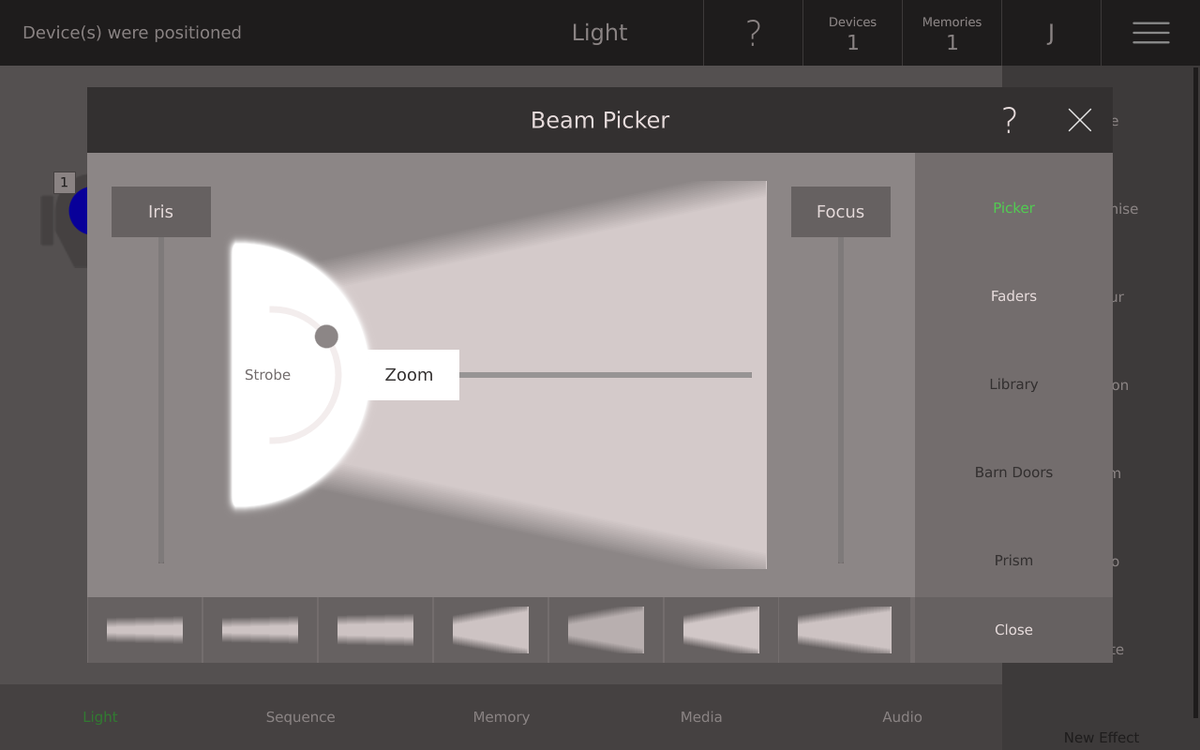
To set the beam of a device:
Along the bottom of the Beam Picker are the recently selected beams. Simply tap a recently selected beam apply the selected focus, iris, zoom and shutter to a selected device. If no device has a particular attribute, then the control for it will be greyed out.
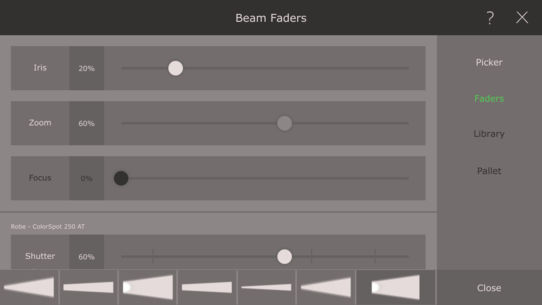
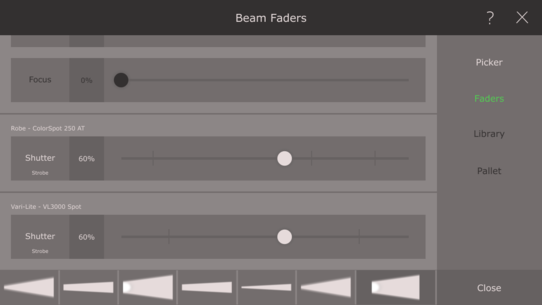
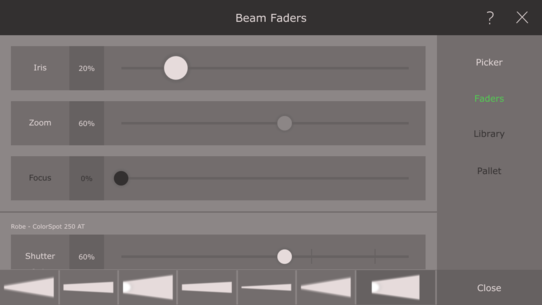
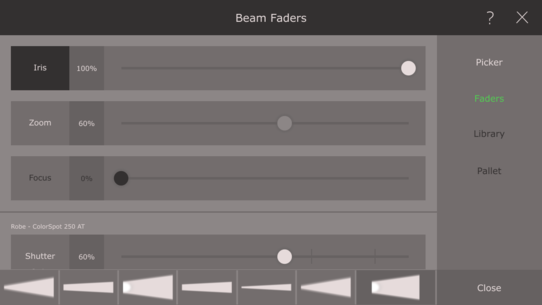
The Beam Fader Dialogue gives you the opportunity to edit to 4 different attributes of Beam:
All Beam Fader show:
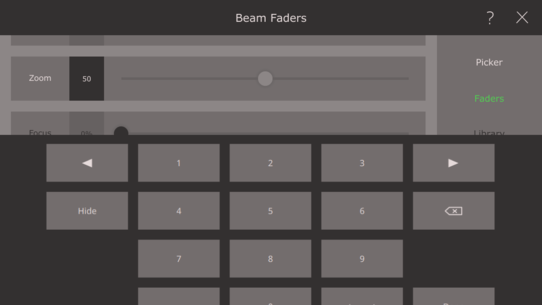
The Faders can be dragged to new position on the screen. You can tap anywhere on the bar, this will change the value of the fader. Taping on the name of the fader changes the value in three steps: first to 50%, then to 100%, then to 0% and so on. If the current fader is already above 50% then the value is to 100%. For changing the value in percentage you tap on the number of percentage, the numeric keyboard opens, now enter a percentage (accurate to 2 decimal places).
In Ray Console it is possible to control some standard beam attributes of your Moving Light:
Iris - Controls the size of the hole through light is emmited. Changing this will reduce the amount of light your device produces and may also make the beam appear narrower.
Zoom - Controls how narrow the beam is. When zoomed out the beam will be wide and your device will cover a large area on the stage. When zoomed in the beam will be narrow and only shine on a small area.
Focus - Controls how sharp the edges of the light is. Changing this can make edges of the circle of light cast by your device either sharp or blury. If you are using gobos, we recommend that you make the edges of your beam sharp.
Strobe - Makes your device flash quickly. Setting a strobe makes your device flash slowly or quickly.
Shutter - The shutter is a mechanical component used to create strobe effects. It is a piece of metal that is moved briefly in front of the light source. We do not recommend setting the shutter to closed, as it is easy to forget that you have done this. Please use the intensity fader.
To set the gobo of a device:
Because no type of device has the same gobos located on the same position of the same wheels, it is necessary to select the gobo for each type of selected device.
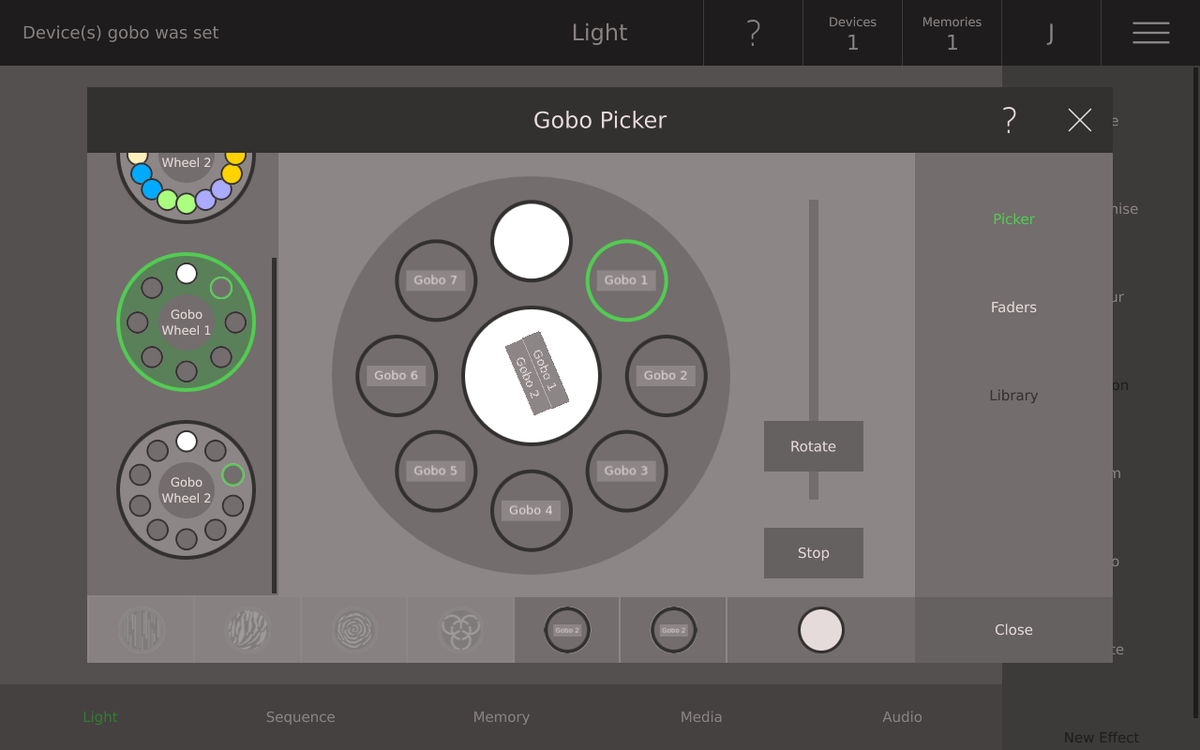
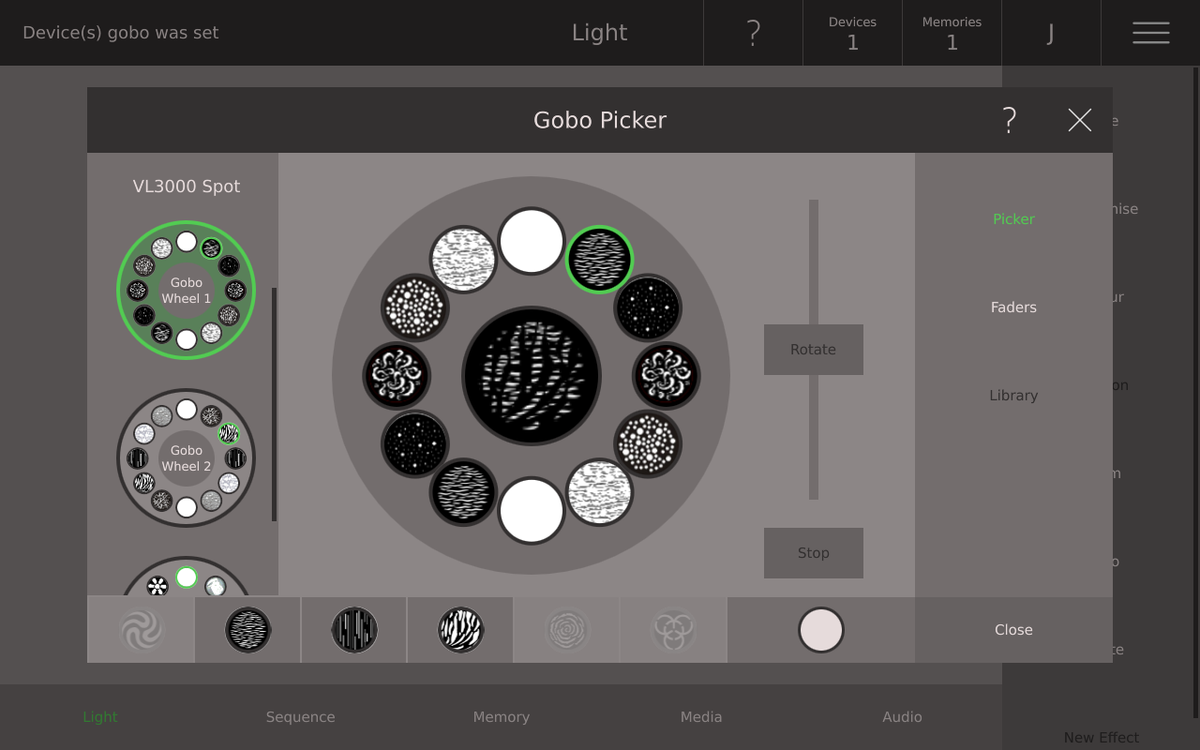
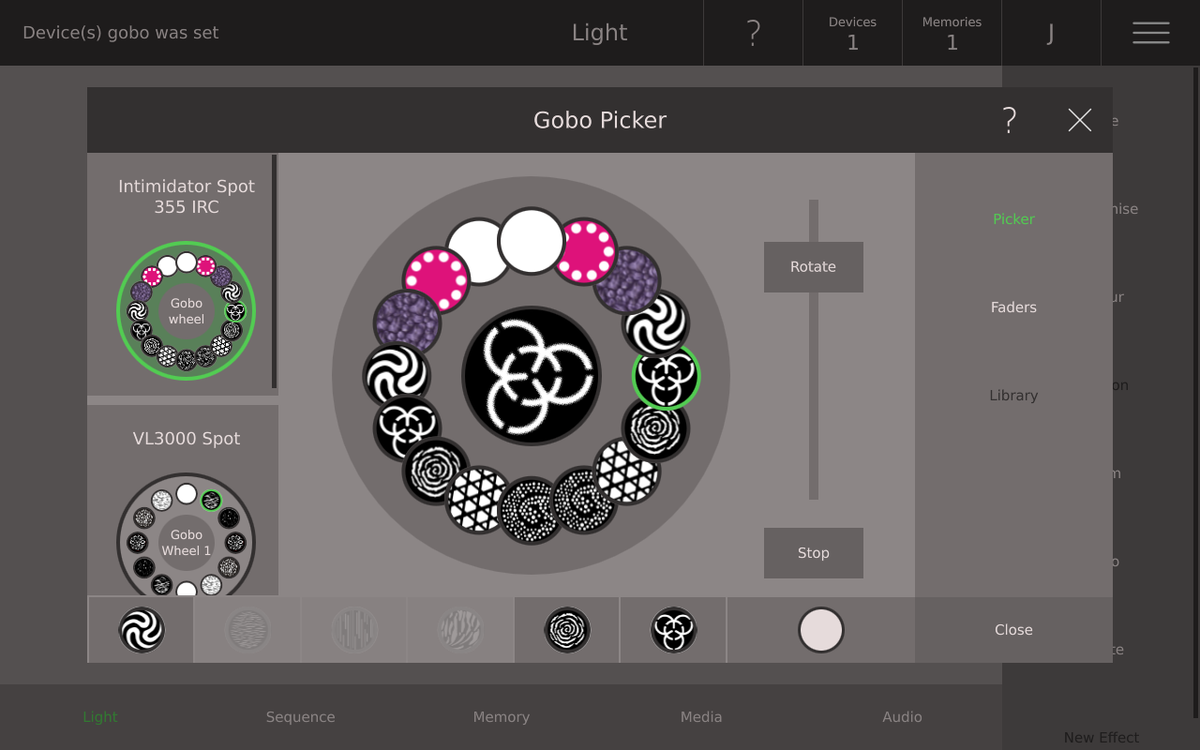
Each different selected device is listed, with a small graphic showing their gobo wheel. Select a gobo wheel to choose a gobo and move the on screen fader to set rotation of that gobo. Up to three gobo wheels can be controlled per device.
Along the bottom of the gobo picker are the recently selected gobos. Simply tap a recently selected colour to apply it to a device. Ray Console will help you out if you try and select a recent gobo that is not available on the current device.
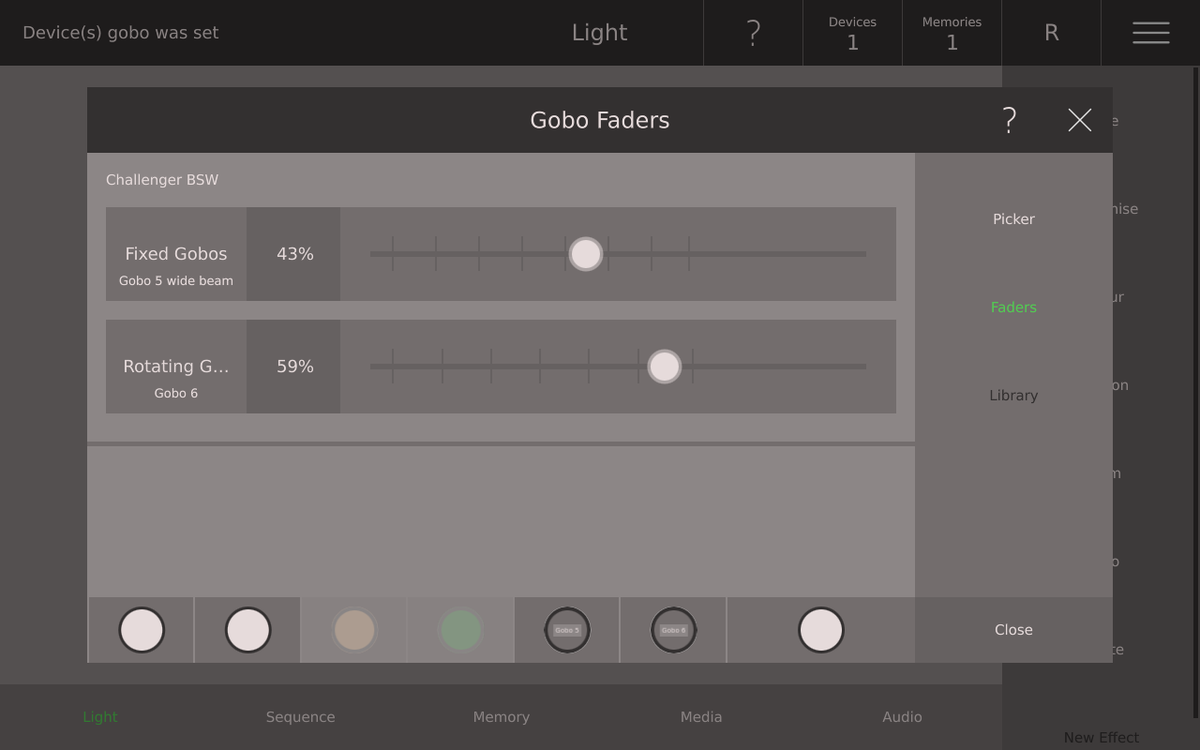
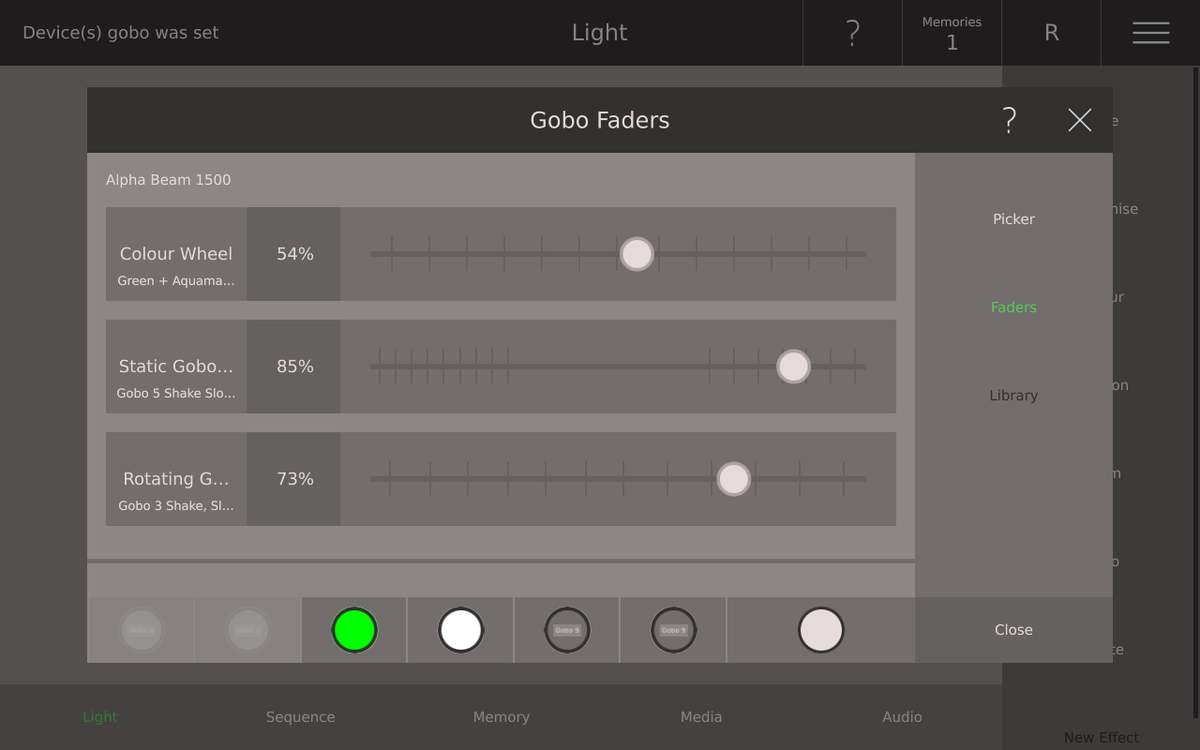
The Gobo Faders dialogue shows all the gobo channels for the selected devices. If you scroll down the gobo faders of more selected devices will be shown.
All gobo faders have the following features:
The Faders can be dragged to new position on the screen. You can tap anywhere on the bar, this will change the value of the fader. Taping on the name of the fader changes the value in three steps: first to 50%, then to 100%, then to 0% and so on. If the current fader is already above 50% then the value is to 100%. For changing the value in percentage you tap on the number of percentage, the numeric keyboard opens, now enter a percentage (accurate to 2 decimal places).
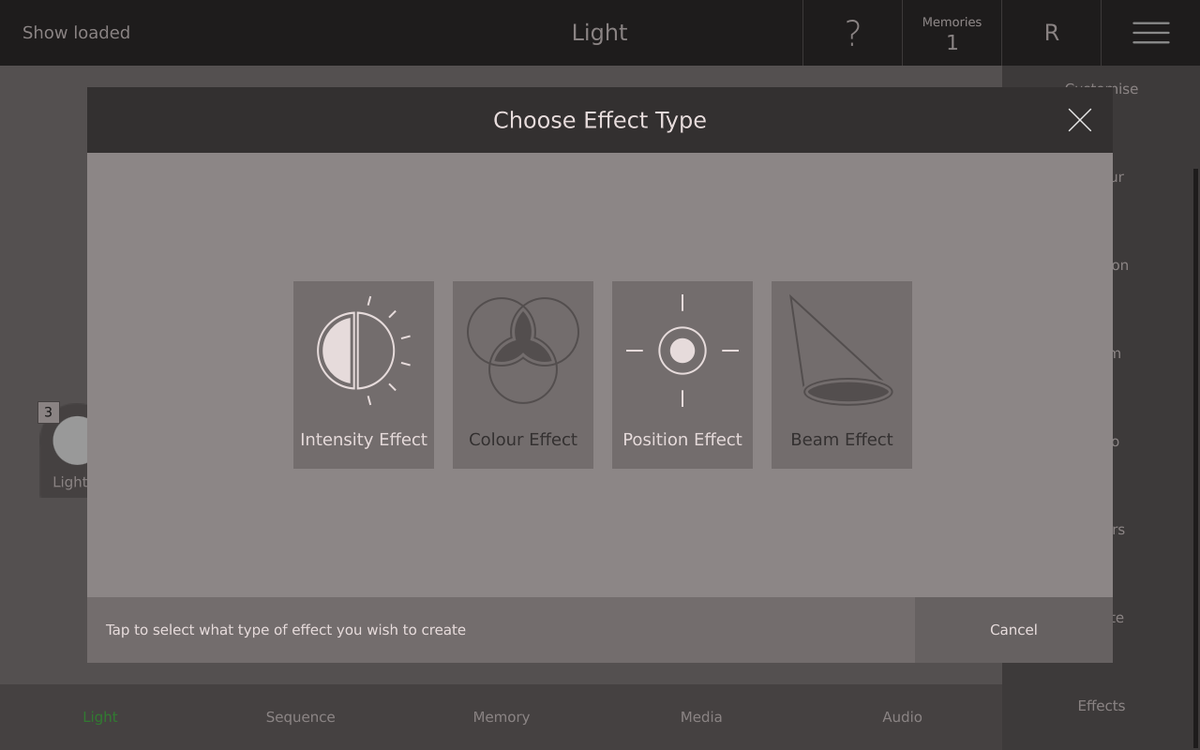
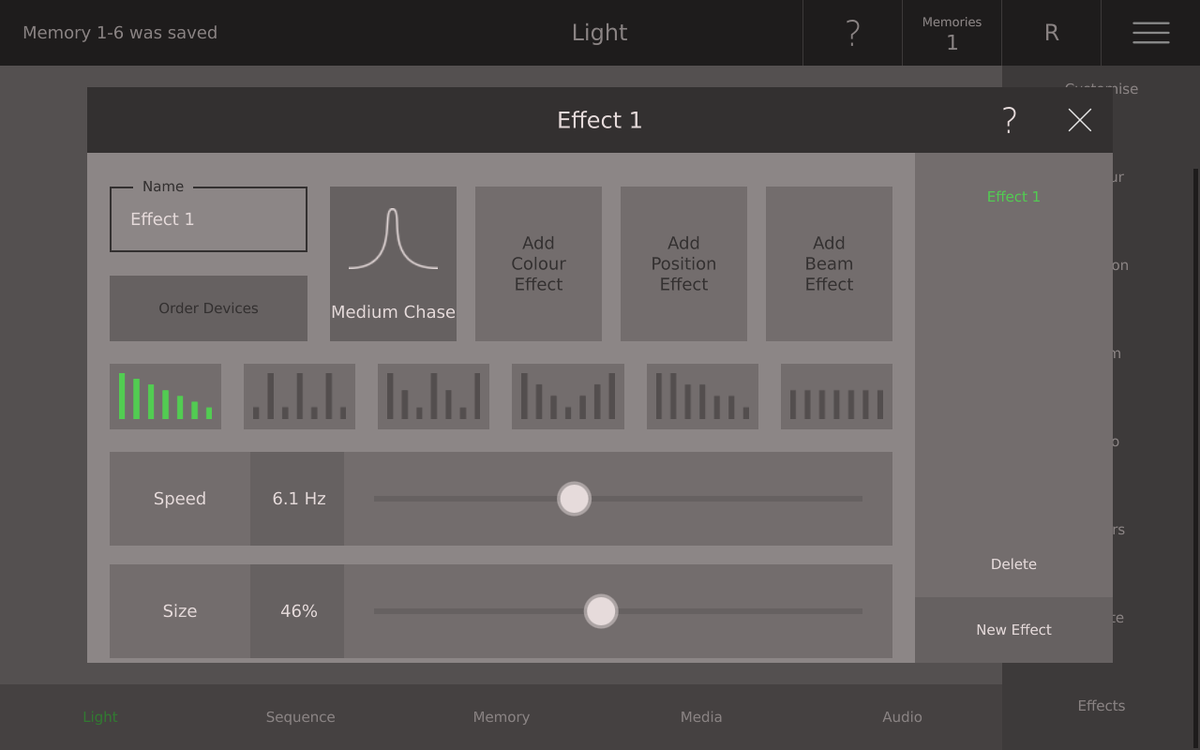
A range amazing effects will be available as modules to purchase or subscribe. You will be easily and quickly be able to create intensity effects, position effects, beam effects, gobo effects or even combinations thereof.
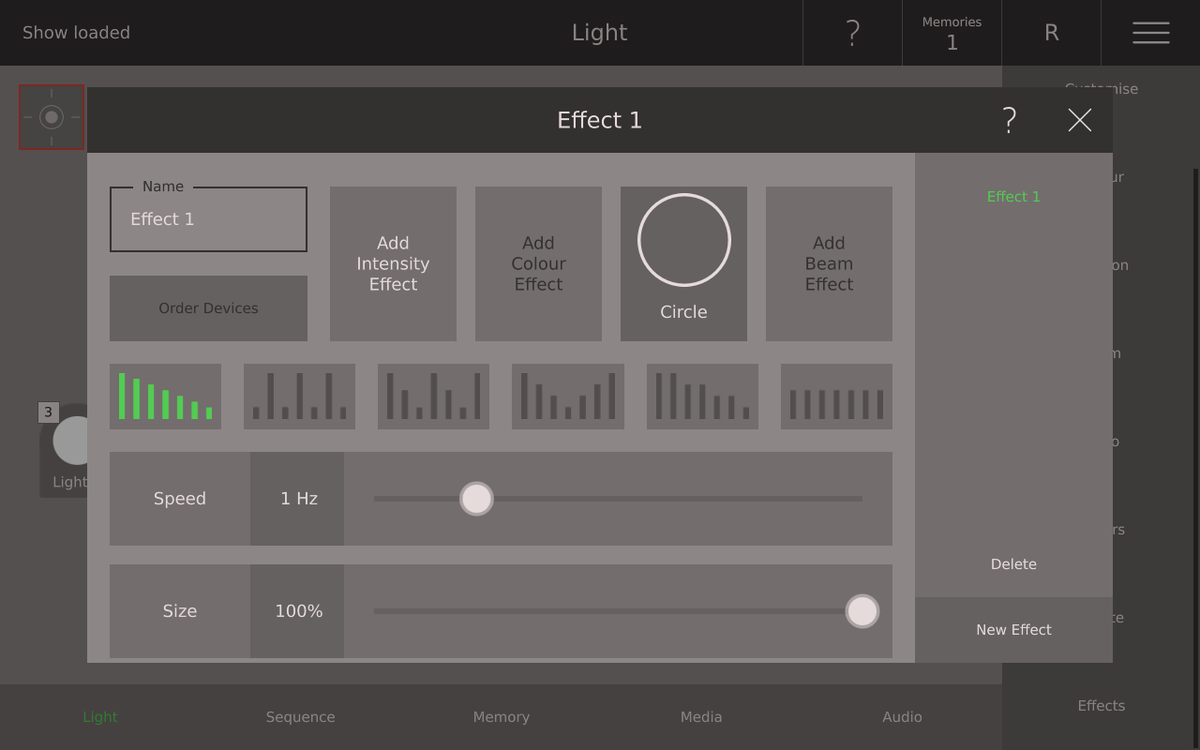
This is how you create an Effect on your Ray Console:
1. Select the device you wish to add an effect to
2. Tap on Effects on the right functions bar, maybe you have to scroll down a little bit, depends on how many functions you already have
3. Choose an effect type
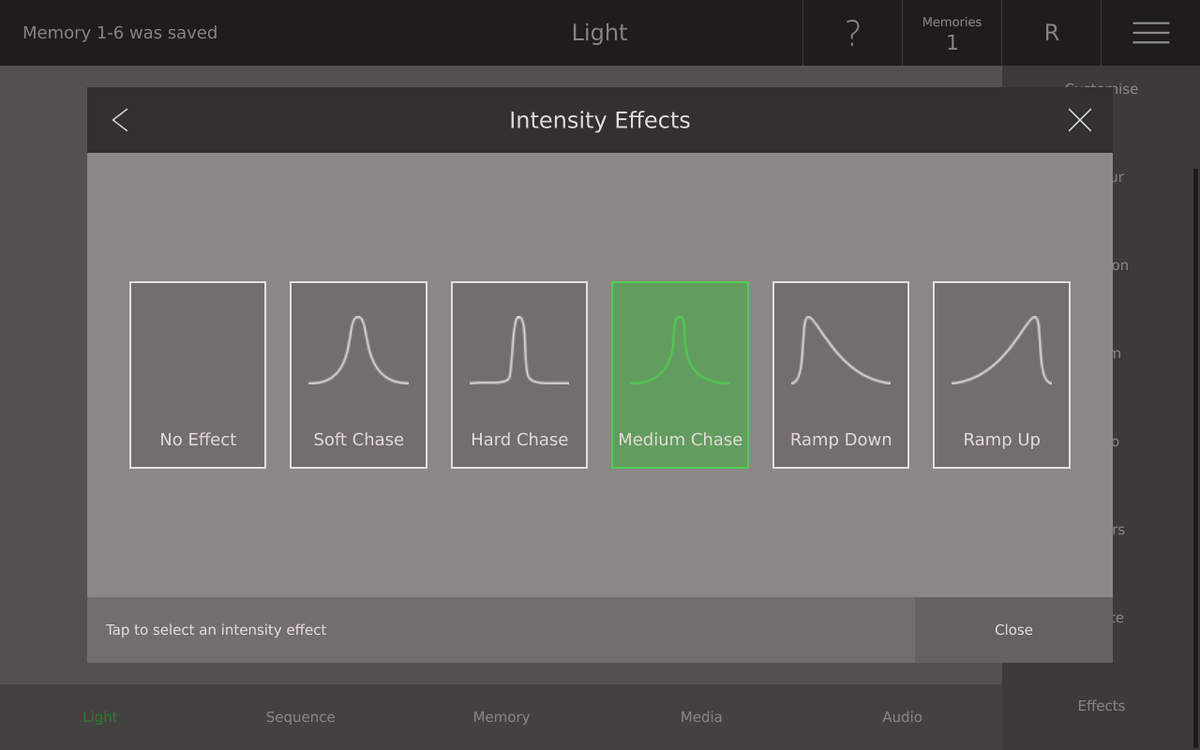
4. Choose one of the listed effects
5. Edit your effect by giving it a unic name, set the speed and the size of the light.
6. Close the dialogue will save the effect. Please be aware that you need to do following step No.7 to see the results
7. Save this light to a memory or as a sequence step
8. Playing the memory or the sequence step will play the effect on the devices
Please be aware, that you need at least one Effect Module, e.g. Intensity. The Effects are combinable.
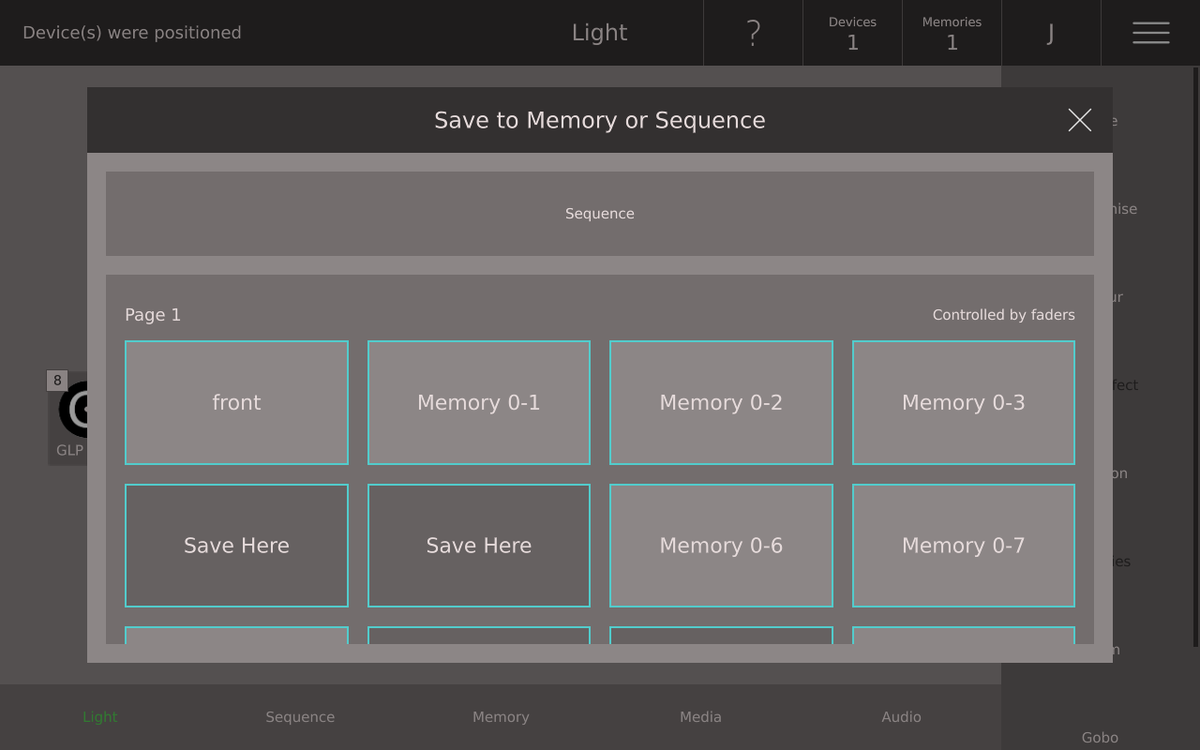
In a memory you save all the attributes of all your devices. This means that what you see on stage when you save is exactly what you later see on stage when you play back the memory. You can also use memories as building blocks and combine them to quickly create an unlimited number of scenes on your stage. To create a memory:
You can also save memories by pressing Save on the Light View and selecting a memory on the dialogue shown
To play a memory simply move up the fader above the button where you save the memory. Alternatively you can press the button itself to flash the memory.
If you have saved a memory on another page, you will first have to change page. Select the Memories button on the title bar, and then tap the arrows to change the page. The page is changed instantly, so can play memories without closing it.
What you see is what you get. So the simplest way to edit a memory is:
Another way to edit a memory is to use update. Update add the attributes of shining devices to the memory. To edit a memory using update:
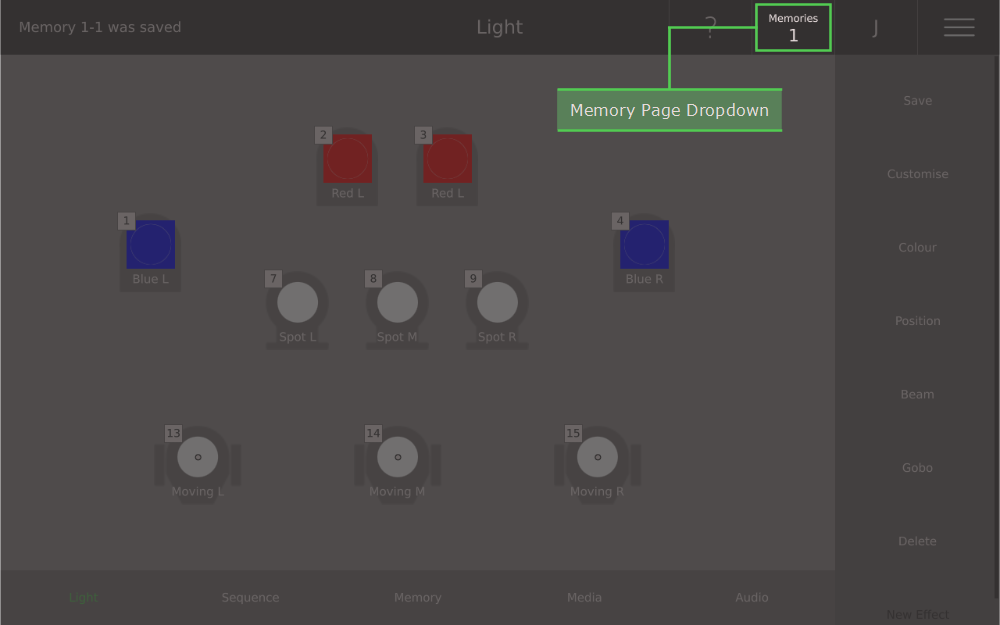


To customise a memory, select the Memory Page Dropdown, tap the memory you want to customise and select the Customise option on the right.
The number of the memory is simply its location: [Button][Page]. Tap the name to change it to whatever you want.
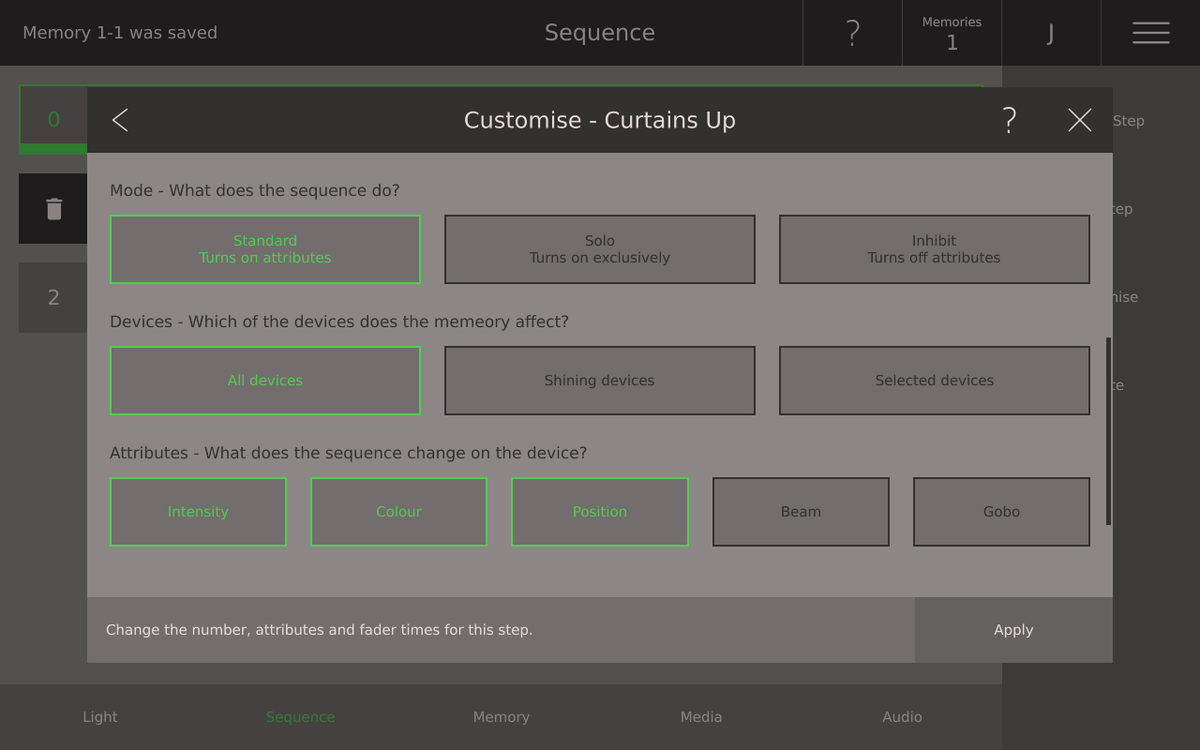
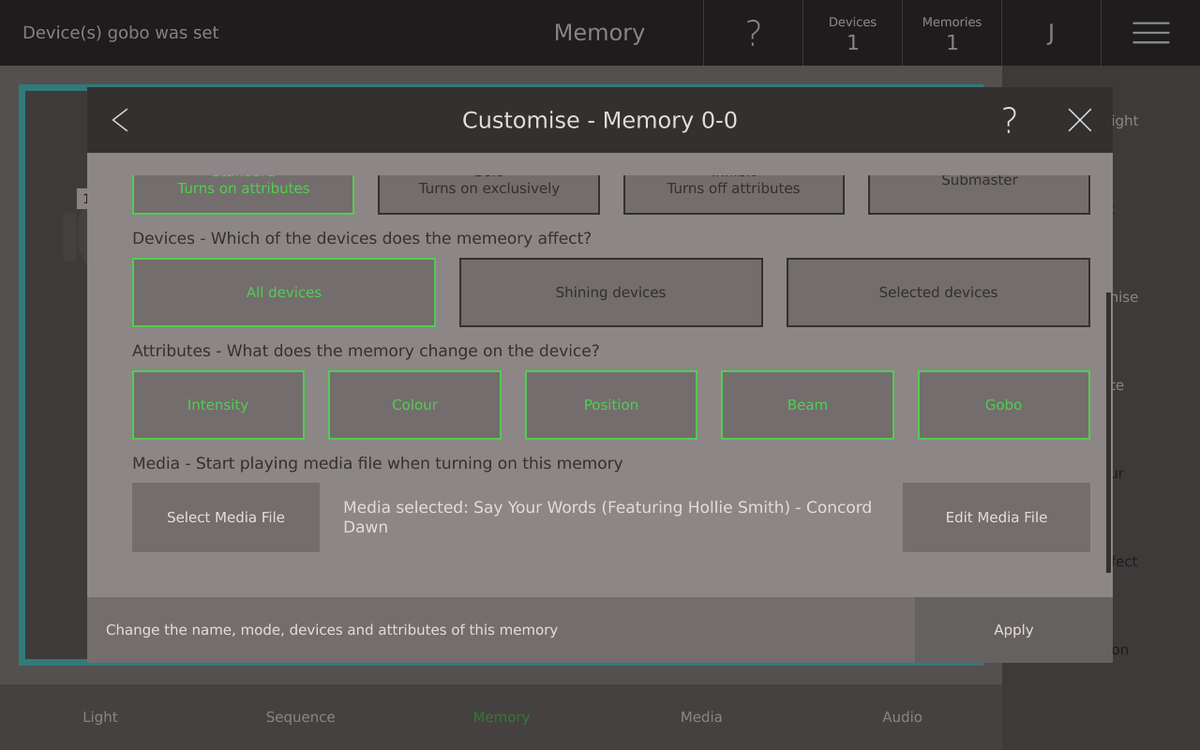
What you see is what you get. This means all attributes of all devices are saved in your memory. However, sometimes it is useful, not to play some attributes, this way you can for instance change a devices position independently of its intensity. Here is an explination of each option:
Modes
Standard: The device attributes saved on the memory are applied to the light view and DMX output. The changes are mixed via HTP and LTP with any other devices, memories or sequence steps.
Solo: The device attributes saved on the memory are applied to the light view and DMX output. All attributes of all other devices not in the memory are faded out as the memory is faded in. When the memory is faded out, all attributes of other devices return to normal.
Inhibit: The device attributes saved on the memory are removed from the light view and DMX output as the memory is faded in. The attributes are faded back in as the memory is faded out.
Submaster: Various different fuctions can be put on the device fader such as grand master, house lights, volume, etc...
Devices
All Devices: The default is to apply saved attributes from all devices when the memory is faded in.
Shining Devices: This setting applies only the attributes of devices with an intensity over 2%. This means attributes of devices which are not shining are not changed.
Selected Devices: Selecting this setting opens a dialogue where you can choose exactly which device's attributes should be applied to the light view whan the memory is turned on.
Attributes
Intensity: Enabling this means the intensities saved in the memory will be applied when the memory is turned on.
Colour: Enabling this means the colours saved in the memory will be applied when the memory is turned on.
Position: Enabling this means the positions saved in the memory will be applied when the memory is turned on.
Beam: Enabling this means the beams saved in the memory will be applied when the memory is turned on.
Gobo: Enabling this means the gobos saved in the memory will be applied when the memory is turned on.
Finally you can also cause a media track to start playing by selecting a media as described in Starting Media from Memories and Steps
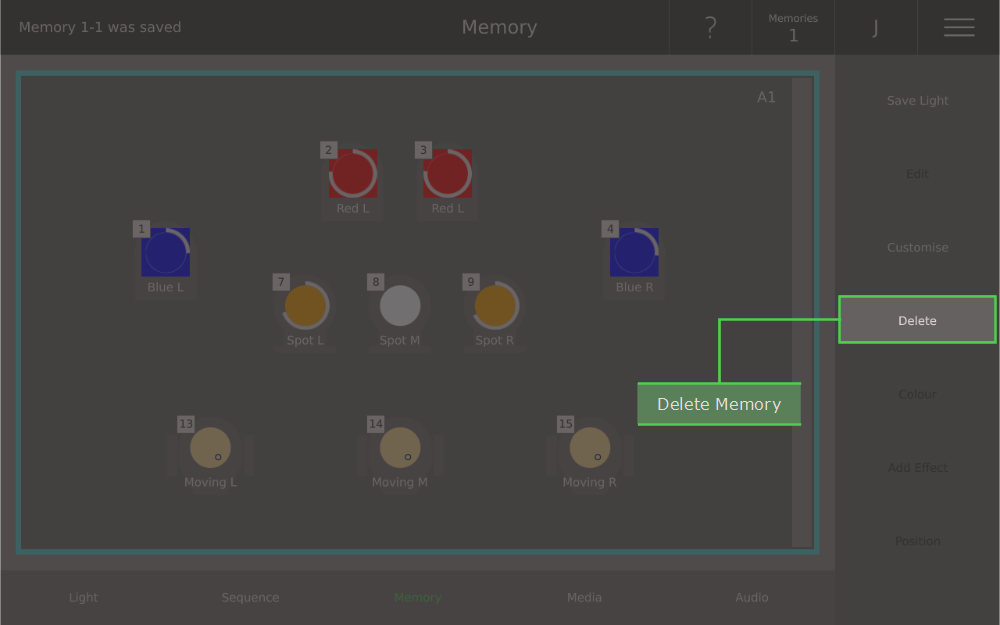
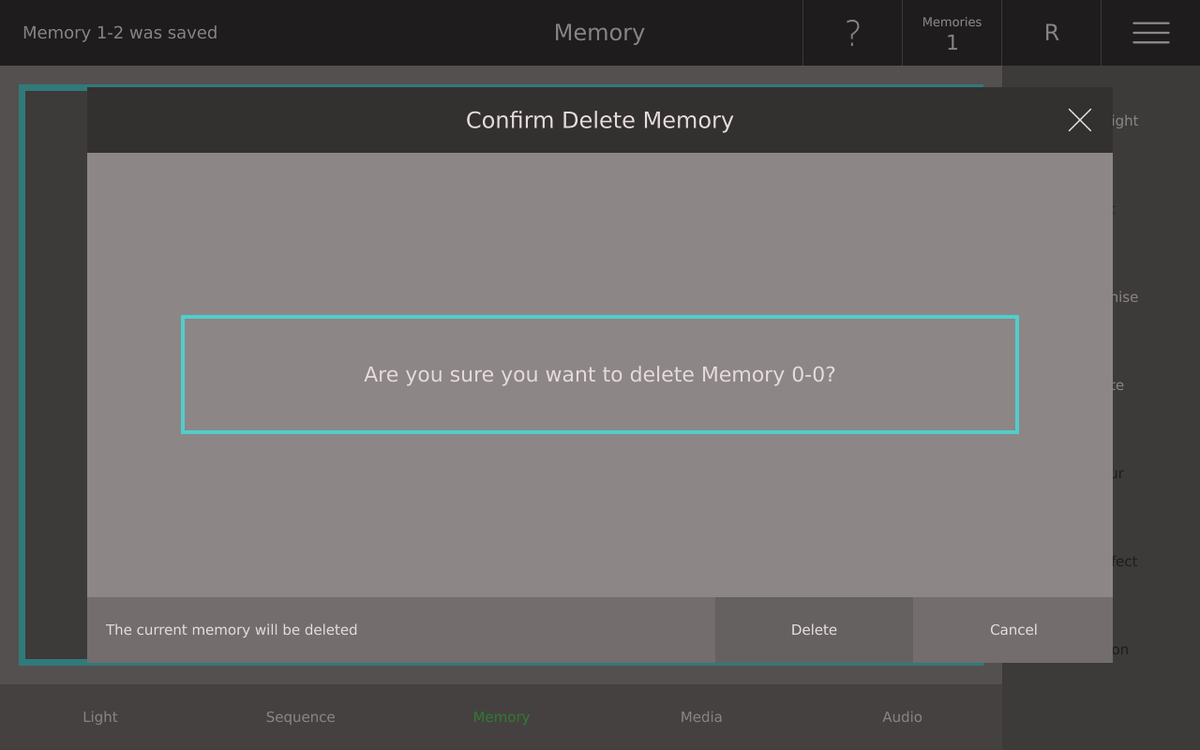
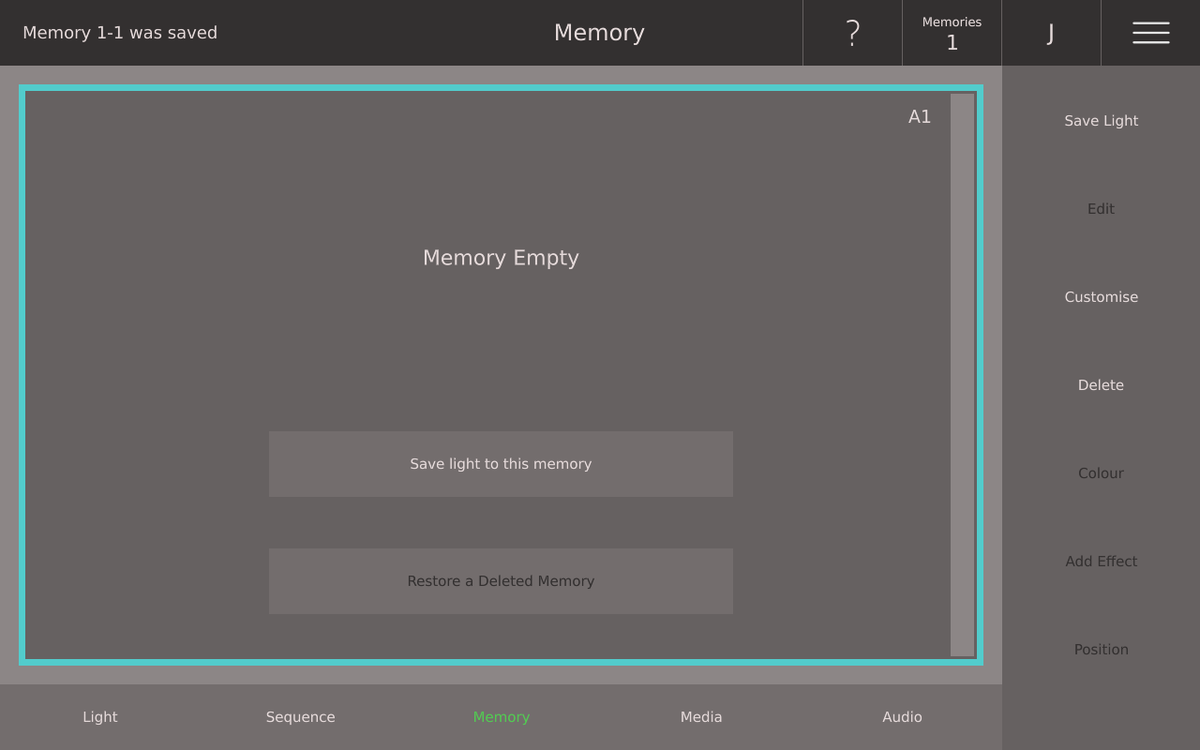
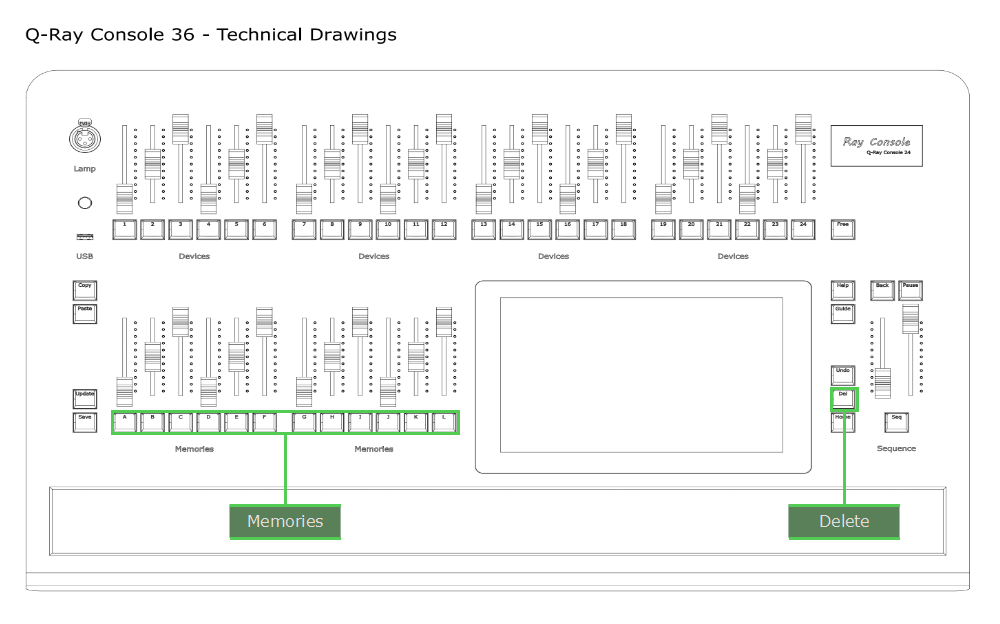
To delete a memory:
Alternatively simply press the [Del] button and then the button of the memory e.g. [B]. You can confirm the delete by pressing the same memory button again.
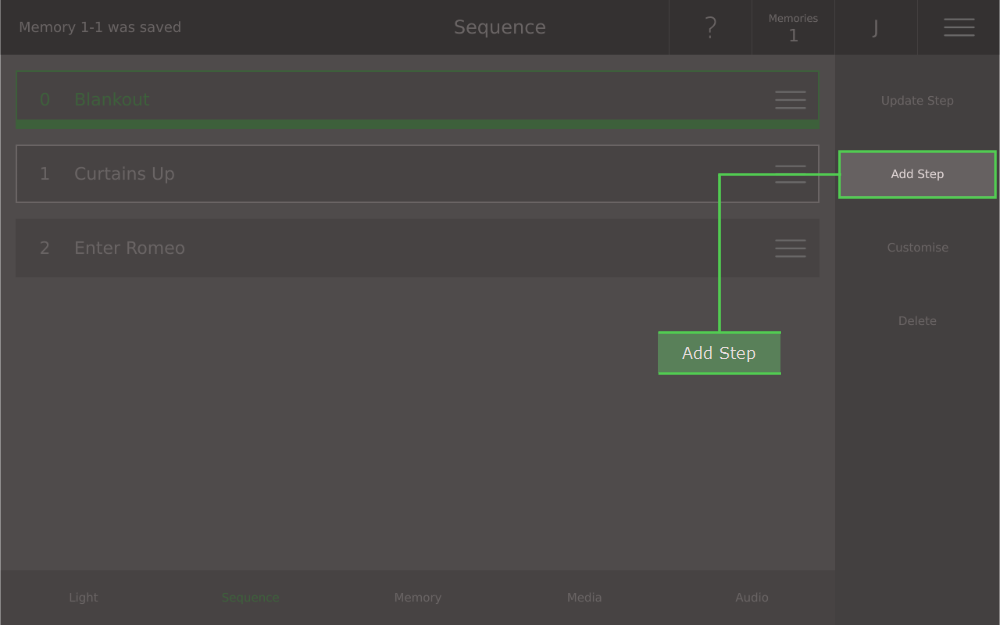
You always have a sequence controlled by the crossfader on the right side of the Ray Console. A sequence is made up of steps, which are essentailly the same as memories. Further sequences can be added to memory faders with the relevant module.
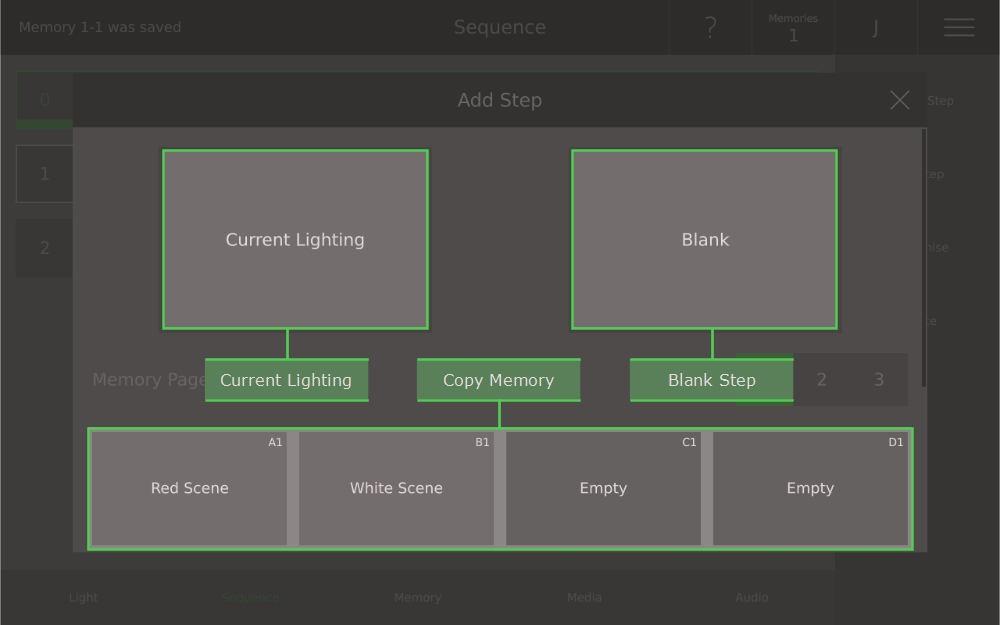
To save a sequence step press the [Save] button and then the [Seq] button. Now the current light view and DMX output will be saved as a new step in the sequence. Steps can also be saved via Light View / Save and then selecting Sequence. More advanced options for adding a new step can be found in Seqeunce View / Add Step. Here it is possible to add a blank step or add a previously saved memory as a step.
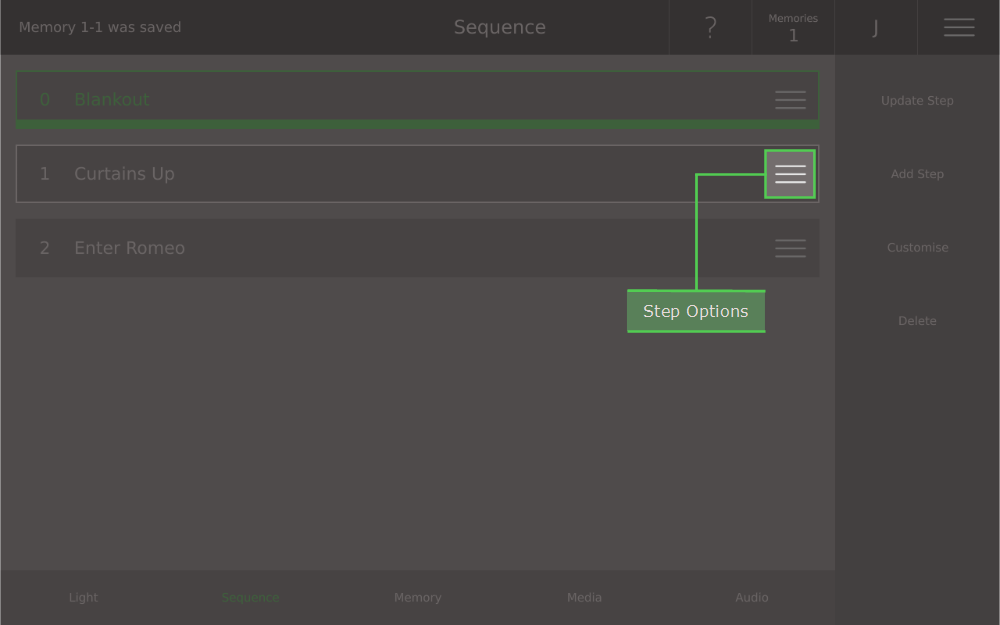
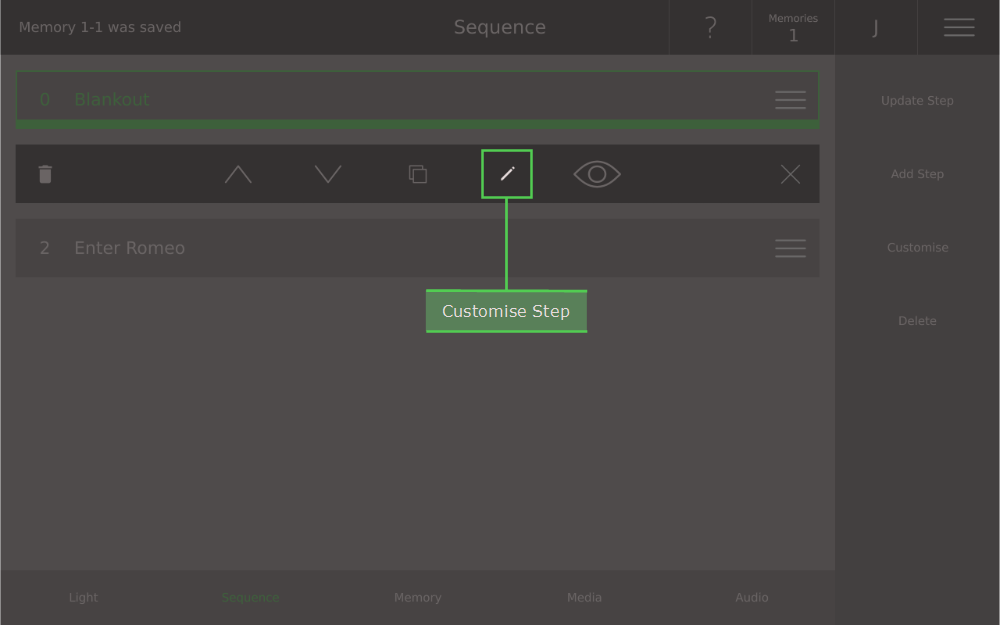
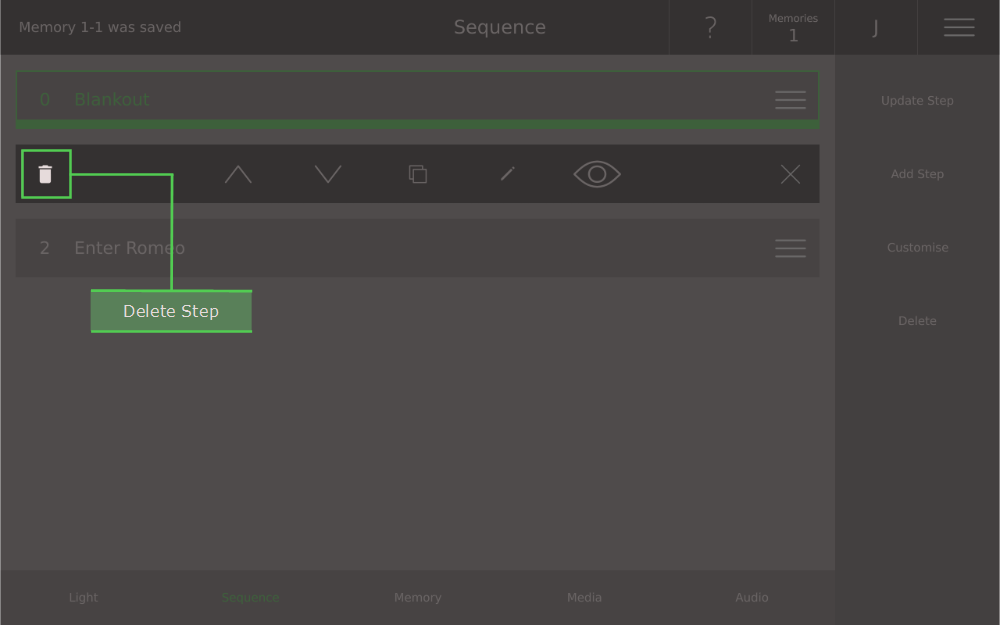
Once you have added a few steps, you can now start to edit them and prepare your show. Tap the three lines on the left of any step to display the step options:
Delete: Remove the selected step from the sequence
Move Up / Down: Move the selected step so that it plays in a different order in the sequence
Duplicate: Make an exact copy of one of your steps
Customise: Freely change the name and number of your step (the order in which steps are played is defined by the sequence list). Further options are detailed in Customise Step and Step Timers.
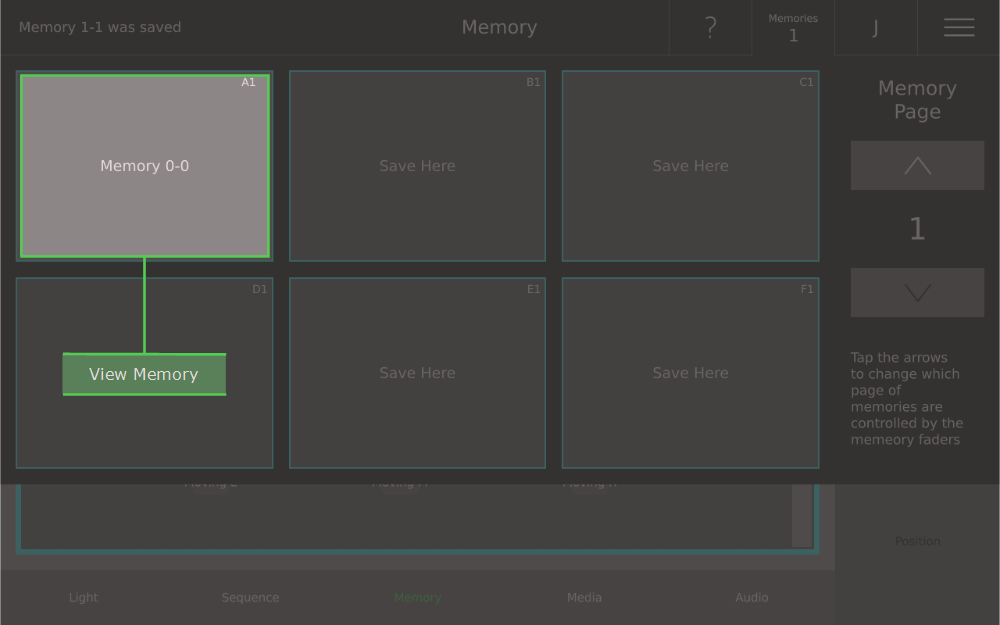
View Step: See what device's attributes are saved in the step
What you see is what you get. So the simplest way to edit a step is:
To manually play the sequence, move both crossfaders (faders to the right of the touch screen) from one end to the other.
To automatically play the sequence, simply press the [Seq] button.
Manual Play
The left hand crossfader controls how the the current step is faded out. The right hand crossfader control how the next step is faded in. When both crossfaders has reached the end, the current step becomes the next step and the next step is move to the next step on the list. This means you can fade in the next step, before fading out the current step.
Automatic Play
Pressing [Seq] starts an automatic crossfade. The time taken for the current step to fade out and the next step to fade in are defined in their respective Step Options / Customise Step. Pressing [Pause] pauses the automatic crossfade where it is. Pressing [Back] reverses the crossfade. It is also possible to automatically play multiple steps after each other by settings a non-zero wait time in Step Options / Customise Step (module required).
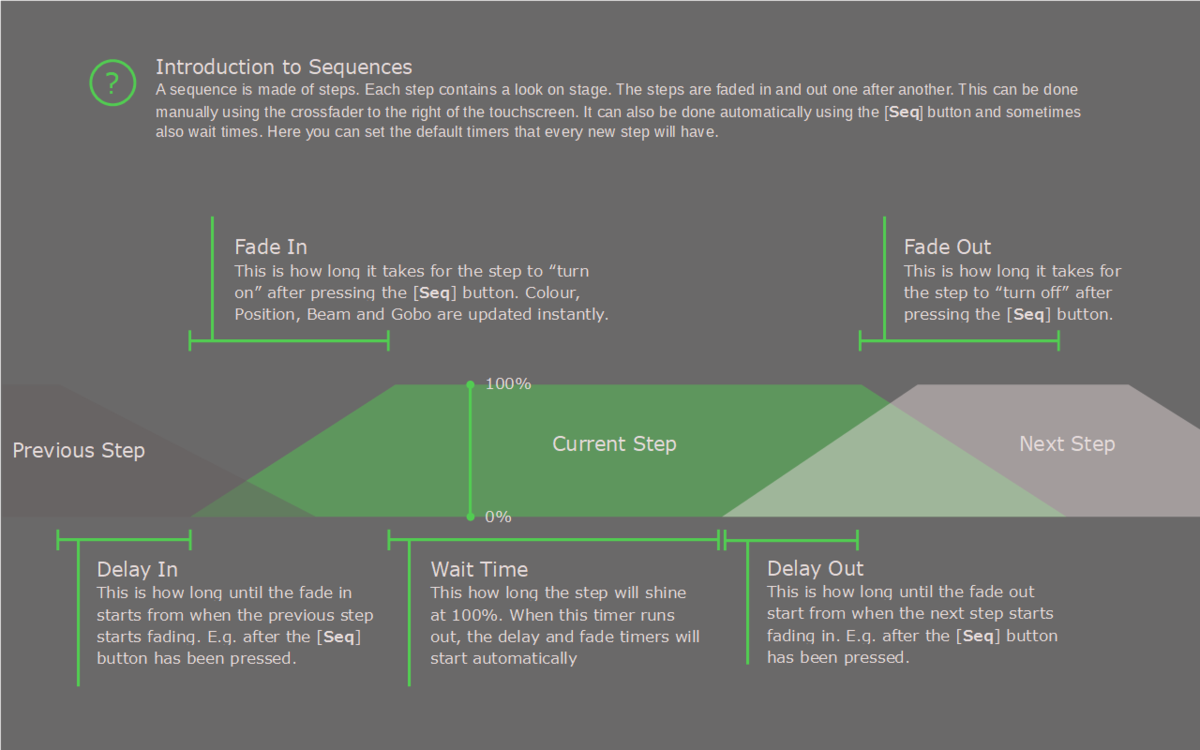
By going to Step Options / Customise Step it is possible to automate a crossfade with 5 timers. Here is an explination of each timer:
Fade In: This is how long it takes for the step to “turn on” after pressing the [Seq] button. Colour, Position, Beam and Gobo are updated instantly.
Fade Out: This is how long it takes for the step to “turn off” after pressing the [Seq] button.
Delay In: This is how long until the fade in starts from when the previous step starts fading. E.g. after the [Seq] button has been pressed.
Delay Out: This is how long until the fade out start from when the next step starts fading in. E.g. after the [Seq] button has been pressed.
Wait Time: This is how long the step will shine at 100%. When this timer runs out, the delay and fade timers will start automatically. If the wait time is zero, you must press [Seq] to start fading to the next step.
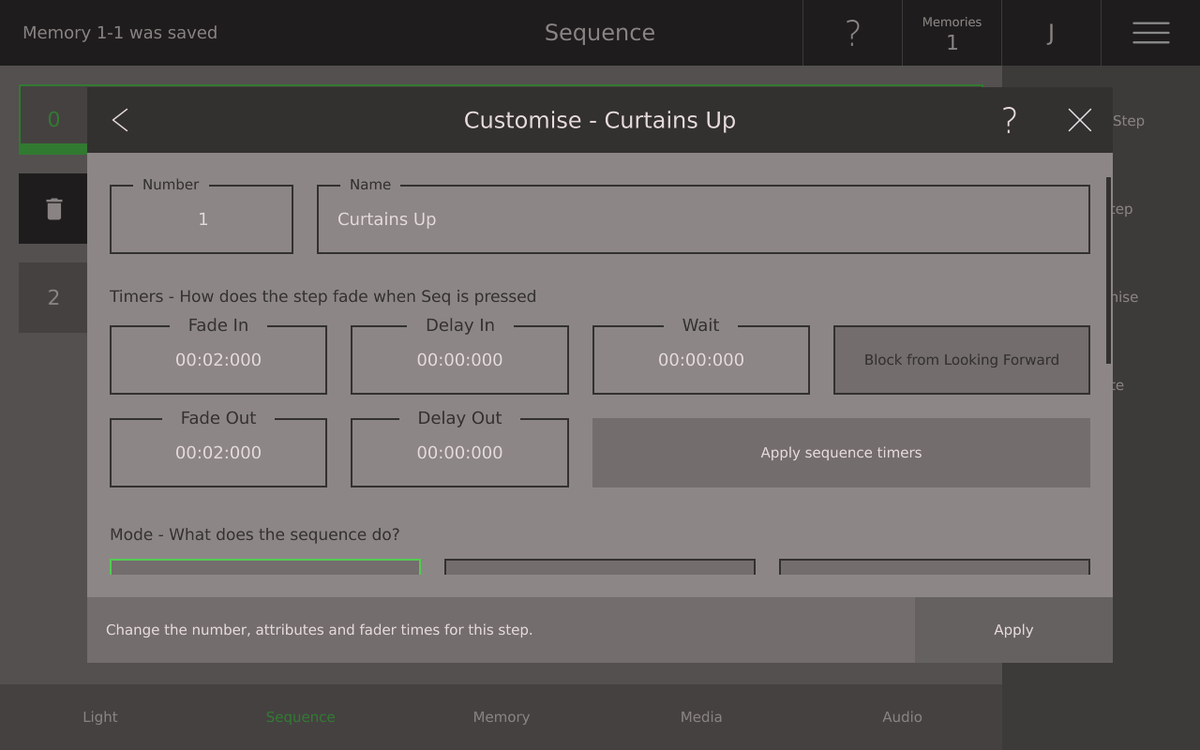
You can customise a step by selecting Step Options / Customise Step. In Customise Step you can freely set a number and name for the step (the order that steps are played is defined by the order of steps in the sequence list). You can also set all step timers, see Step Timers for more details and update the step timers to be the same as the sequence default. Finally you can set how the step affects the light view and DMX output, see Customising Memories for more details.
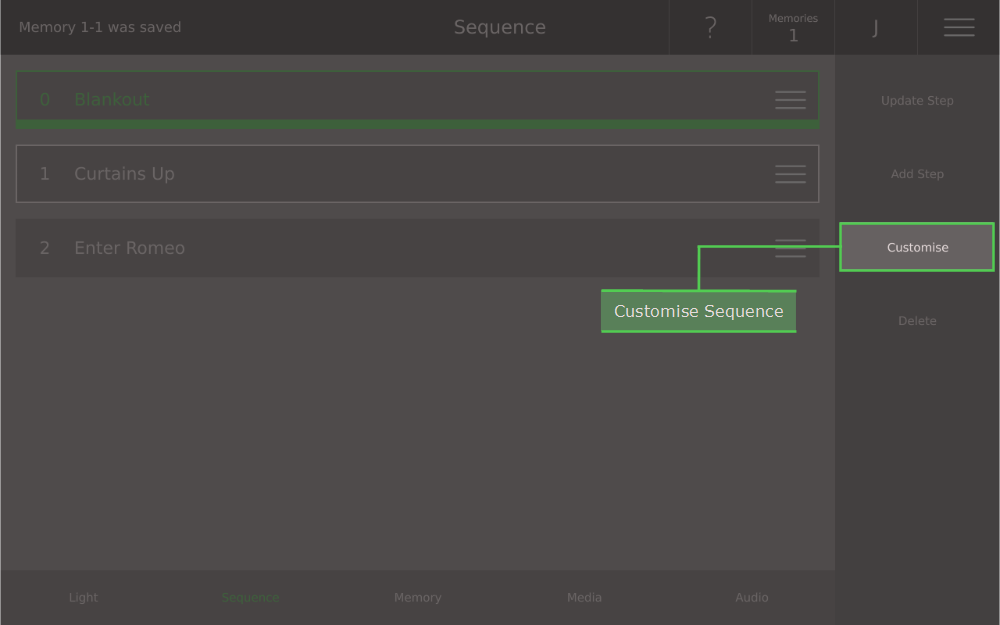
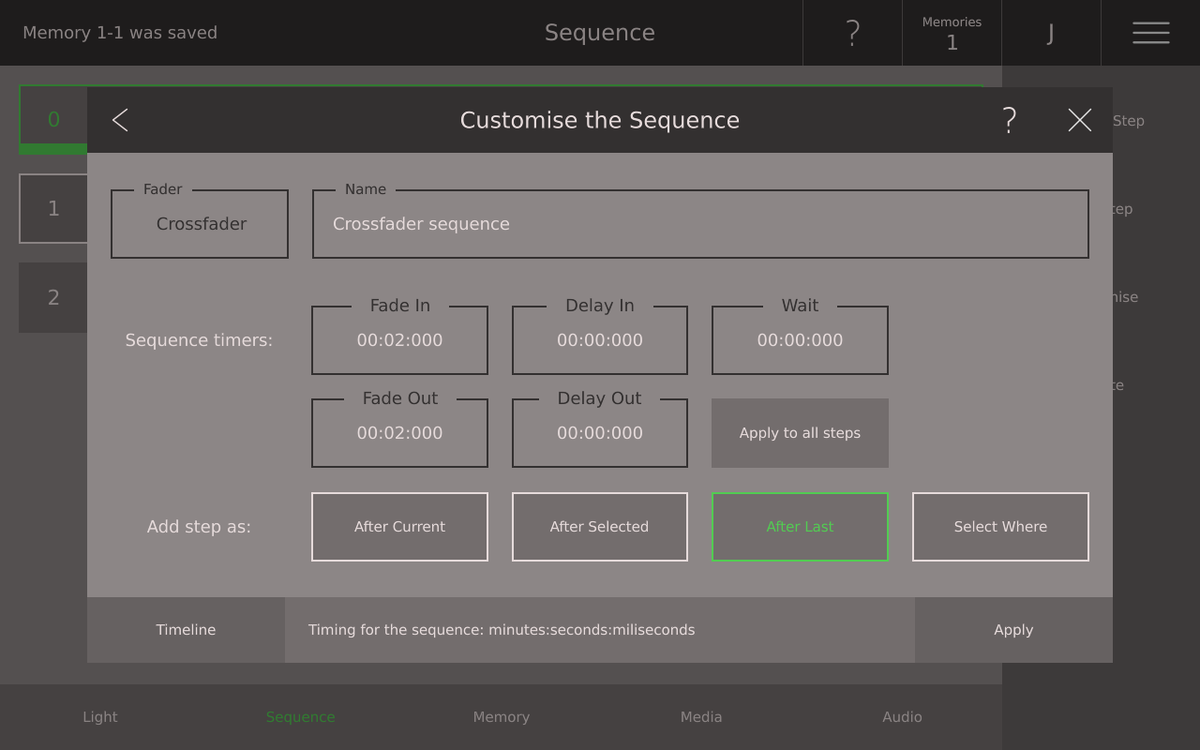
To set defaults for the entire sequence select Sequence on the bottom of the touch screen and select Customise on the right hand side. Here you can give the sequence a name, set the default location and the default timers for newly created steps. Newly created steps can be added:
After Current: After the currently shining step (outlined in green on the Sequence View).
After Selected: After the currently selected step (also refered to as the next step, outlined in white on the Sequence View)
After Last: After the last step in the sequence
Select Where: You will be asked where to add the new step every time.
Apply to all steps updates all timers on every step in the sequence to be the same as the default shown here is Customise Sequence.
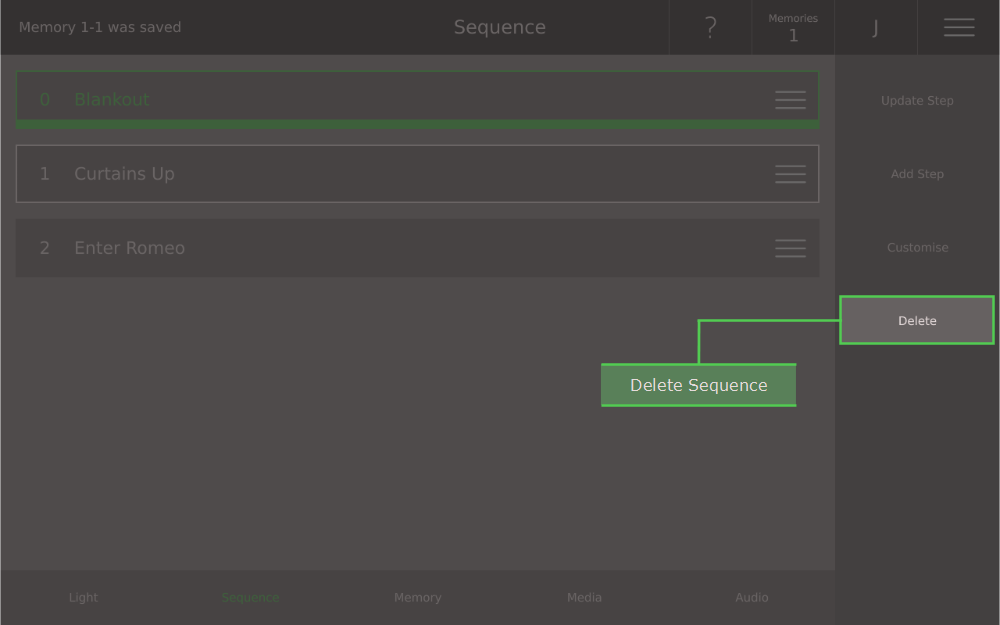
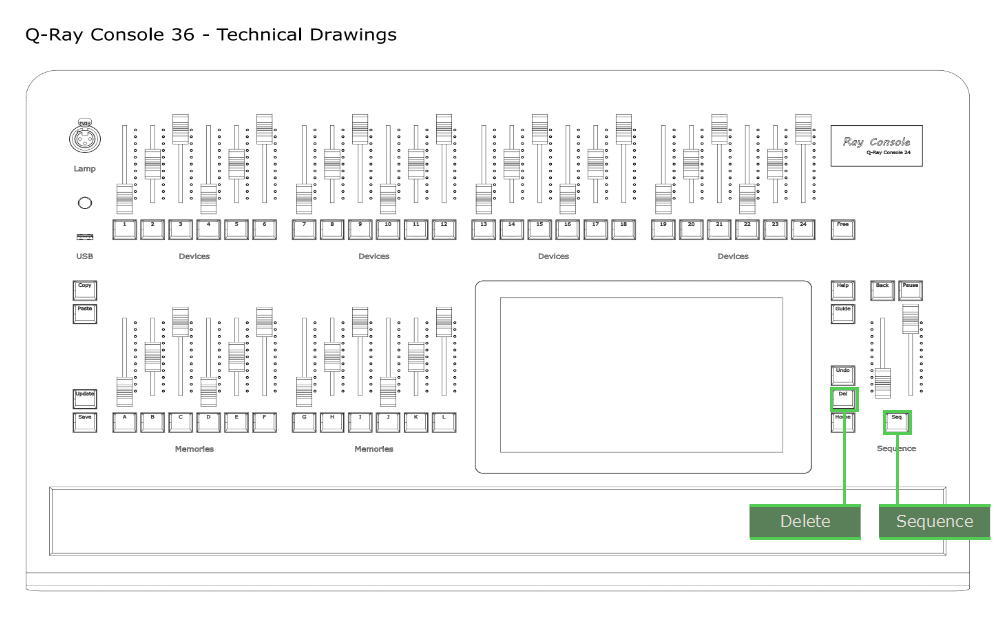
To delete all steps in the sequence and return Customise Sequence to its default, go to the Sequence View, press Delete on the left hand side and confirm. Using the buttons press [Del], then [Seq] and then confirm. Individual steps can also be deleted by pressing [Del] and then the Step on the Sequence View.
Instead of using a separate laptop or phone, you can use Ray Console to play audio tracks during your show. On the Media View you can add, organise and play back audio tracks as an integrated part of your show. Tracks can be added via USB and are played from the 3.5mm Audio OUT connector on the back of the console. Tracks in the Media View can also be started and stopped by a Memory or Step and thereby integrating audio seamlessly into your lighting show.
In the future you will also be able to intergrate images and videos into your show and play them directly from the consoles DVI-D connector. To add audio tracks you must have the module Media Control.
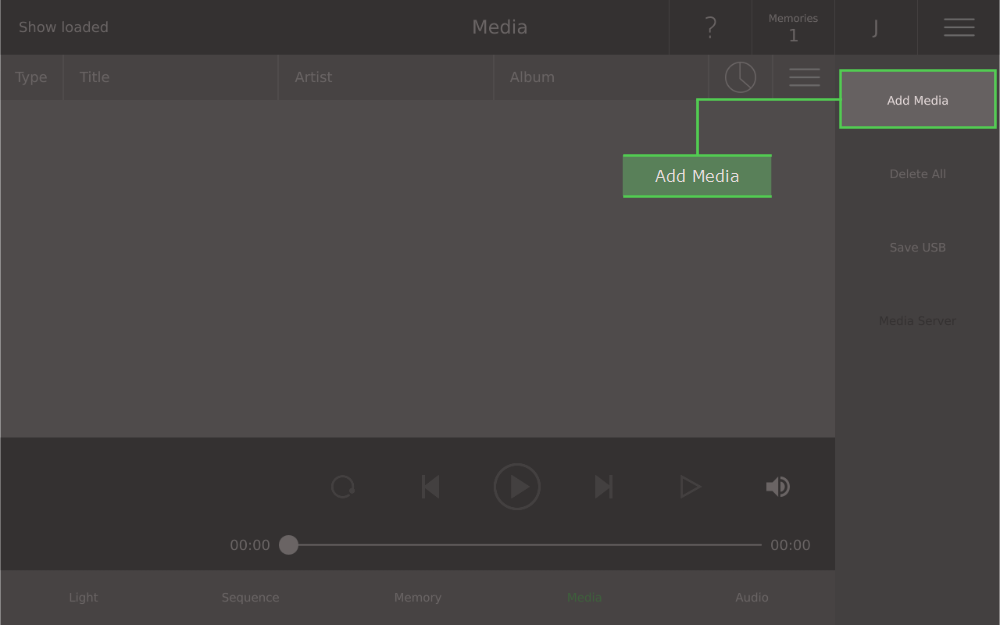

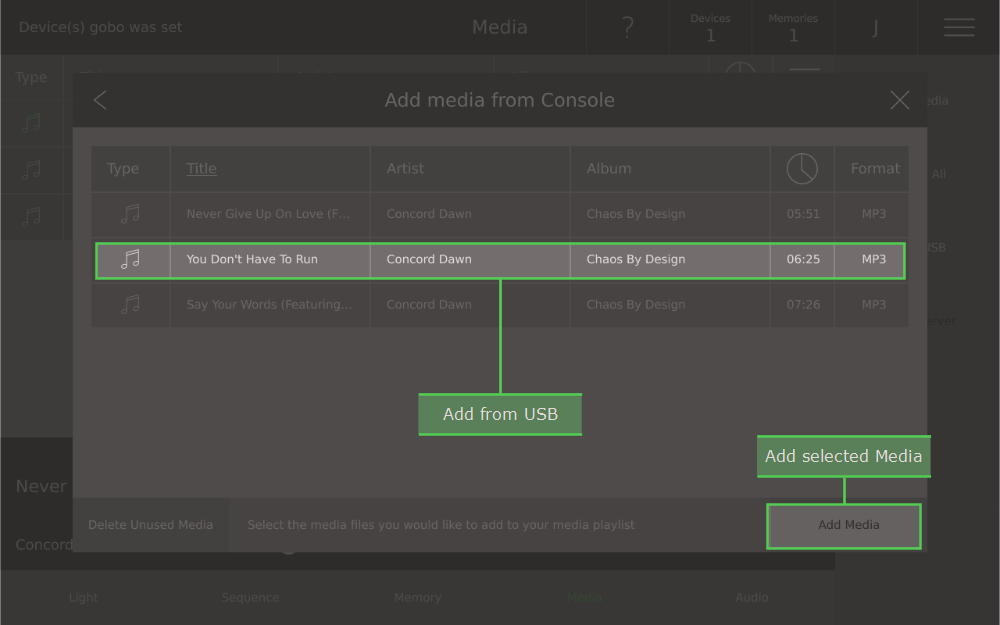
To add a new audio track to your show, select Media View / Add Media (requires the Media Control module) and choose USB. There you can select all the media tracks you want to add and press Add Track. The tracks will then be added to the Media View form which they can be played. All tracks saved in all shows can also be added from Media View / Add Media / Console.
The USB storage device must be formatted to FAT32 and the audio tracks must be in the folder RayConsole / Media. The file formats are supported:
MP3 - .mp3
WAV - .wav, .wave (WAV)
FLAC - .flac
ALAC - .m4a, .caf
AAC - .aac, .3gp, .m4r
There is no limit to the amount of storage the connected device can have.
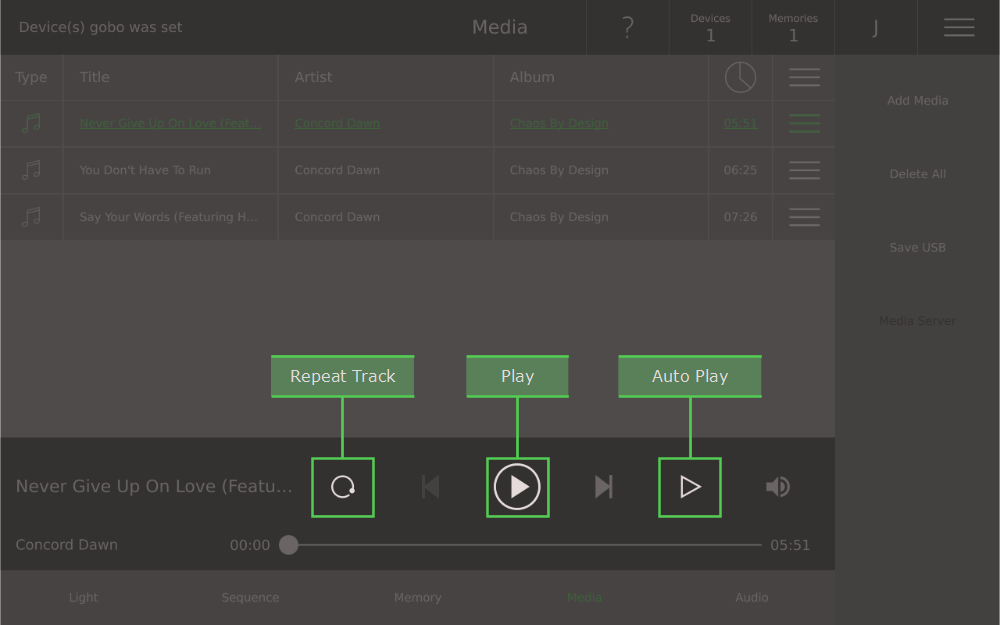
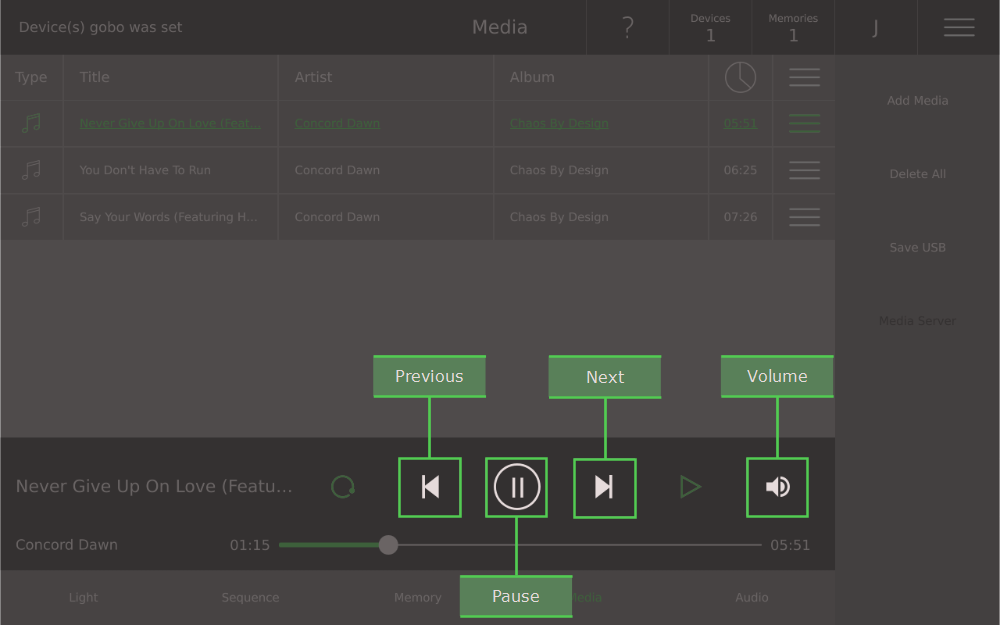
Playing tracks on the media view is similar to any media playing software. Here is an overview of the controls:
The name of the track and the artist are shown to the left of the controls. There is a slider under the controls, the number on the left gives the current location, the number on the right gives the total length of the track in minutes and seconds. The slider can be dragged.
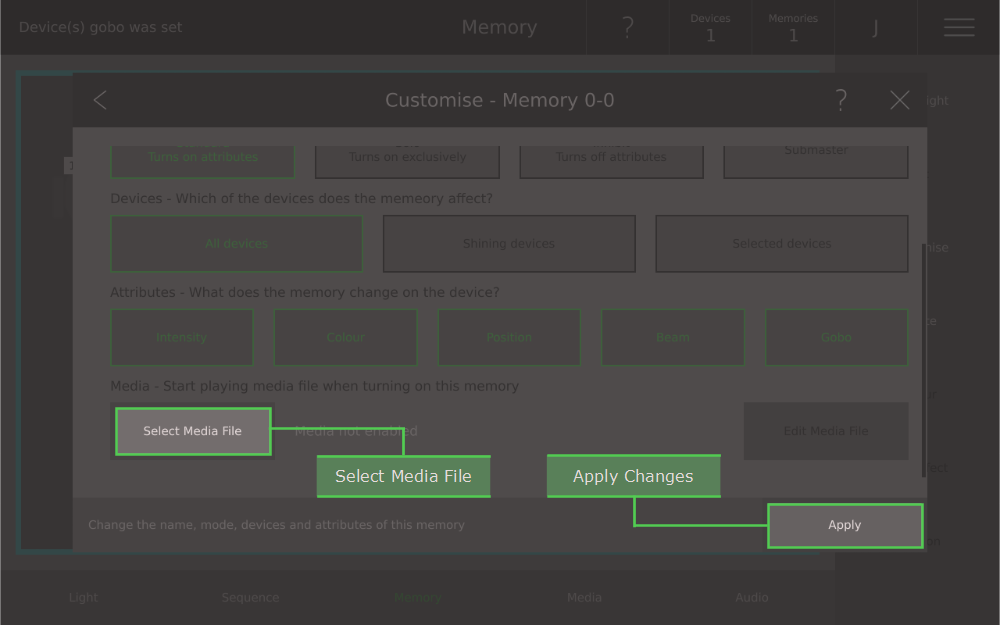
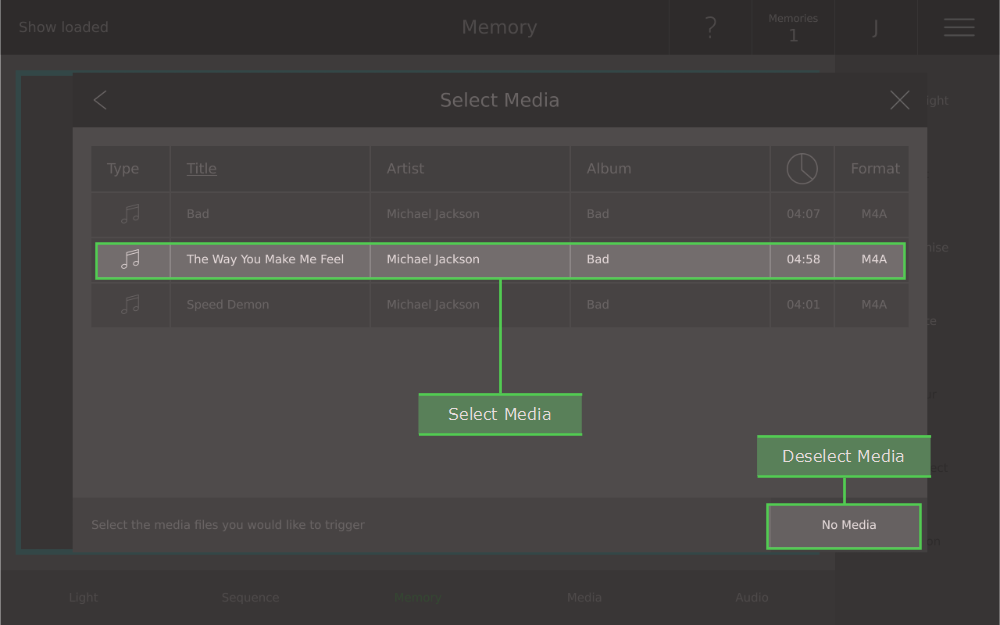
Any memory or step can be used to start and stop a track on the Media View. To do this, go to either Memory View / Customise or Seqeunce View / Step Option / Customise Step. Scroll to the bottom of the dialogue and tap Select Media File. A dialgoue with all the tracks in the current show will open, tap the track you want to control and it will be selected. This means that:
For a memory:
For a step:
Please note: for a better user experience record the audio to memory. In that case - separated from the Steps in the Sequence - you have total control over the audio files.
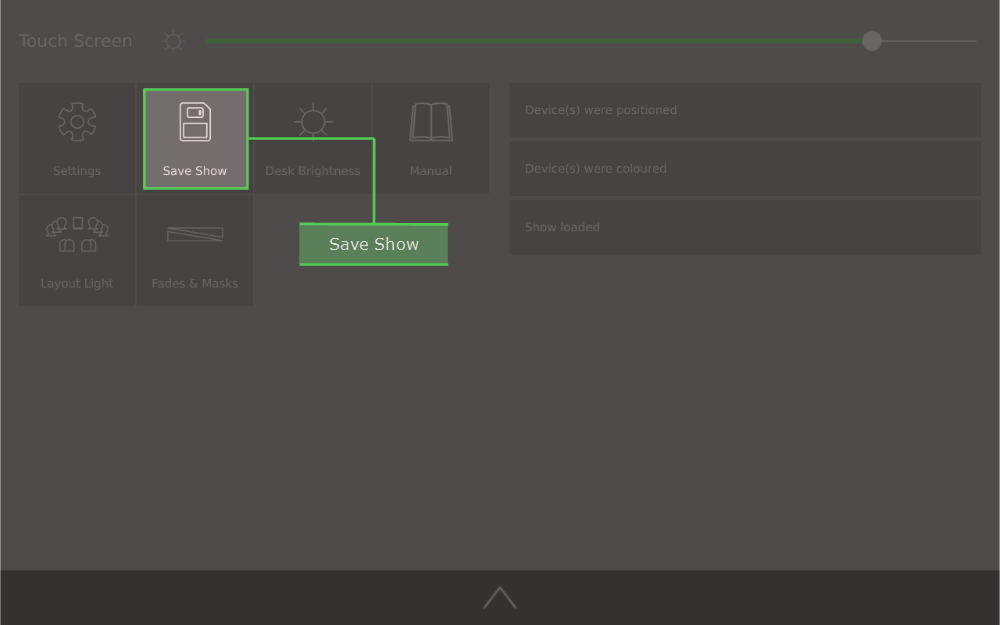
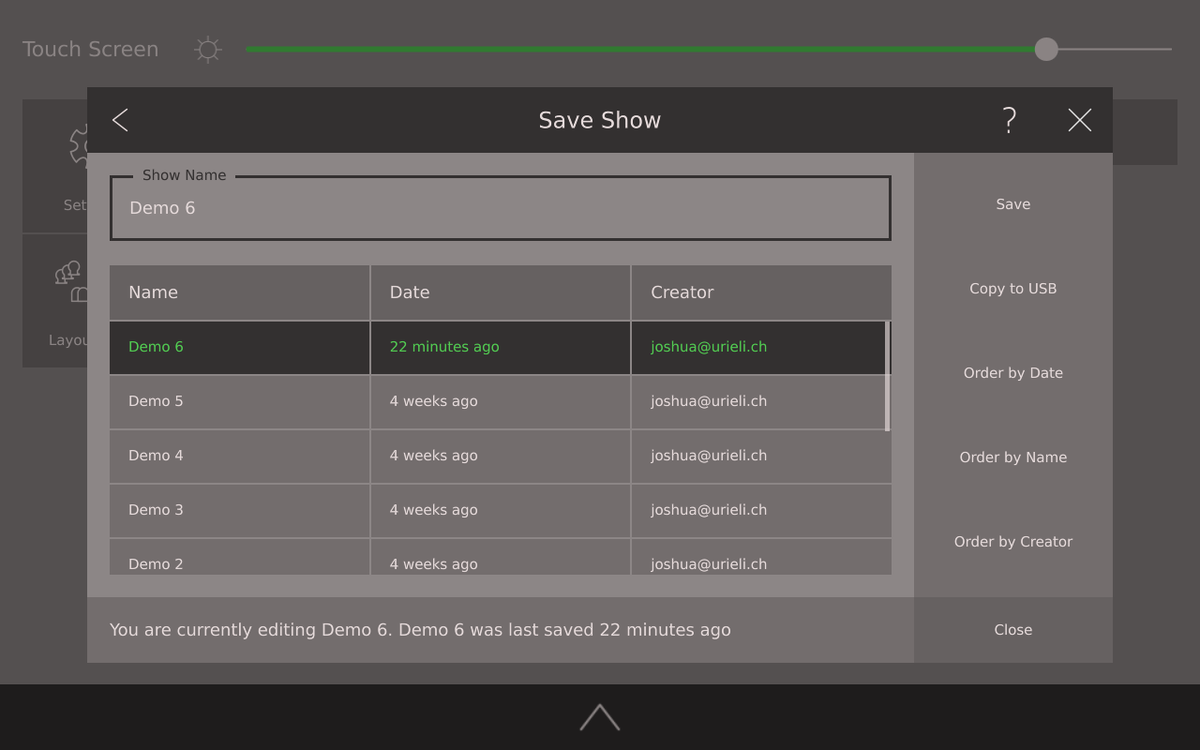
A show contains the patch, the light layout, all memories, all sequences, all used media files, the desk brightnesses, submaster settings and all used device templates.
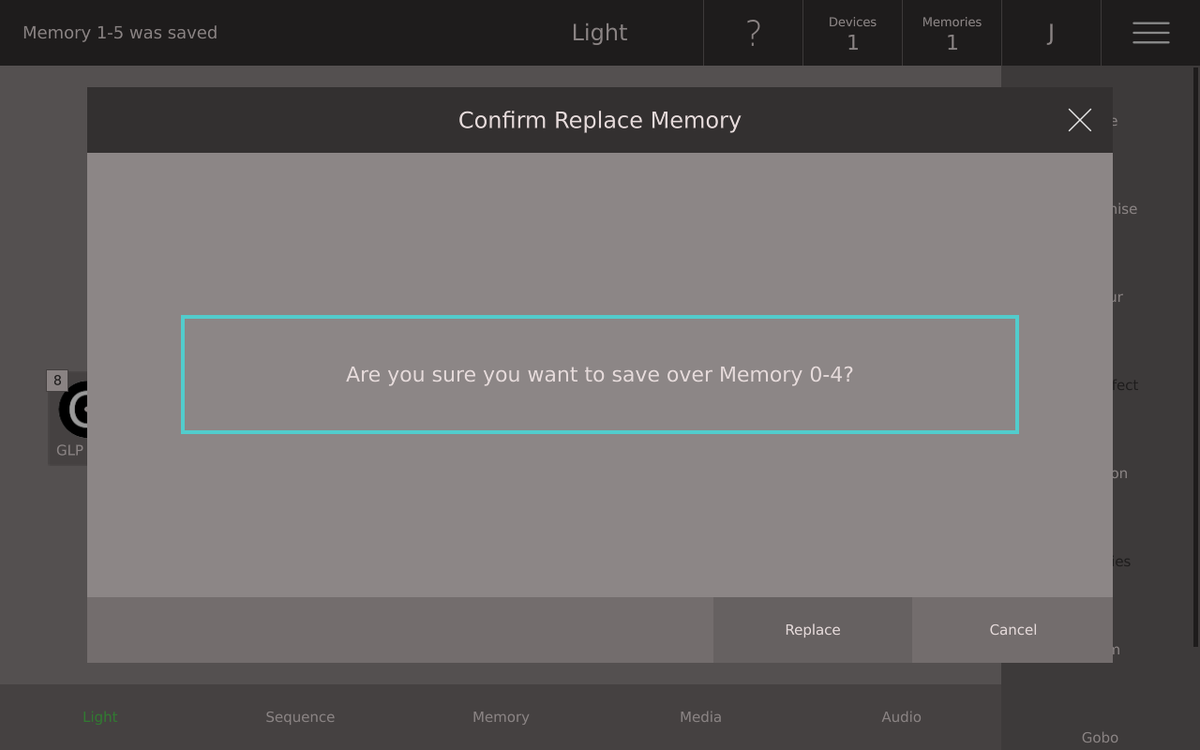
To save a show select Options View on the top bar (three horizontal lines) and then select Save Show. Simply pressing Save will save over the current (last saved or loaded) show file. Entering a new name and pressing Save will save the show as a new file. Selecting a show from the list and pressing Save will save over the selected show file.
You can backup your show files to a USB storage devices. Plug a storage device (formatted FAT32) into one of the USB ports. Next select Copy to USB, then select which shows you wish to backup and finally press Select. You can copy files back onto the console in Settings View / Open Show.
If you run out of space on the console to save shows, you can either purchase a module upgrade or delete shows in Settings View / Open Show / Delete.

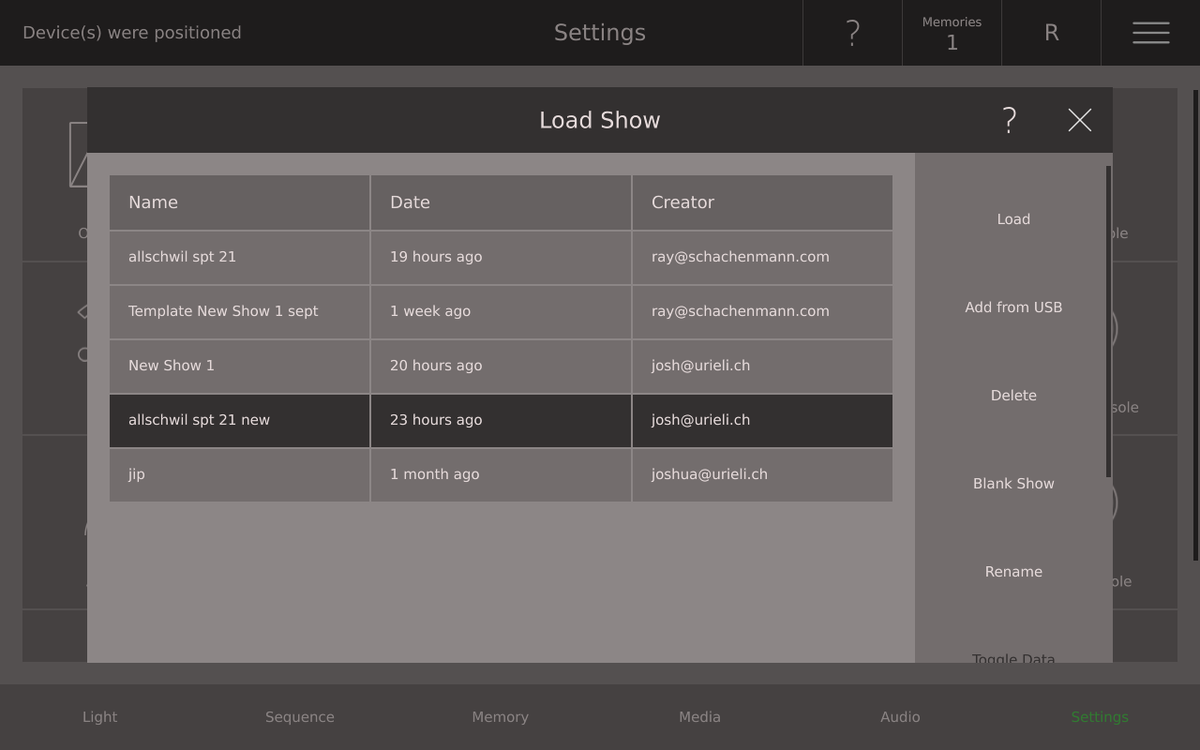
To load a previously saved show go to the Settings View and press Open Show. A list of all saved shows on the console appears, tap to select one and press Load on the right hand side. Now Ray Console will ask you, if you want the save the current show before loading another one. Note that any unsaved changes to the current show will be lost.
In the Open Show dialogue you can also delete shows. Simply select the show you wish to delete and press Delete on the right hand side.

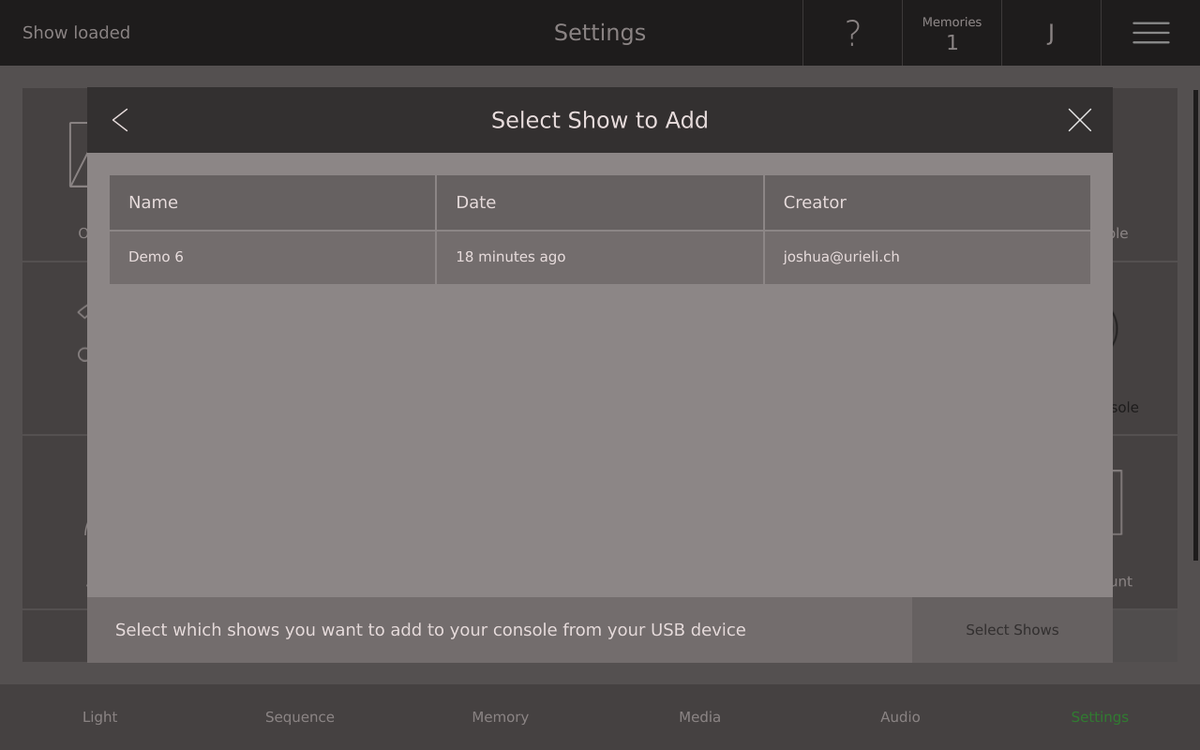
You can backup your show files to a USB storage devices. Plug a USB storage device (formatted as FAT32, no size limit) into one of the USB ports. Next select Copy to USB, then select which shows you wish to backup and finally press Select. Once the show files have been copied you can unplug your USB device.
To copy a show back onto the console from a USB storage device, plug in your USB storage device into one of the USB ports. Go to Settings View and select Load Show. Next select Copy from USB, choose which shows to copy and press Select. Once the show files have been copied, you will be able to load them onto the console.
If you copy a show from a Q-Ray Console 36 to a Q-Ray Console 24 or from a console with more universes than the extra memories and devices will remain in the show but cannot be played directly. They first must be moved to fit on the available memory faders / pages and universes respectively.
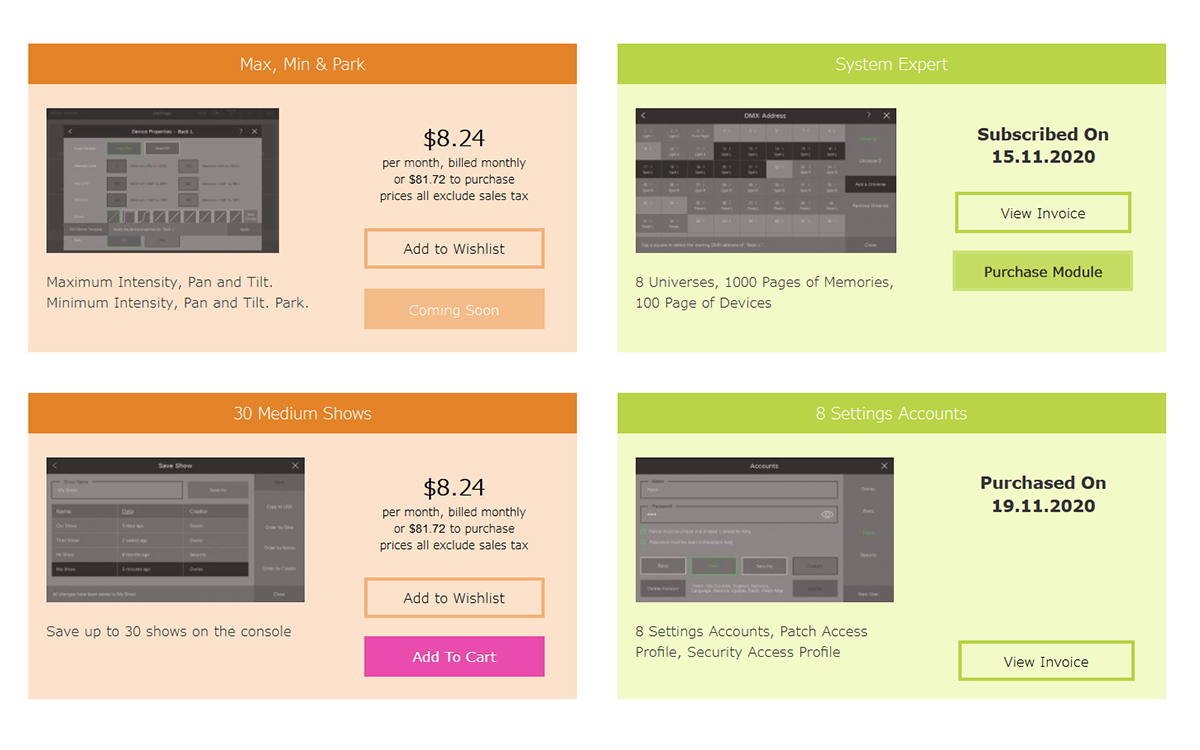
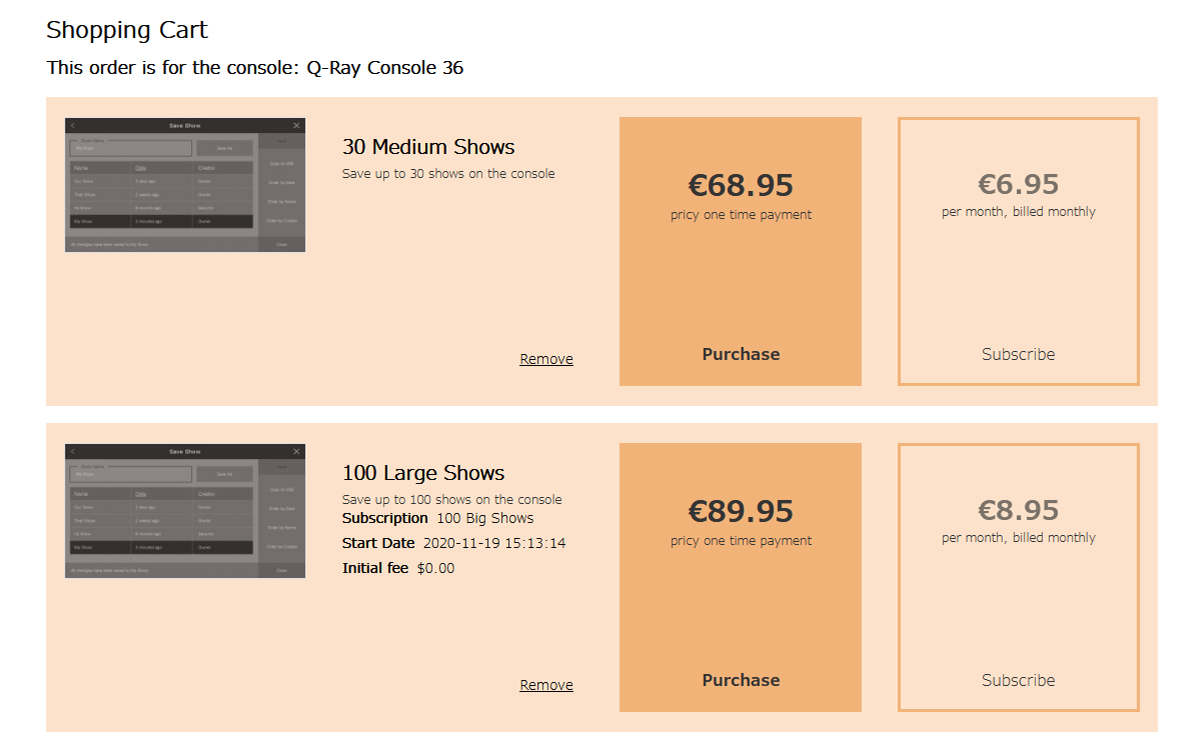
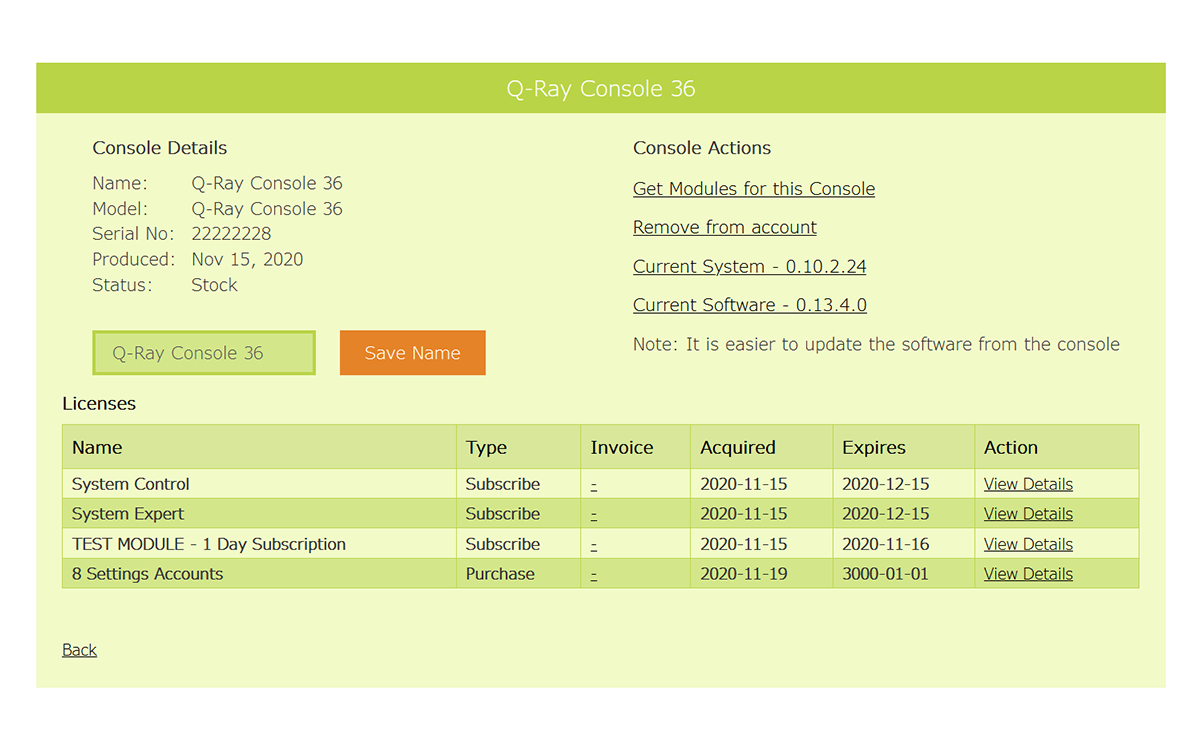
You can extend the features and capabilities of your console by purchasing or subscribing to modules. Modules can be purchased or subscribed on rayconsole.com via a computer, tablet or phone. By signing into (or registering) your account on rayconsole.com and entering the serial number on the back of your console, you will be quickly and easily manage the modules for each of your Ray Consoles.
There are two license options available, modules can either be purchased or subscribed to on a monthly basis. If you are not sure if you need a module, we recommend the monthly subscription. Monthly subscriptions can be unsubscribed at any time on your rayconsole.com account in Account / My Subscriptions. An unsubscribed module remains valid until it's expiry date is reached.
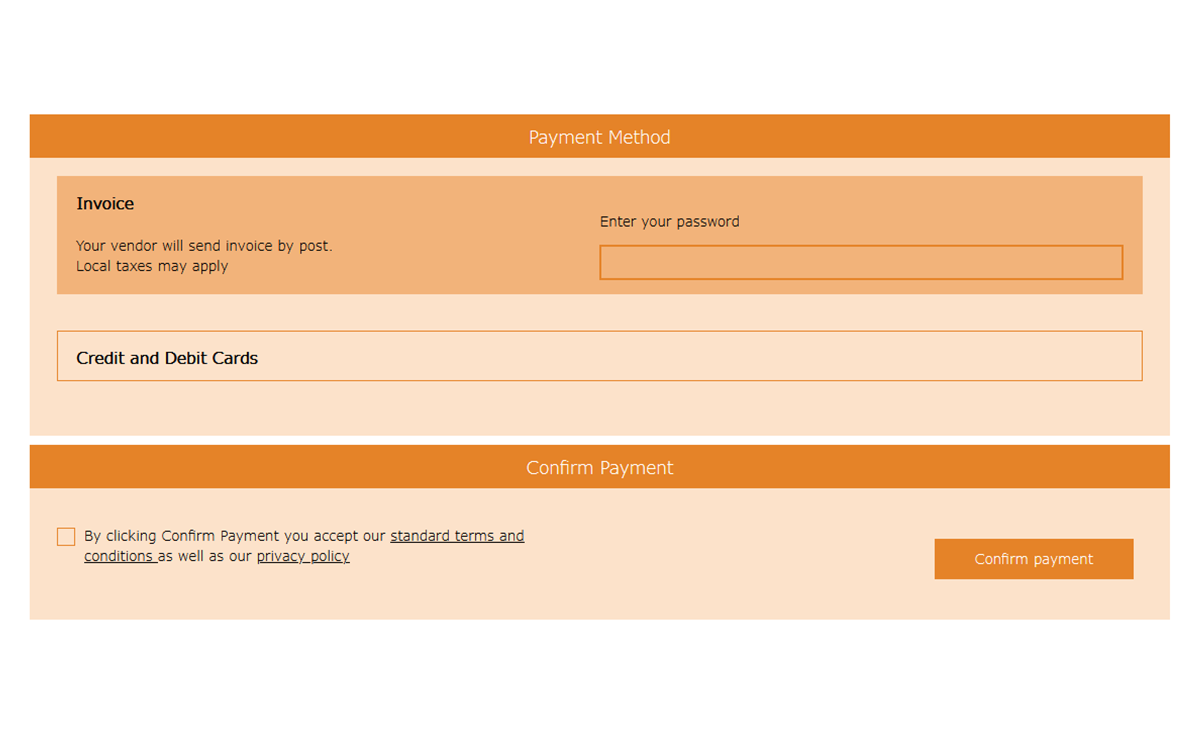
Modules can be paid for via debit card, credit card or through an invoice sent by your local distributor (requires with pre-approval by your distributor). It is also possible recieve free modules and discounts by entering a discount code.
Details of relevant modules are given throughout the console, wherever they may come in handy. Modules can also be browsed on rayconsole.com where they are split into 4 catagories:
Functions: These modules allow you to edit more complex attributes in more complex ways. Modules in this category include: Position Control, Gobo Control, Intensity Effects and much more...
Controls: These modules allow you to create more complex playbacks your saved memories and steps. Modules in this category include: Delay and Wait, Submaster Control, 3 Medium Sequences and much more...
Extensions: These modules allow you to extend the size of the system your console can control. Modules in this category include: System Control, 30 Medium Shows, 8 Settings Accounts and much more...
Languages: These modules give you access to convenient contextual help overlays on the console in another language. Modules in this category include: German, French, Polish and much more...

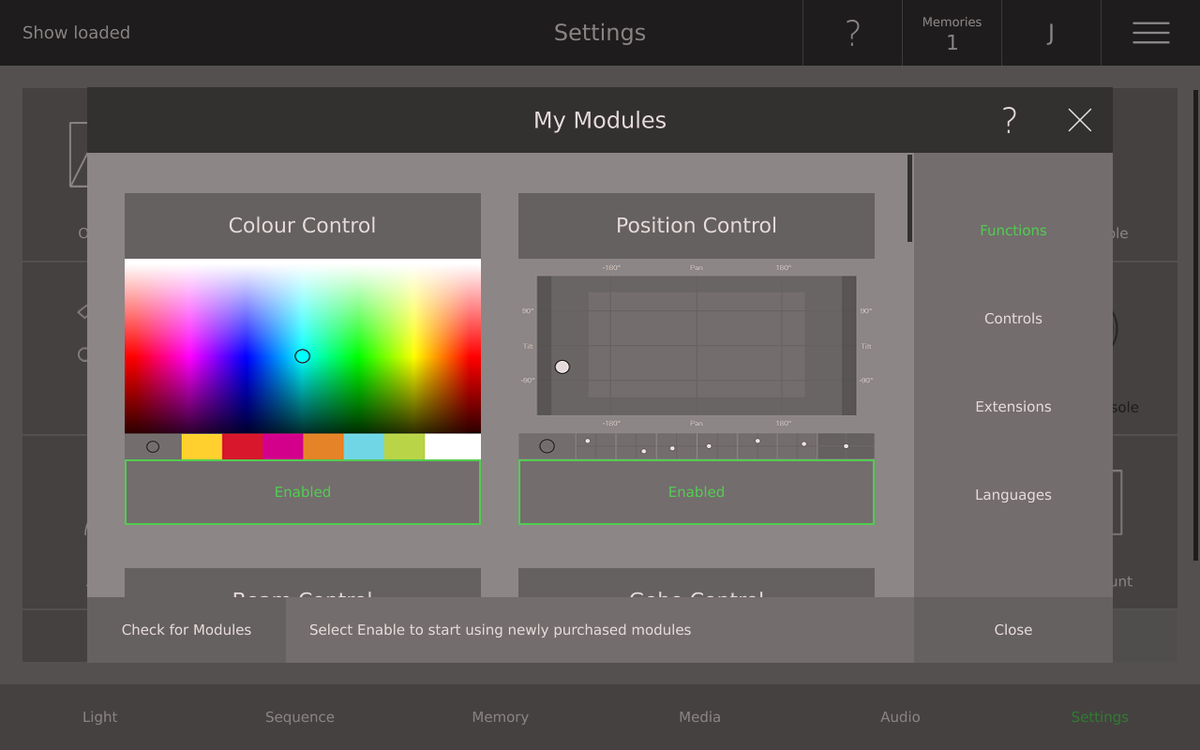
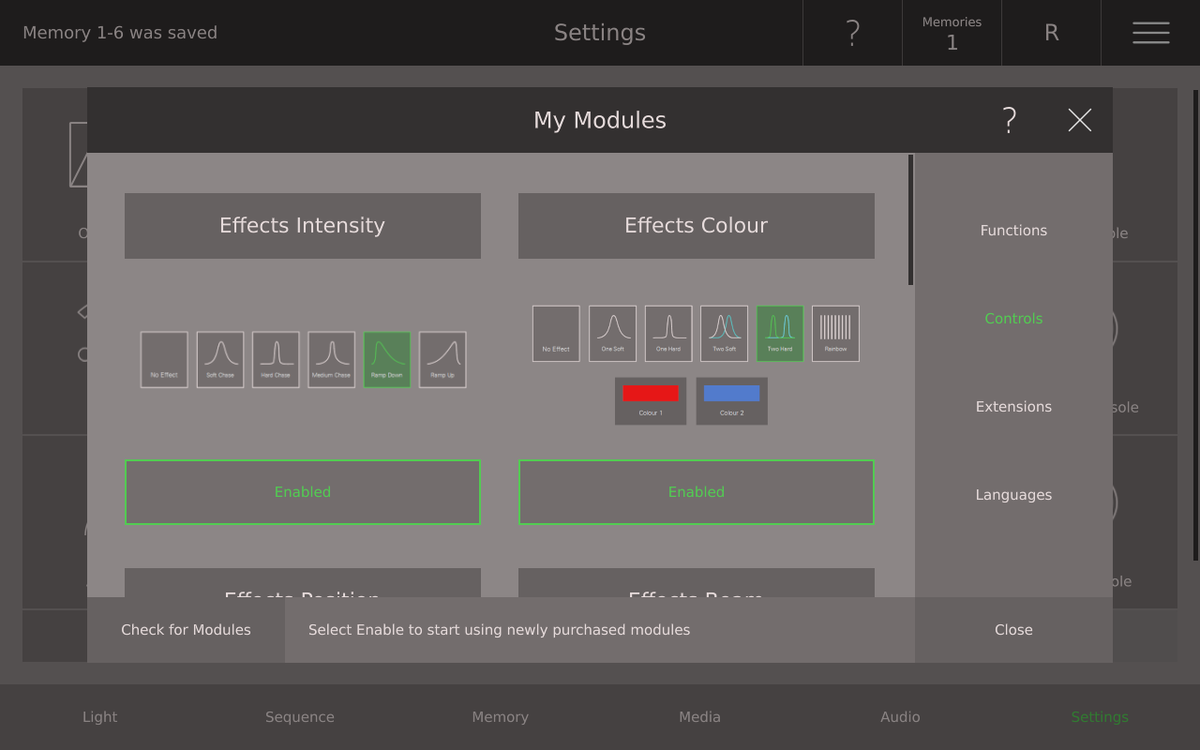
Once a module has been purchased or subscribed to, the module be available the next time the console connects to the internet. The next time you turn on your console, go to Settings View (signed in as the console owner), open the My Modules dialogue and press Check for Modules. You can then enable each new module by pressing Disable, at a time that suits you. When the button is green and shows Enabled, then the module is enabled.
This operation does not require much bandwith, so if you do not normally connect your console to the internet, then quickly using a hotspot will only use a few kilobytes of your data.
Disabling and Removing Modules
You can see which modules are enabled by going to Settings / My Modules on the console. If you wish to turn off a module, simply select Enabled. When the button is grey and shows Disabled, then the module is disabled. Subscribed modules can be canceled on rayconsole.com. Shows created with now canceled modules can still be played however some attributes and setting will not be editable.
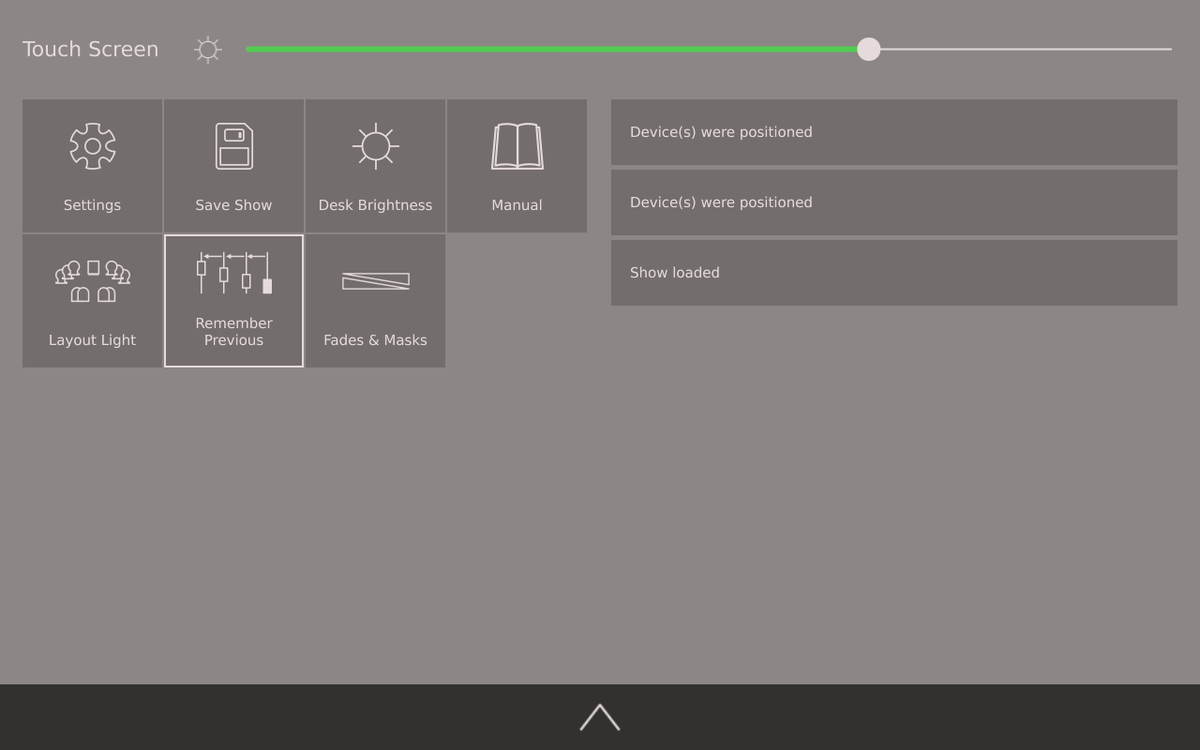
The Options View contains certain key settings and is available to all users, without signing in. To access the Options View tap the three horizontal lines in the top bar or drag the top bar down. On the left there are various options. On the right is a list of recent actions.
A show contains the patch, the light layout, all memories, all sequences, all used media files, the desk brightnesses, submaster settings and all used device templates.
To save a show select Options View on the top bar (three horizontal lines) and then select Save Show. Simply pressing Save will save over the current (last saved or loaded) show file. Entering a new name and pressing Save will save the show as a new file. Selecting a show from the list and pressing Save will save over the selected show file.
You can backup your show files to a USB storage devices. Plug a storage device (formatted FAT32) into one of the USB ports. Next select Copy to USB, then select which shows you wish to backup and finally press Select. You can copy files back onto the console in Settings View / Open Show.
If you run out of space on the console to save shows, you can either purchase a module upgrade or delete shows in Settings View / Open Show / Delete.
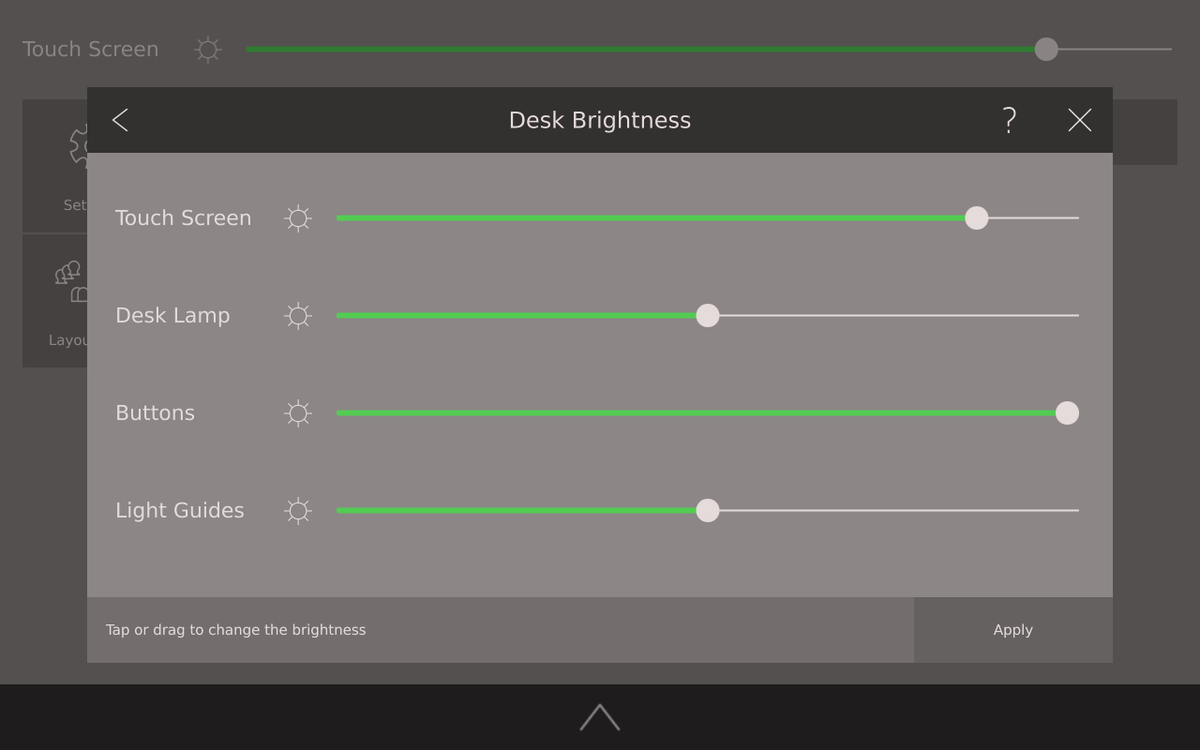
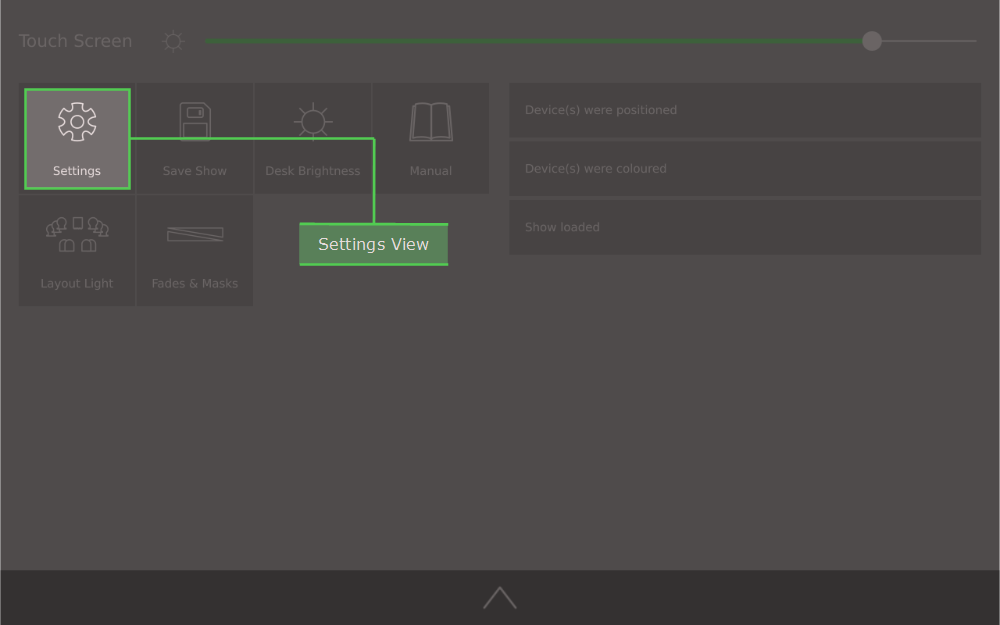
You can change the brightness of the touch screen, desk lamp, buttons and light guides to fit your working environment. Go to the Options View and tap on Desk Brightness. Here is what each slider does:
Touch Screen: Set the brightness of the touch screen by dragging or tapping the slider.
Desk Lamp: Attach a desk lamp to the connector on the top left of the console labeled Lamp an adjust its brightness by dragging or tapping the slider.
Buttons: Set the brightness of all the buttons by dragging or tapping the slider.
Light Guides: Set the brightness of all the light guides (rows of LEDs next to each fader) by dragging or tapping the slider.
The Quickstart and Manual are available if you connect an external monitor to the DVI-D connector on the back of the console. Select Options View, then tap Manual and now you can select which topic you wish to display. The relevant manual topic will then be displayed on the external monitor. You scroll up and down with the arrows on the touchscreen.
We recommend for the external monitor: 1920 x 1080 (FullHD) and 1280x720(HD Ready)
These resolutions are also supported:
Ratio 3:2
Ratio 4:3
Ratio 5:3
Ratio 5:4
Ratio 16:9
Ratio 16:10
The desktop on the Ray Console is the Light View. This view shows you what is happening on stage right now. In the Light Layout dialogue you can spatially organise your patched devices on the Light View. Double tap the title bar to make the dialogue full screen.
The Light Layout dialogue can be found under Options View / Light Layout. To organise devices:
Drag devices to change their position
Select device by tapping them
Deselect all devices by tapping the background twice
Align devices to the last selected device by tapping an option in the bottom left of the screen
Space devices evenly by tapping an option in the bottom left of the screen
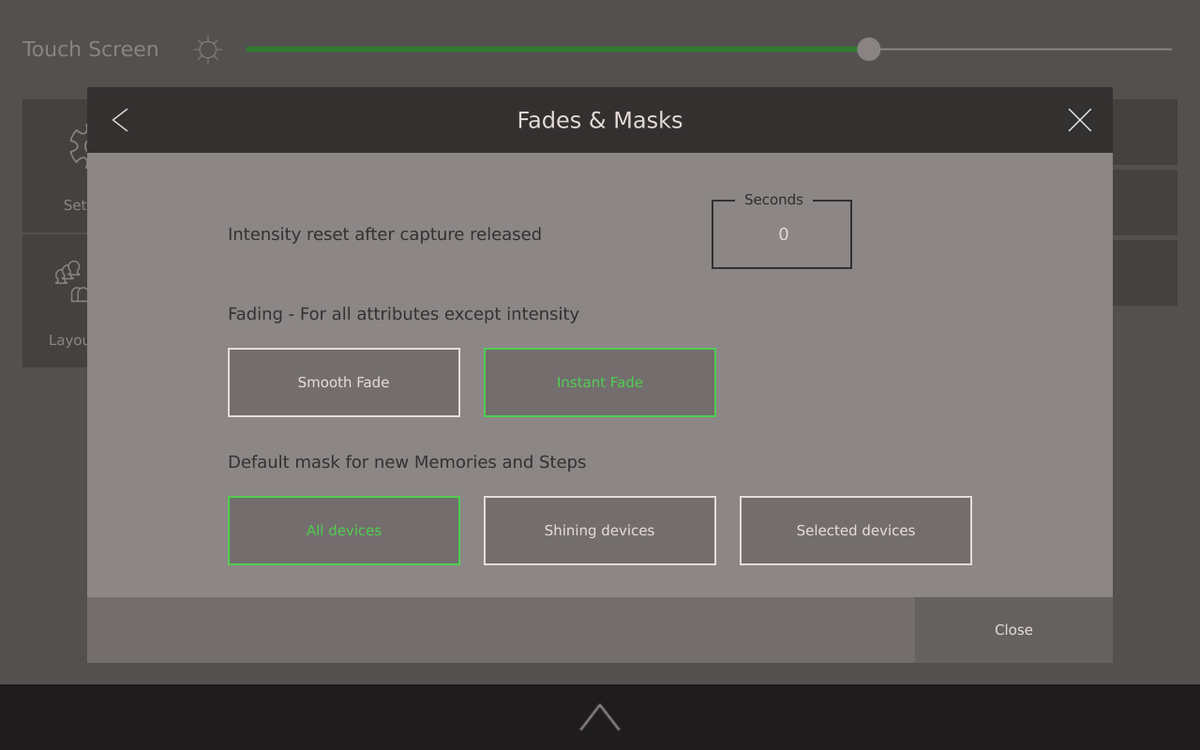
This dialogue contains certain global settings. Access it by going to Options View and select Fades & Masks. The global settings are:
Intensity reset after capture released: This is the time it takes for the intesity of a captured device to rematch the HTP value after [Free] has been pressed.
Default mask for a new step or memory: This sets the default in Memory View / Customise Memoryand Sequence View / Step Options / Customise Step
This dialogue contains an extension of the strickt LTP (last take precedence) principle in Ray Console software. If the Remember Previous Button is activated (framed green) all attribute values (except intensity) which are set by the faders are recorded in the LTP stack. If the fader, that caused a LTP attribute value to be set, is returned to zero, then the previous attribute value is set. For sequences, the current step and next step are included in the stack during a crossfade. The current step is the bottom of the stack, so when the sequence progresses, then all entries before the current step are removed. Pressing Back completely resets the stack.
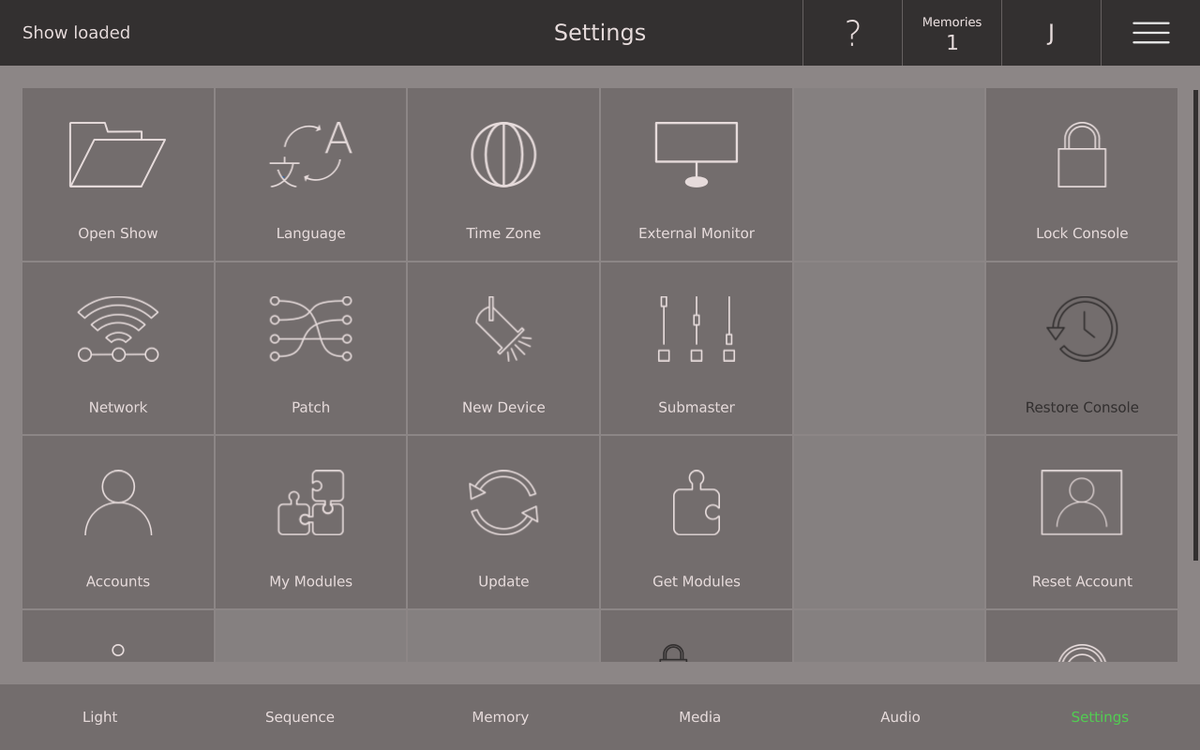
The Settings View contains all advanced settings. It can only be accessed by signing in and the settings available depend on the privilages of the account which is logged in (see Accounts). To access the Settings View tap the three horizontal lines in the top bar or drag the top bar down and then select the Settings button. You may need to be signed in (see Settings Access). Each tile represents and option which can be tapped to display a dialogue with the relevant settings.
To load a previously saved show go to the Settings View and press Open Show. A list of all saved shows on the console appears, tap to select one and press Load on the right hand side. Now Ray Console will ask you, if you want the save the current show before loading another one. Note that any unsaved changes to the current show will be lost.
In the Open Show dialogue you can also delete shows. Simply select the show you wish to delete and press Delete on the right hand side.
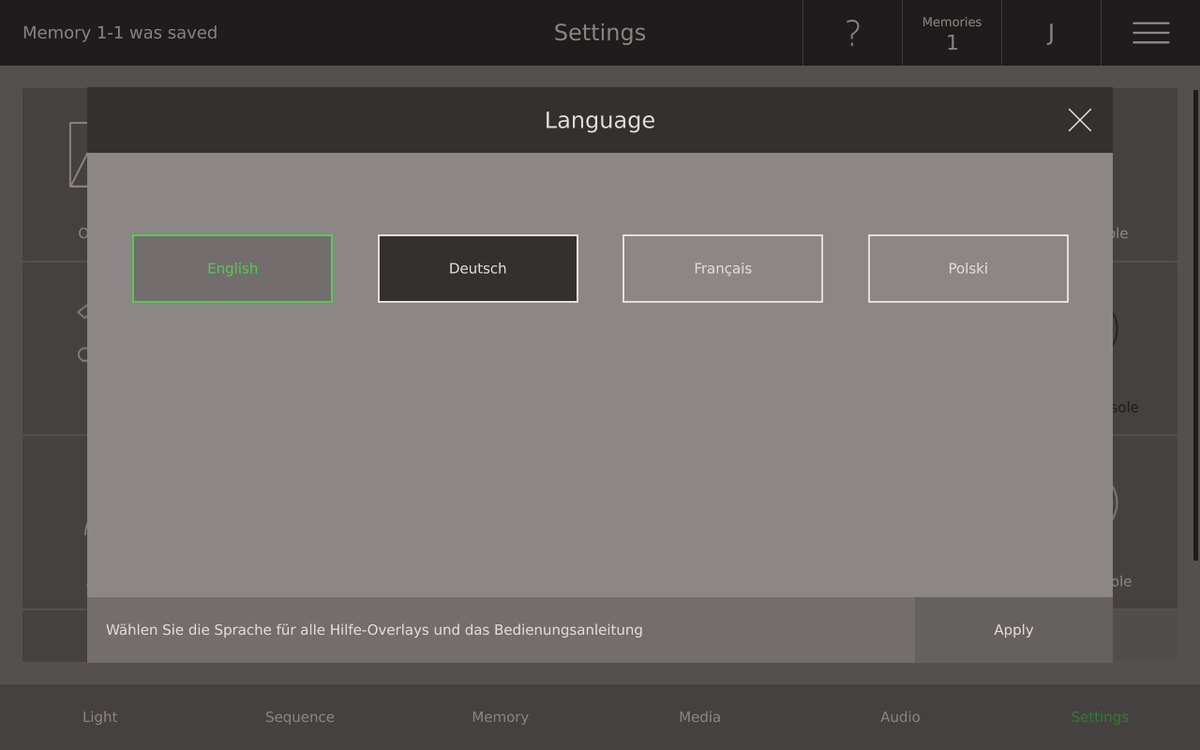
To get the help you need, right where you need it and in your own language, go to Settings View and select Language and enable the language you want.
By default all the help overlays will be in English. Purchase or subscribe to a Language module, to be able to view the help overlays in that language on to the console.
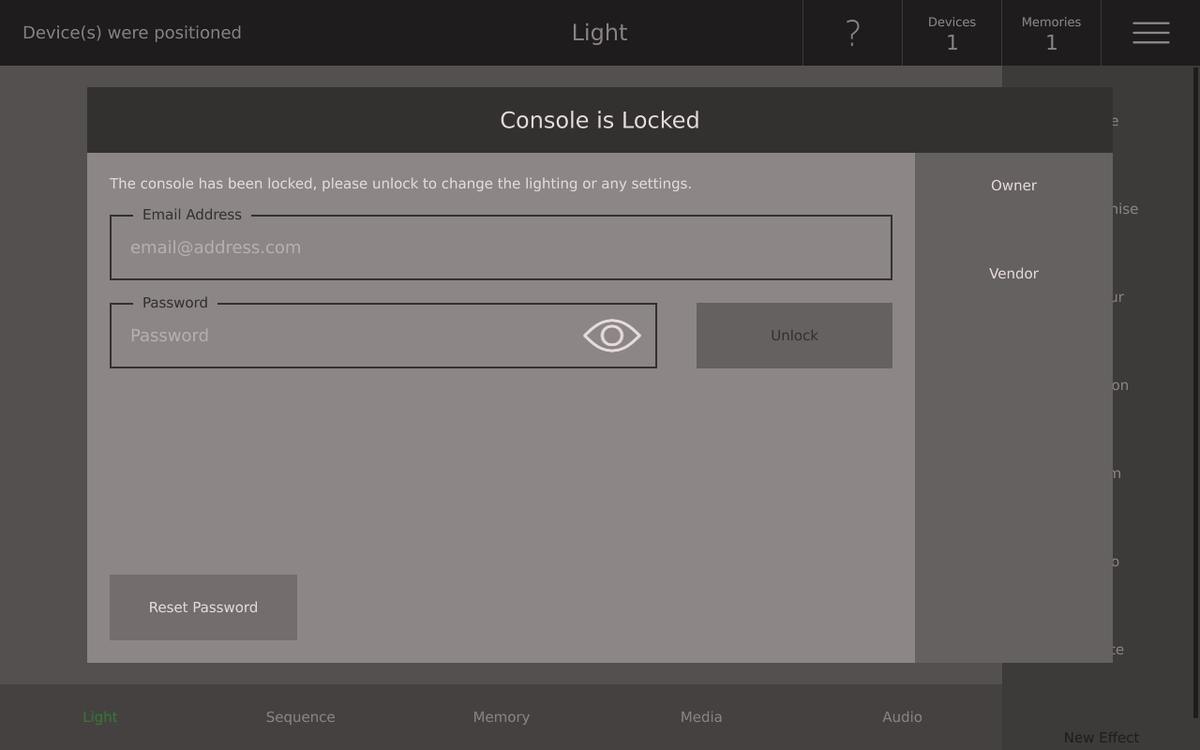
If you have to leave the console alone for a while and you want to make sure nobody changes anything they shouldn't, then go to Settings View and select Lock Console. When the console is locked, the touch screen is blocked, all buttons and faders are disabled, however the DMX will continue to output constantly. Any user can easily unlock the console by selecting their account and using their password, just as when signing into settings.
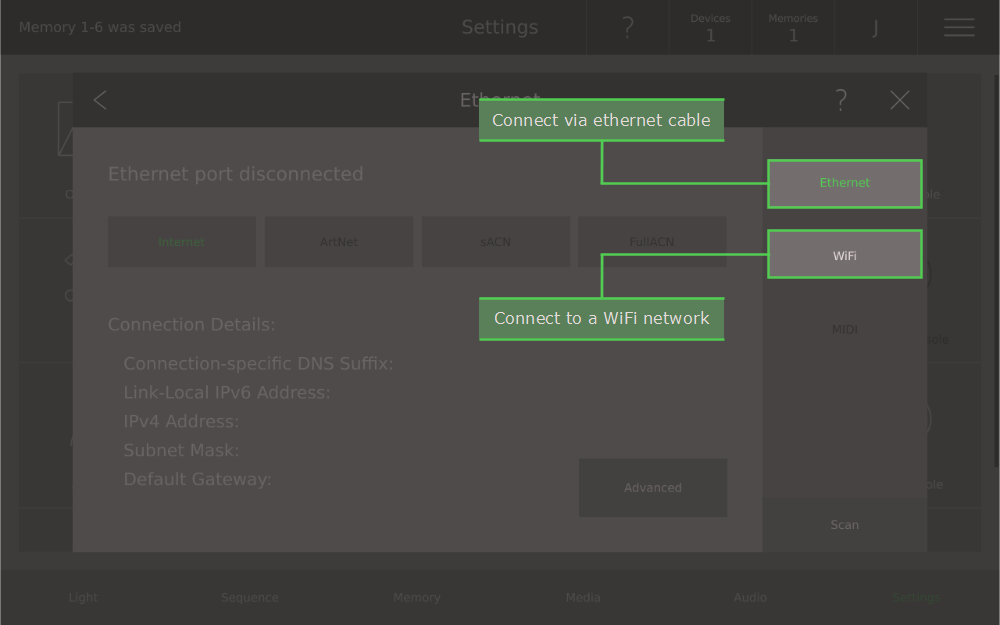
Select Network to connect to a WiFi network, set a static ip-address or setup ArtNet. You can connect the console to rayconsole.com via an Ethernet cable or using WiFi.
To connect to rayconsole.com via an Ethernet cable, simply plug the cable into the back of the console (labeled Ethernet). The console should connect automatically. You can check the connection by going to Settings View / Network / Ethernet where you will see the IP-address listed and the green pulsating dot if connected. If required, you can also set a static IP-address by selecting Advanced, then Static and entering the relevant details.
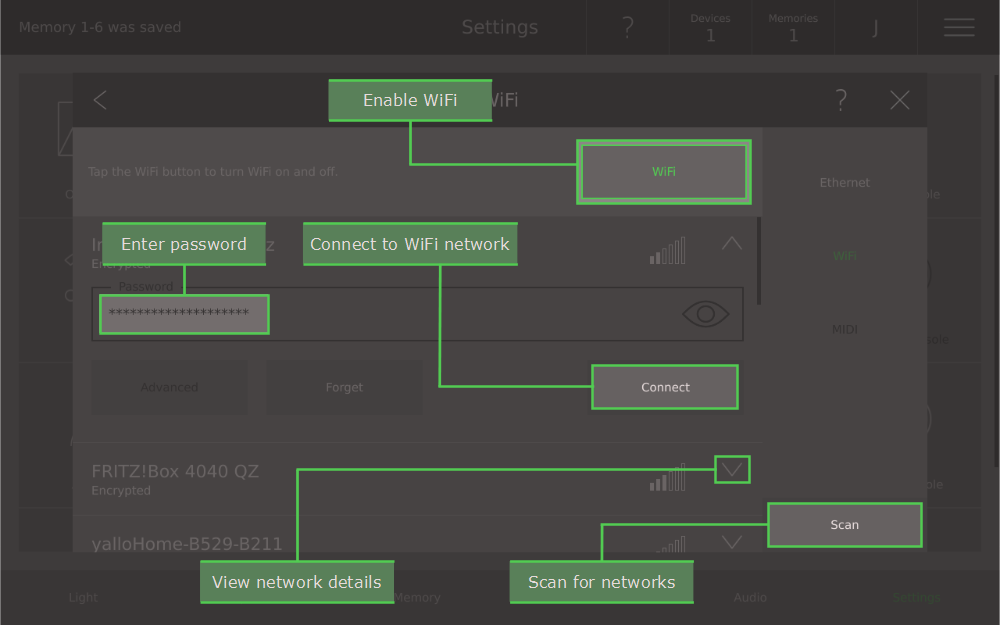
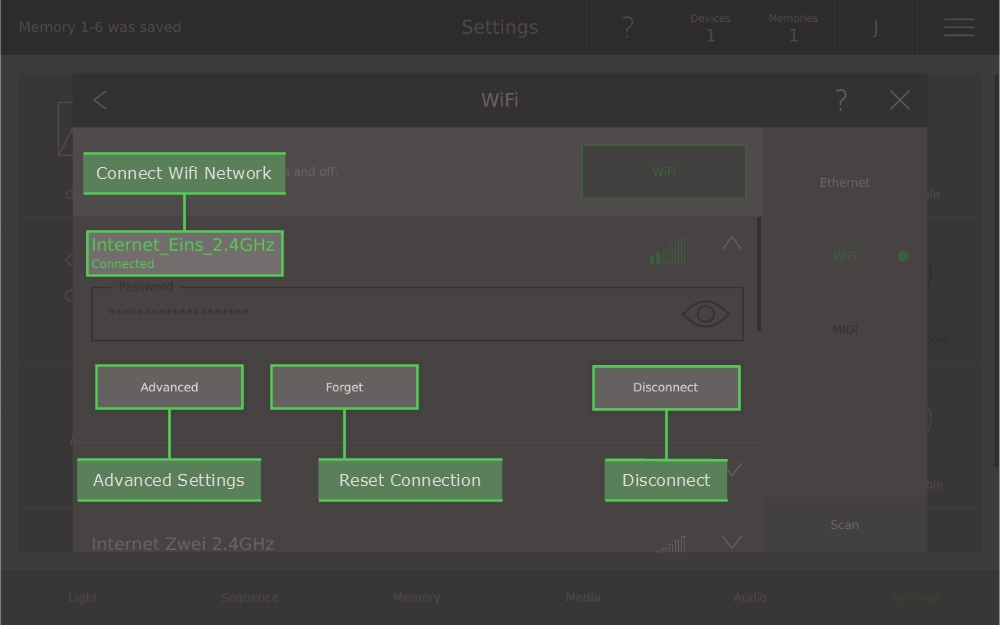
To connect to rayconsole.com using WiFi, go to Settings / Network / WiFi. To turn on WiFi tap the WiFi button, which turns the button text green and scans for available networks. Next select the network with which you wish to connect, enter the network password (if necessary) and select connect. The name of the connected WiFi network will go green and a pulsating dot will appear next to WiFi on the right hand menu. If required, you can also set a static IP-address by selecting Advanced, then Static and entering the relevant details.
NOTE: It is not possible to connect to enterprise networks that require both a username and password to connect. Please contact info@rayconsole.com for more information.
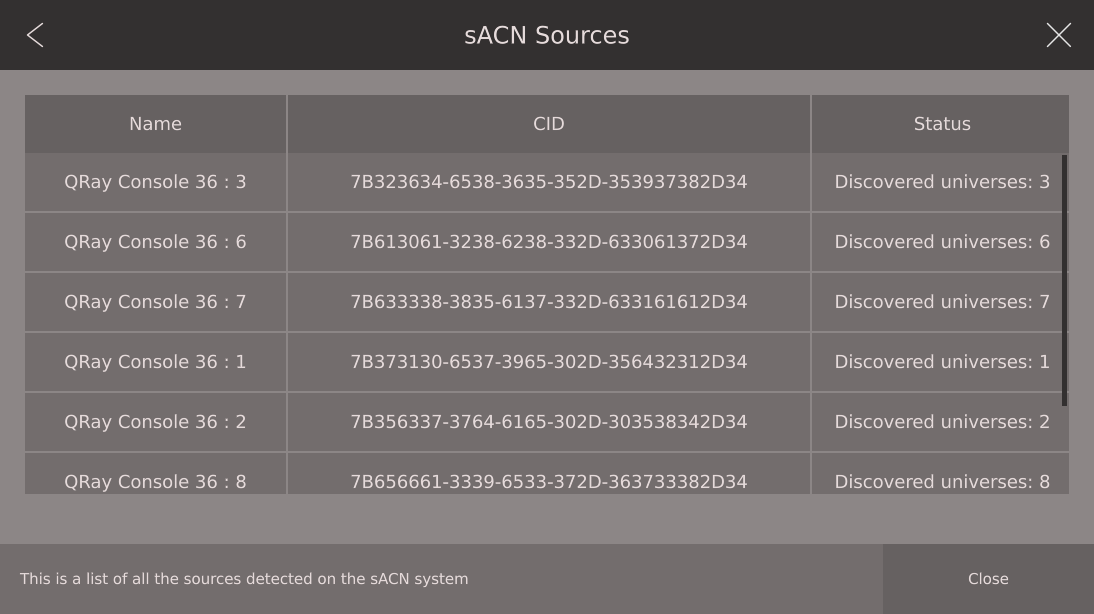
There is a great way to expand your system and make use of DMX Universes 3-8 by by ArtNet or sACN using the Ethernet port.
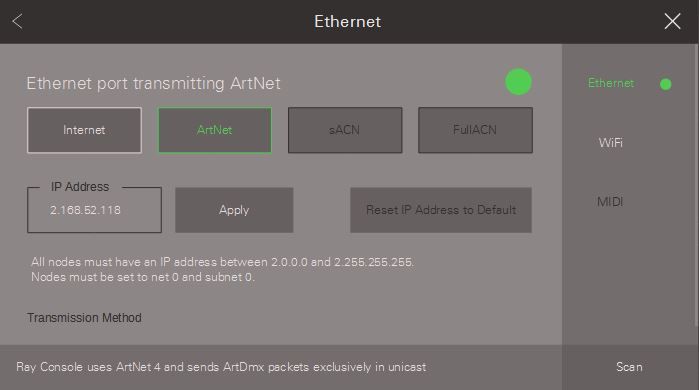
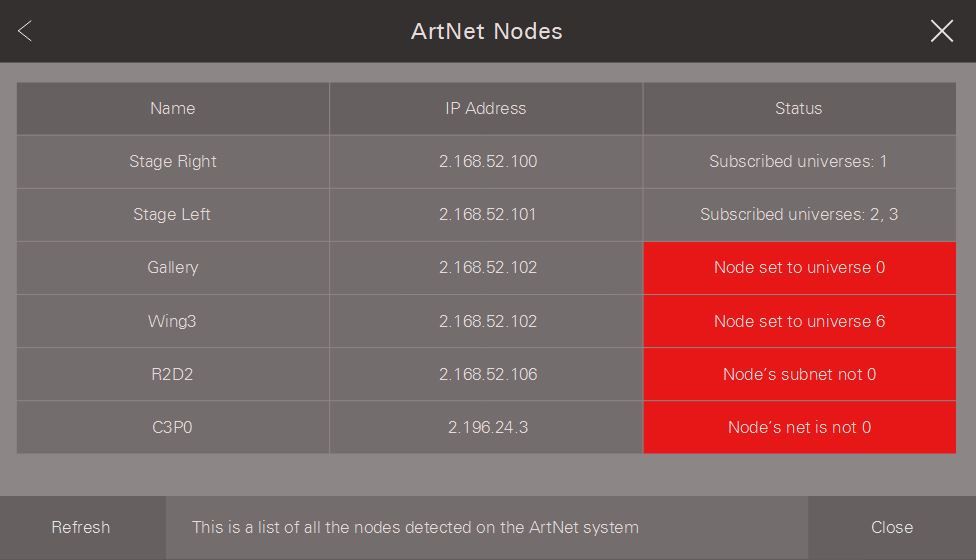
What is ArtNet?
ArtNet is a way to transmit multiple DMX universes using one single ethernet cable. More specifically, it is an ethernet protocol based on the IP protocol suite (used for connecting to the internet). Its purpose is to allow transfer of large amounts of DMX512 data over a wide area using standard networking technology. The console can send ArtNet directly from its Ethernet port, however most devices only receive DMX512 via a XLR connector, so you will need ArtNet Nodes (also known as ArtNet Gates) or to convert ArtNet back to classic DMX512.
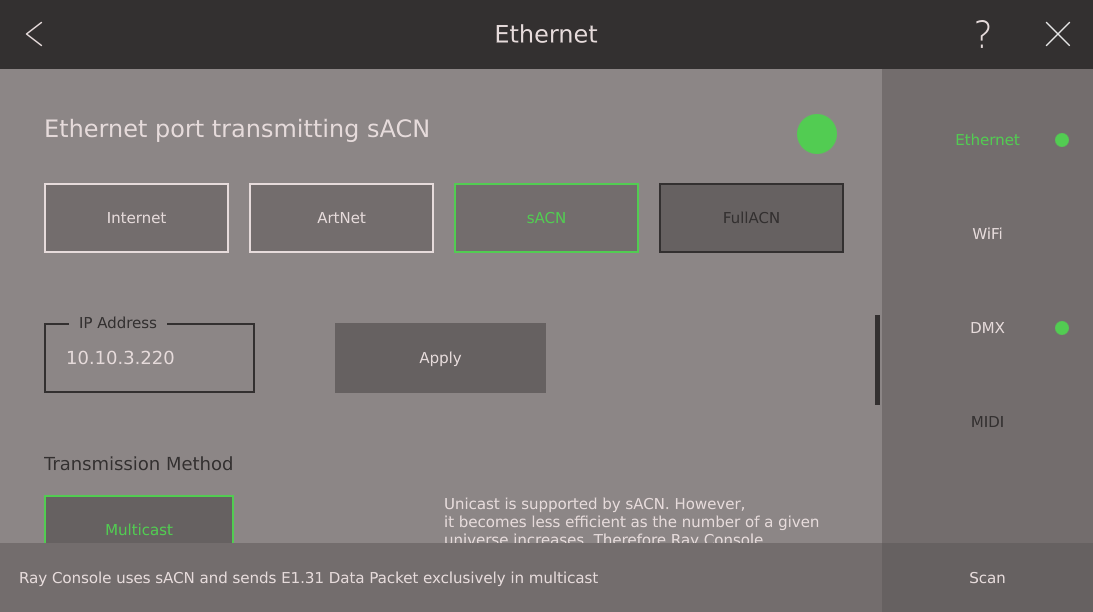
What is sACN?
sACN is a standard to transfer DMX512-A [DMX] packets over a TCP/IP network using a subset of the ACN protocol suite via one single ethernet cable. Its purpose is to allow transfer of large amounts of DMX512 data over a wide area using standard networking technology. The console can send sACN directly from its Ethernet port, however most devices only receive DMX512 via a XLR connector, so you will need sACN Nodes or to convert sACN back to classic DMX512.
Please be aware that you either need the ArtNet-Module or the sACN-Module to use these functions.
All the details about patching can be found in Patching, located earlier in this manual.


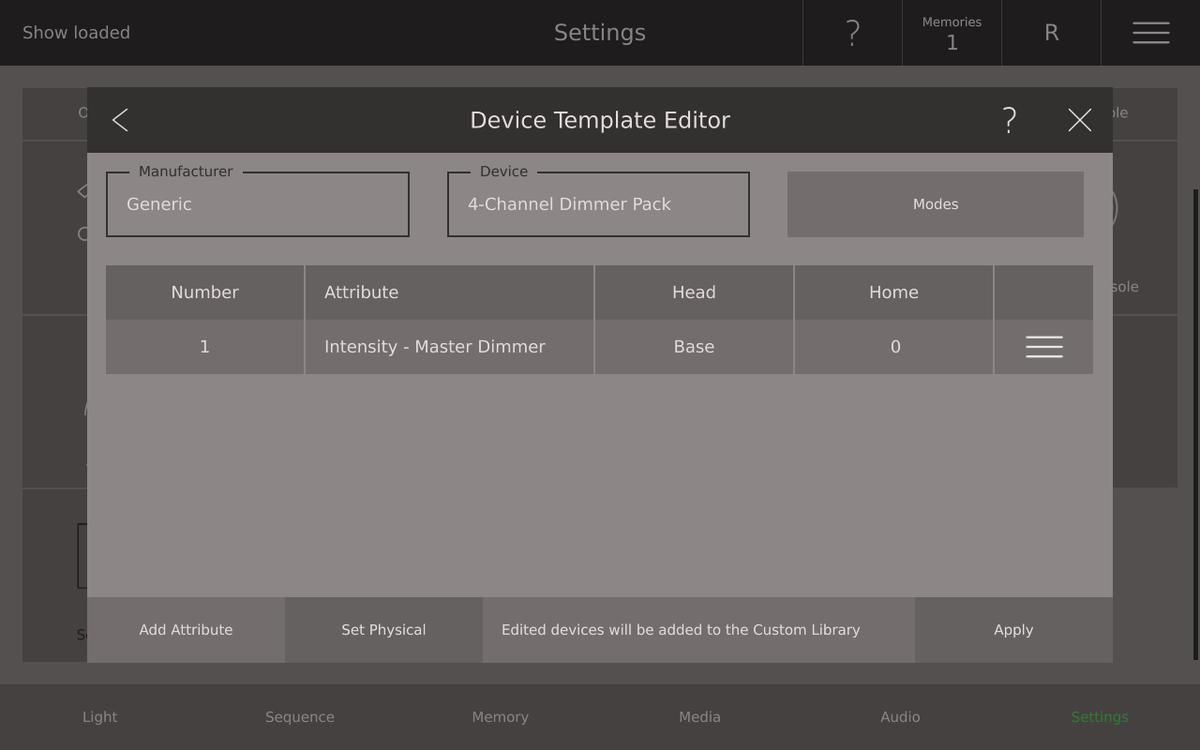
You buy a new device for your venue, it's new on the market and not yet in Ray Consoles Device Template Library. Or you made a really good deal with an old not very usual device and can't find it in Ray Consoles Device Template Library. You're already experienced with lighting control and don't have time to wait for others to implement the device into the library. Then just create the device template on your own, on your Ray Console with the Device Template Editor.
Please be aware that you have the Devices Manual and DMX Chart right next to you while creating a new Device Template.
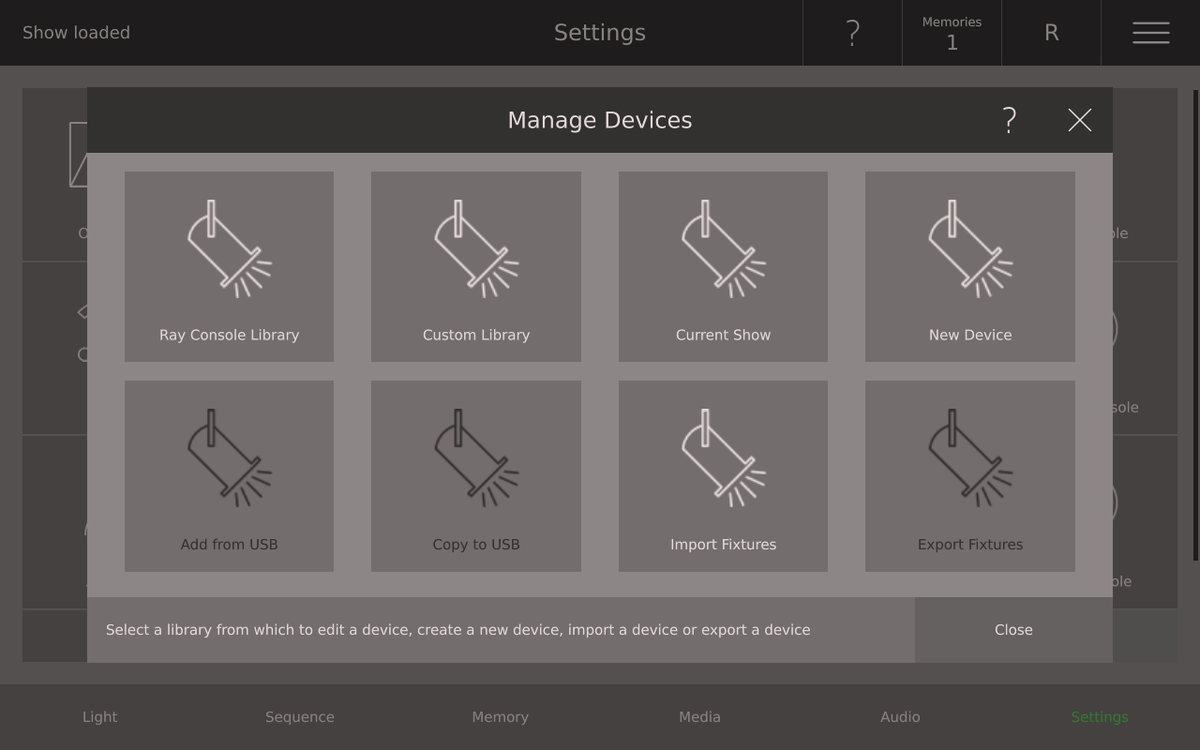
Go to Settings View/New Device/Manage Devices
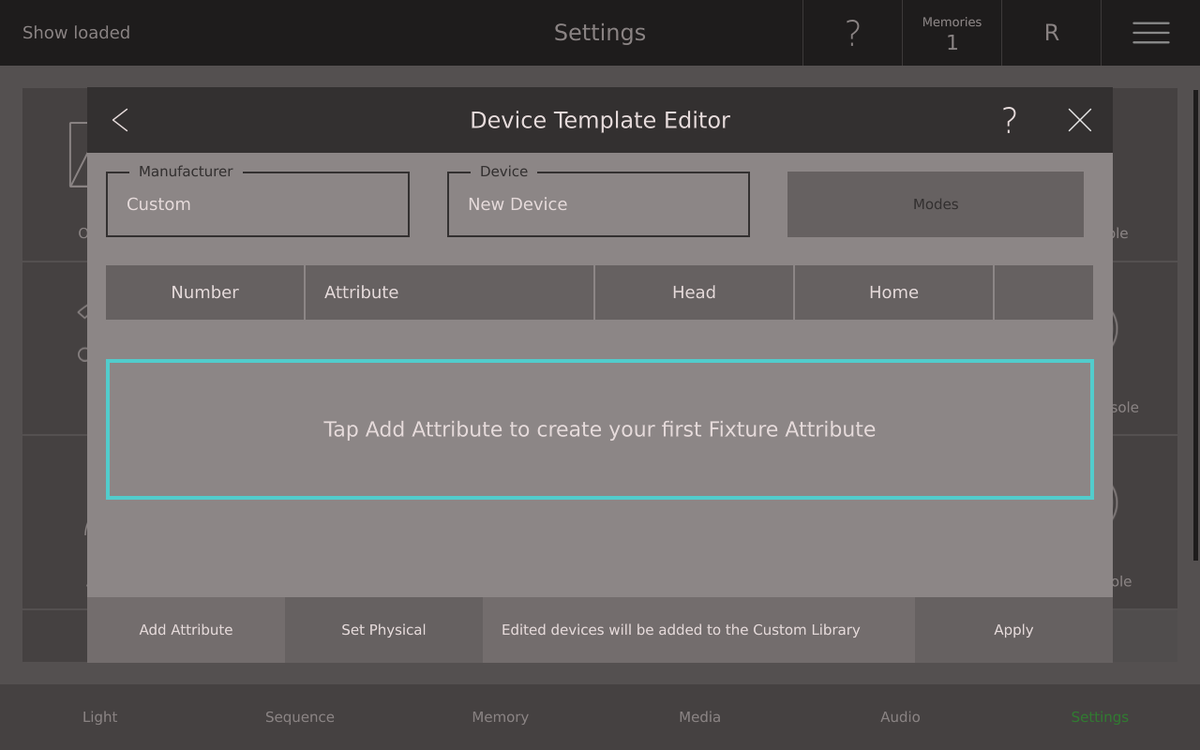
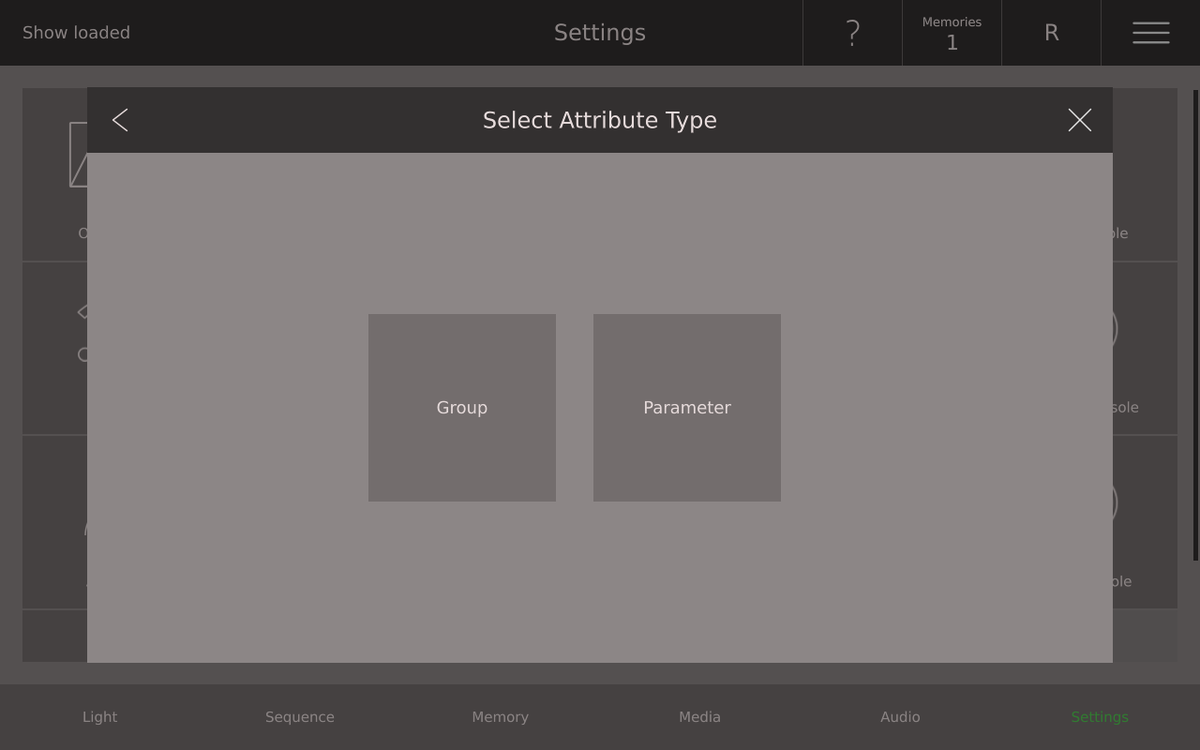
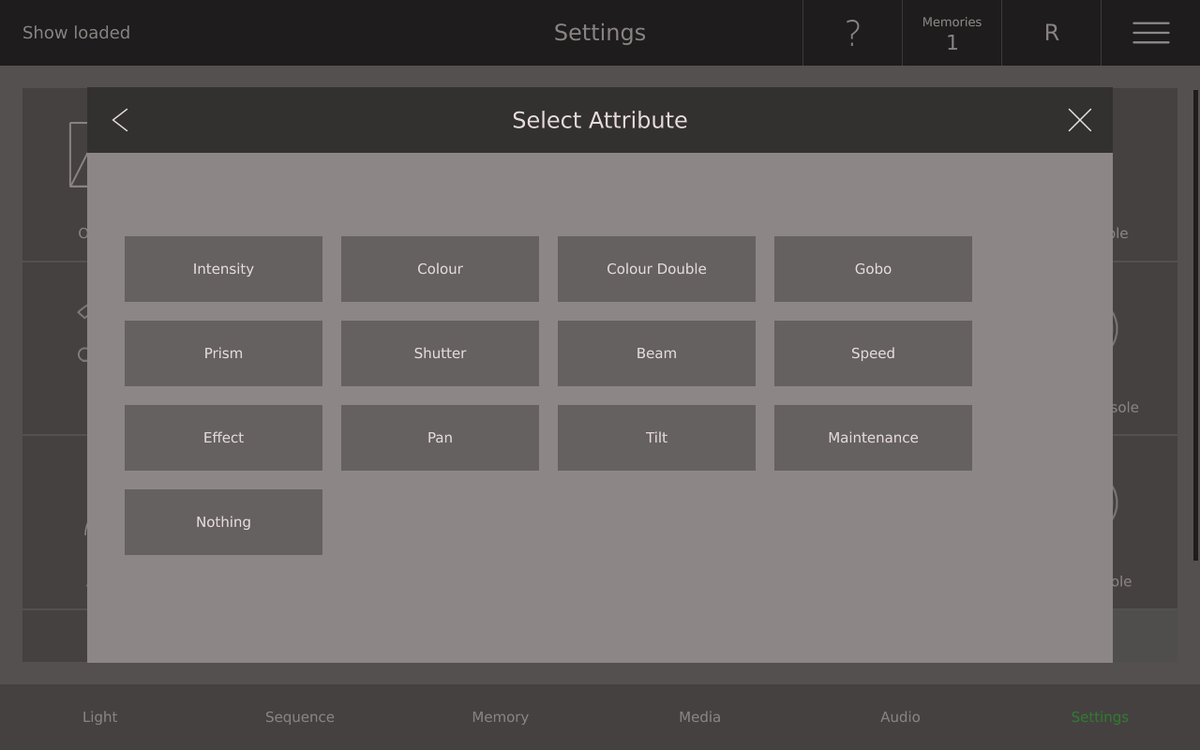
Then choose New Device and the Device Template Editor Dialogue opens. First you can edit the Manufactureres and Devices Name. Next Step is to set Attributes, these are the DMX-channels. You can choose between Group Attributes and Parameter Attributes. Set all the attributes the device has.
Afterwards you set the Physical Properties. These Informations you can normally find on the first pages of a devices manual.
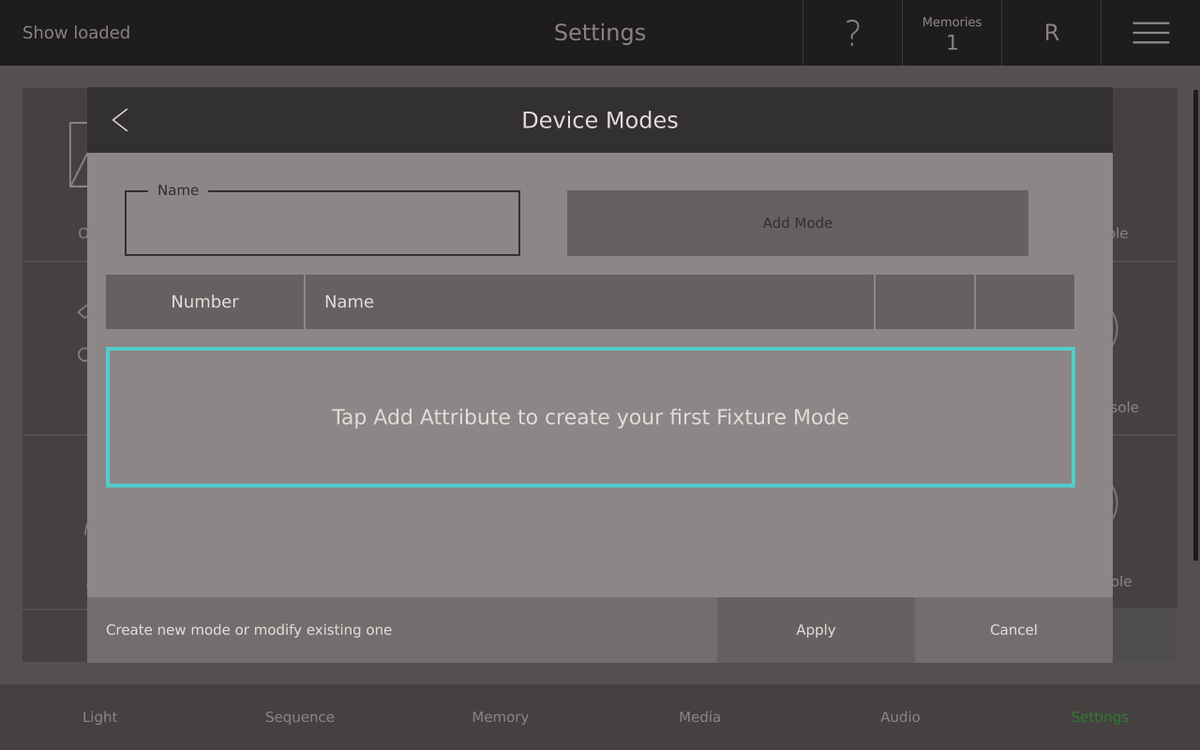
Now tap on Modes on the right side above. The Modes Dialogue opens.
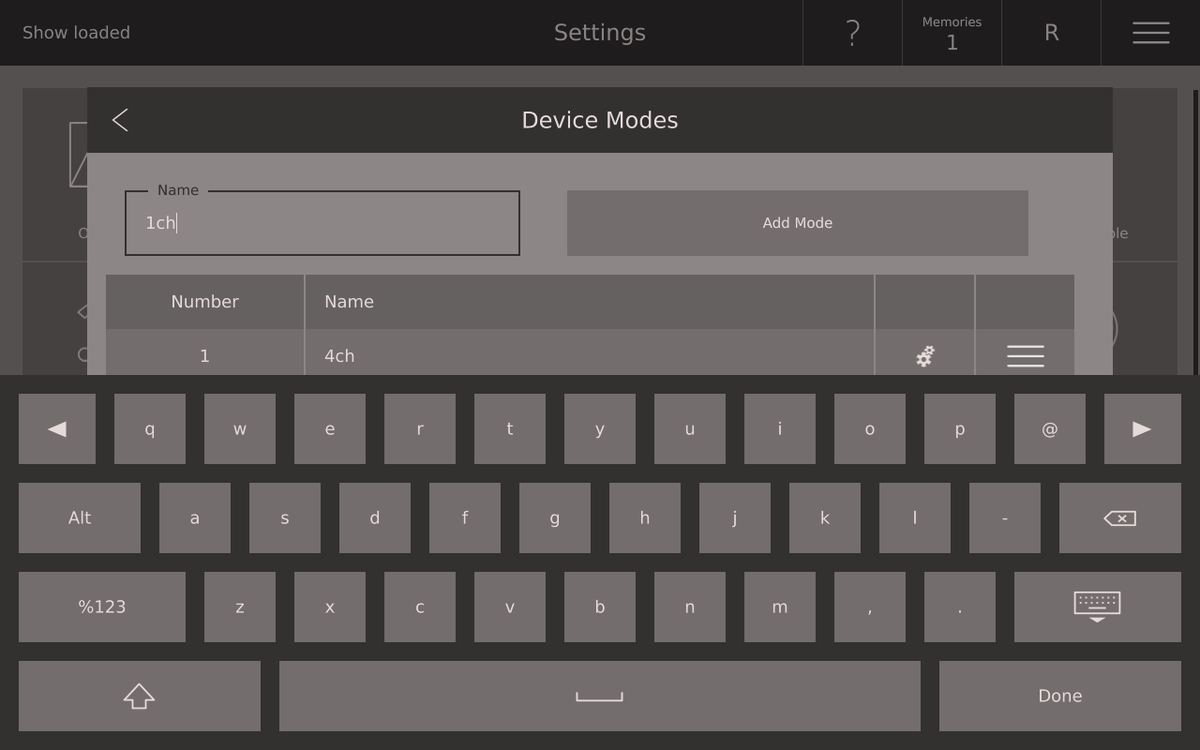
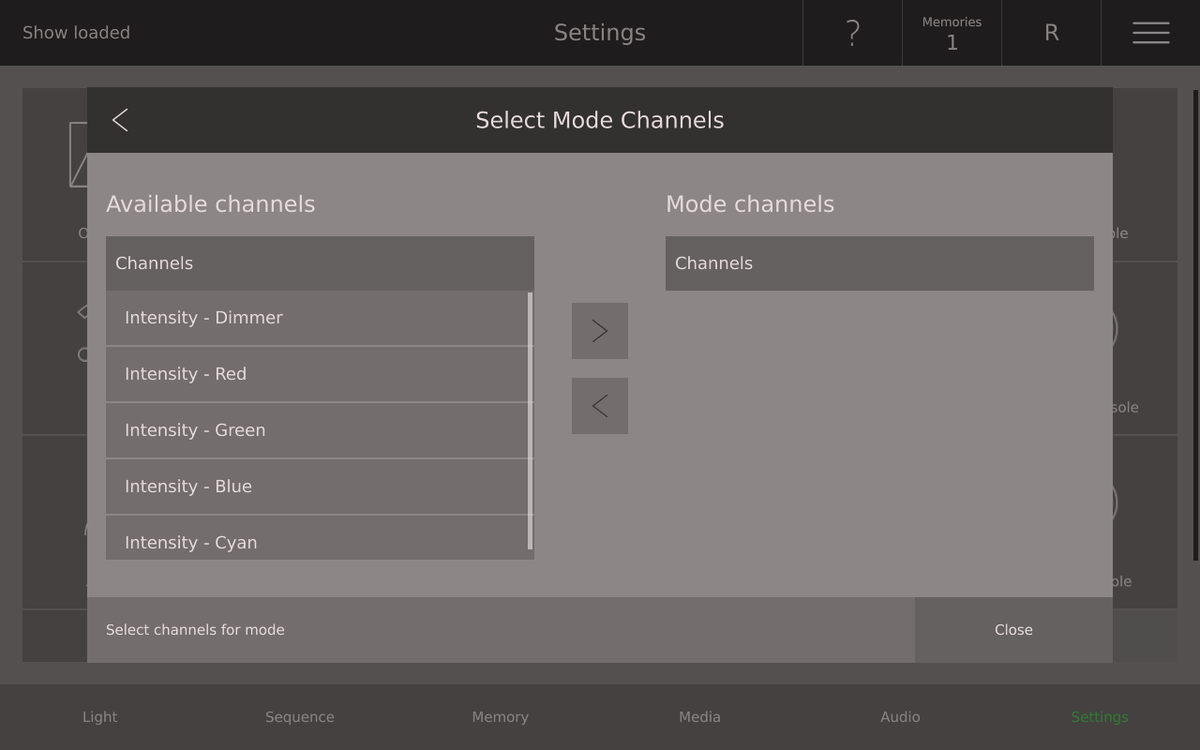
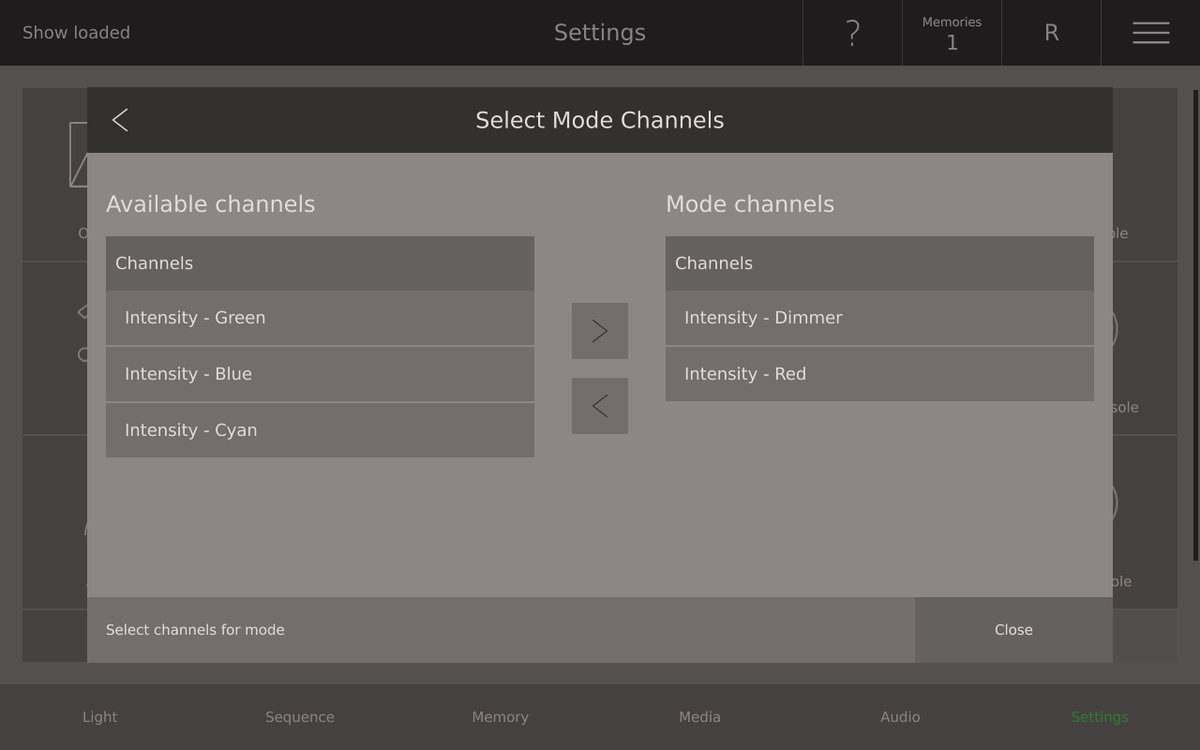
Give the mode a name and tap on Add Mode. The Select Mode Channels Dialogue opens.
Now you add all the attributes required in that mode. Please doublecheck with the Devices Manual. When you're done close the dialogue.
Repeat this for all possible modes.
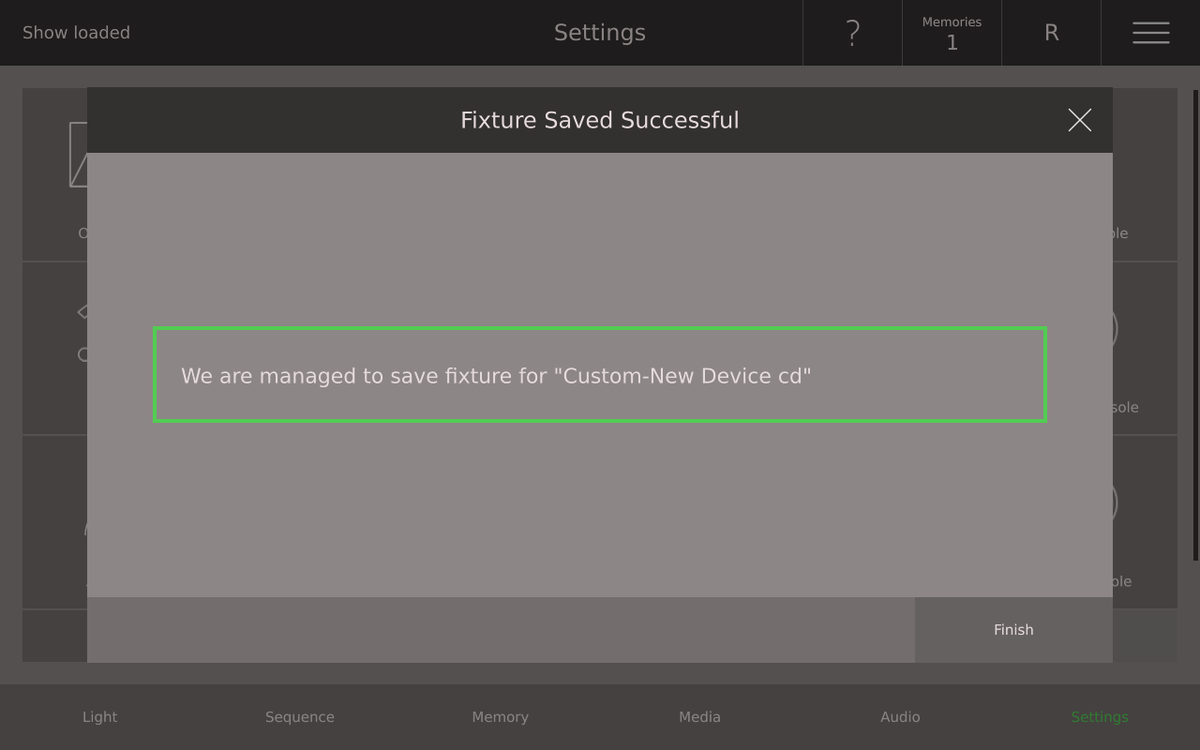
Then tap on Apply in the Device Template Editor Dialogue. Your Device is now successfully saved in the Custom Library on your Ray Console.
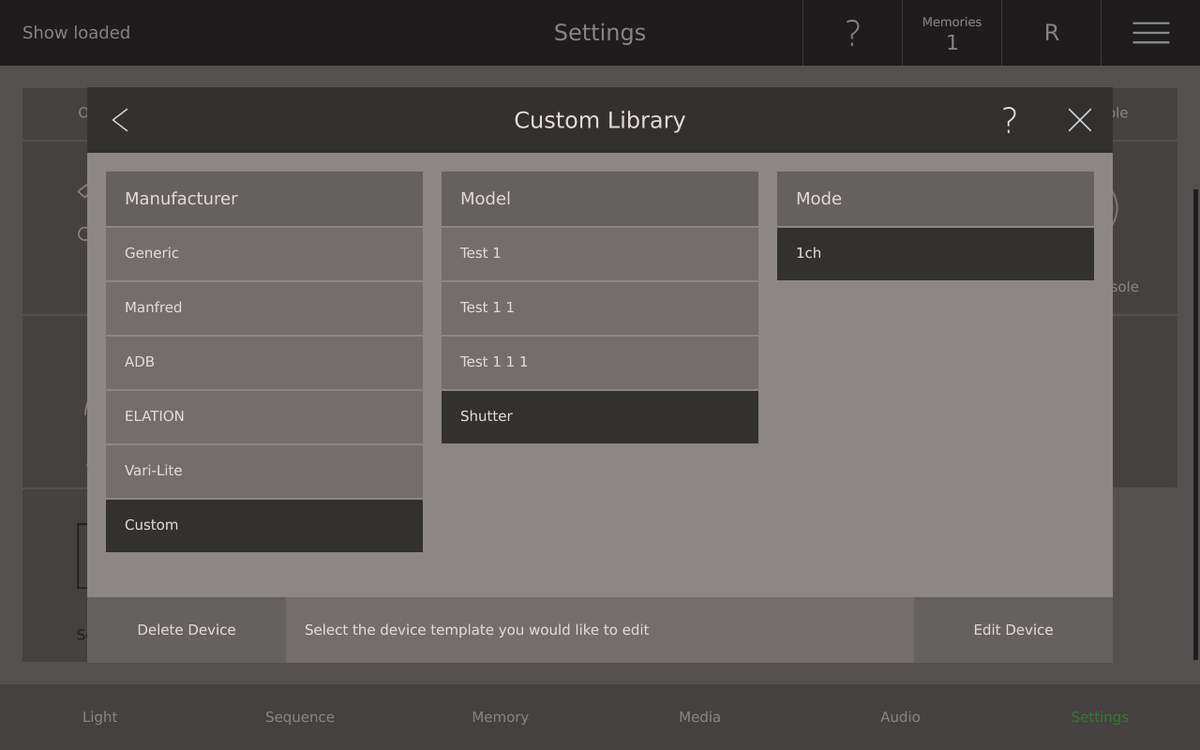
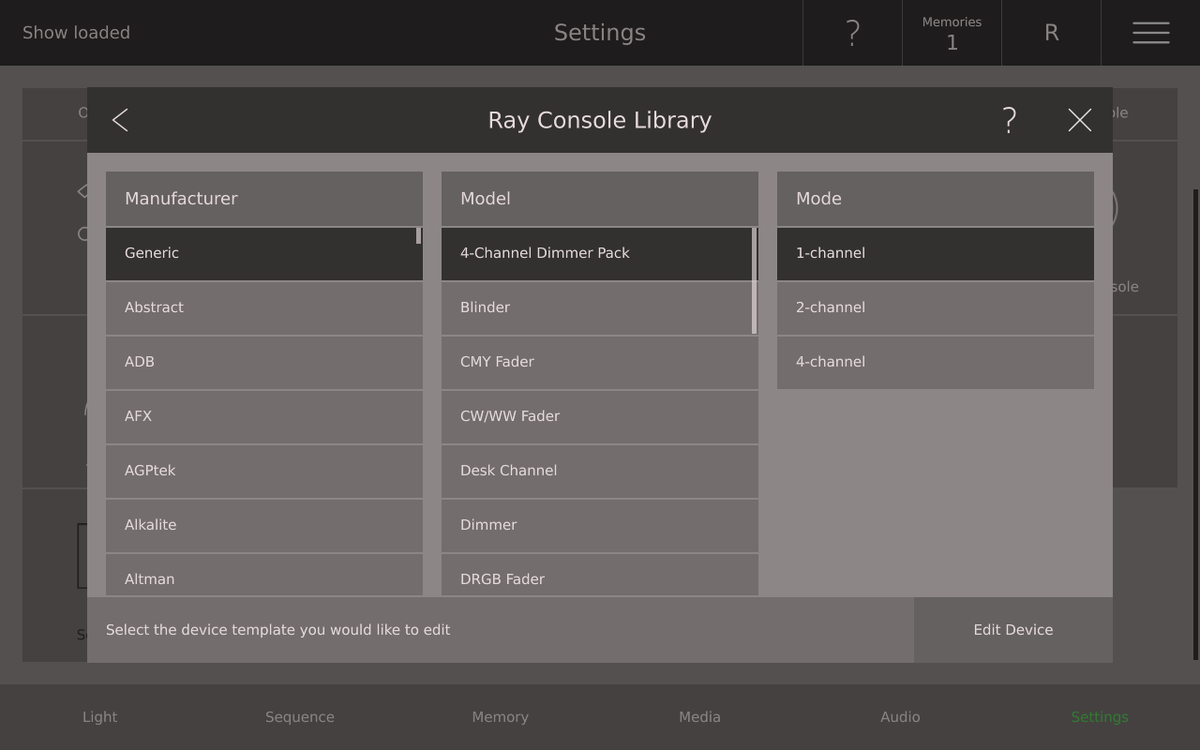
On your Ray Console you can find two Device Libraries. The Ray Console Library comes as default and the Custom Library, where you're created or imported device templates are saved.
Maybe you created or imported a device template and recognize that there is something wrong. Or in Ray Consoles Library you meet something strange between reality of your device and the template. It is possible to edit a device template, this is possible in both libraries. Simply tap on Edit on the right down corner of the Library Dialogue. The Device Template Editor Dialogue opens and you can edit your device template like described in Create a new device.
All edited devices are saved with the same name in the Custom Library. You don't overwrite the existing template, it still exits in the Ray Console Library.
If you edit a device in the Custom Library, it will get an automatic new name, if you don't change the name. You don't overwrite the existing template, it still exits in the Custom Library.
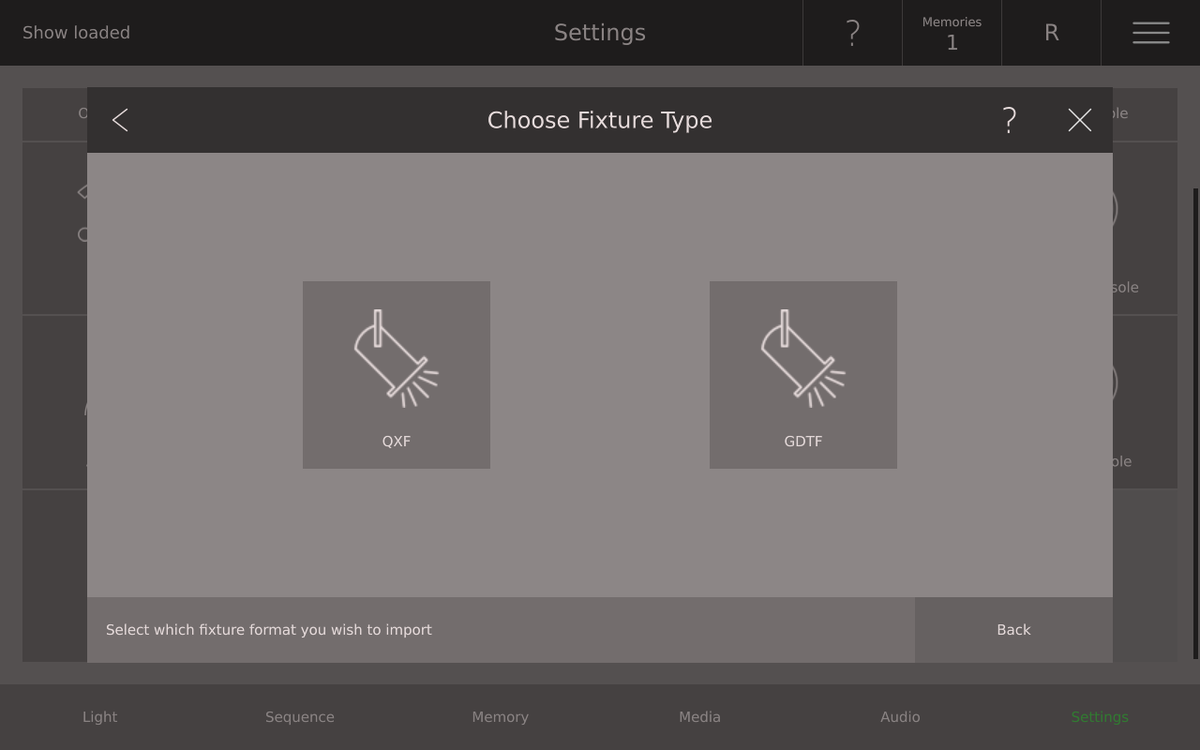

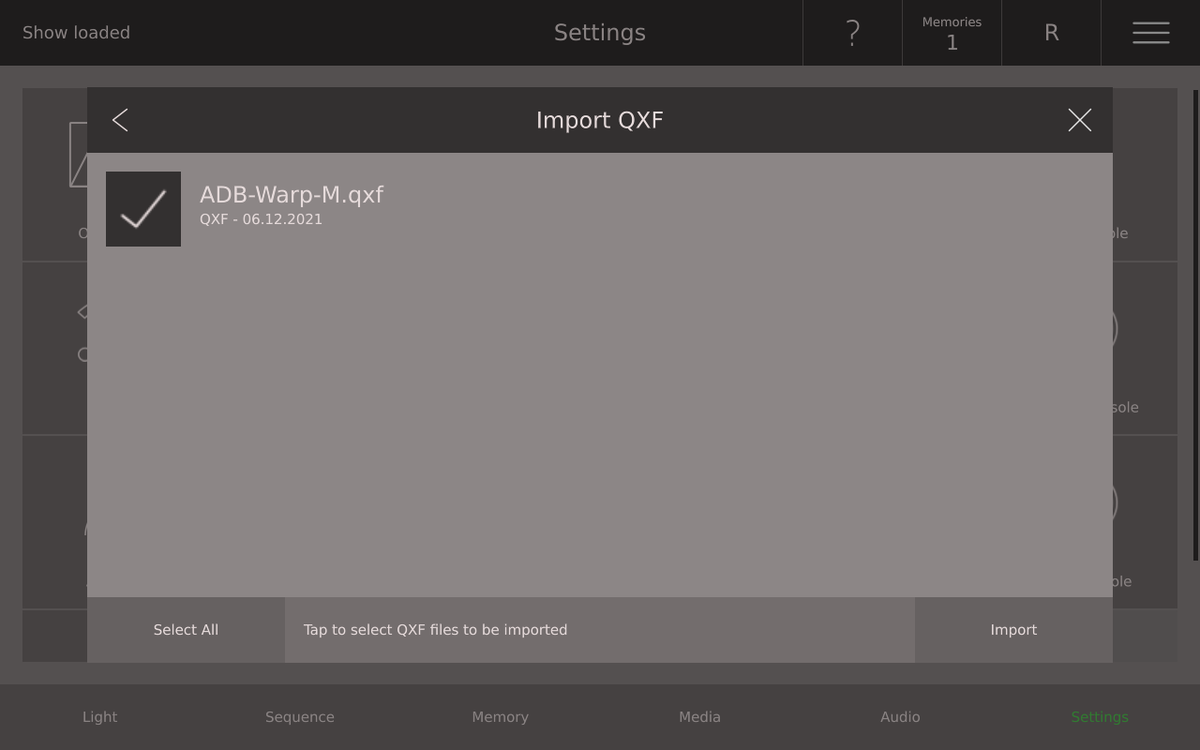

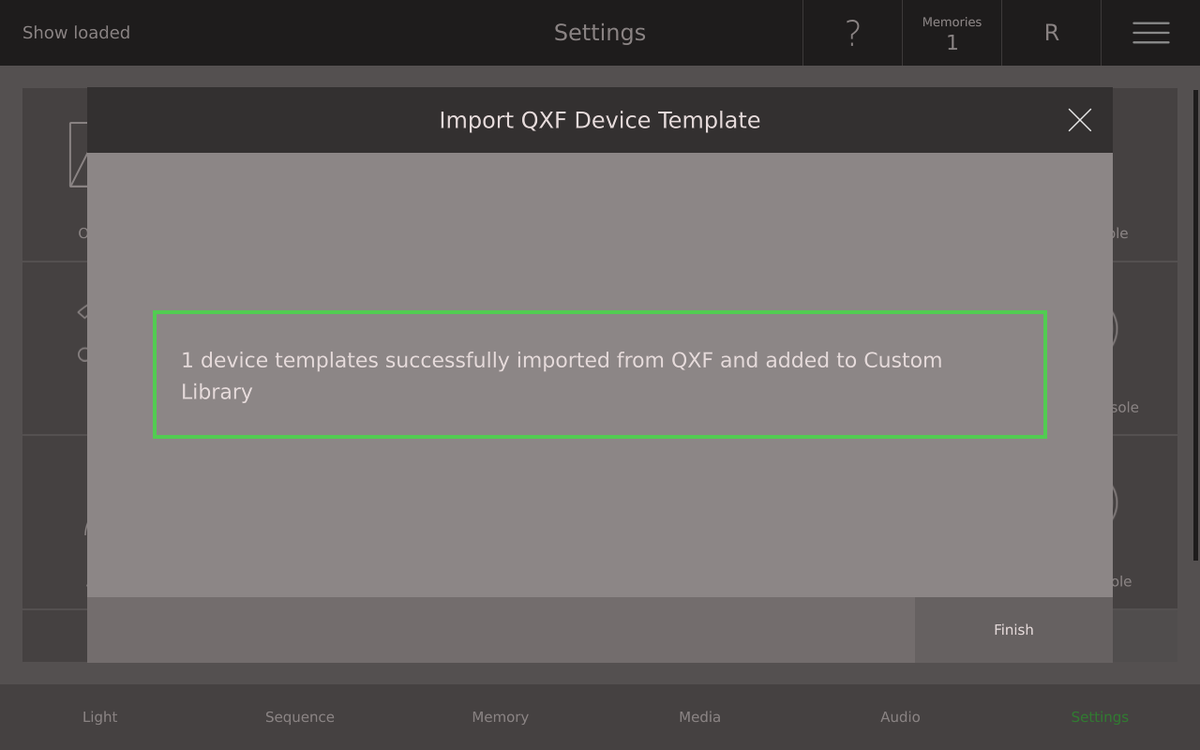
To get a new device template into your library, there is another easy way. Just import existing .qxf oder .gdtf files from your USB Drive.
Plug in your USB Drive, go to the Settings View, tap on New Device/Manage Devices/Import Devices.
Afterwards choose your Device Type: QXF or GDTF
All available files on your USB Drive are now listed in the Import Dialogue. Choose the one you wish to import or select all. Tap on Import. You can find the imported devices in the Custom Library.
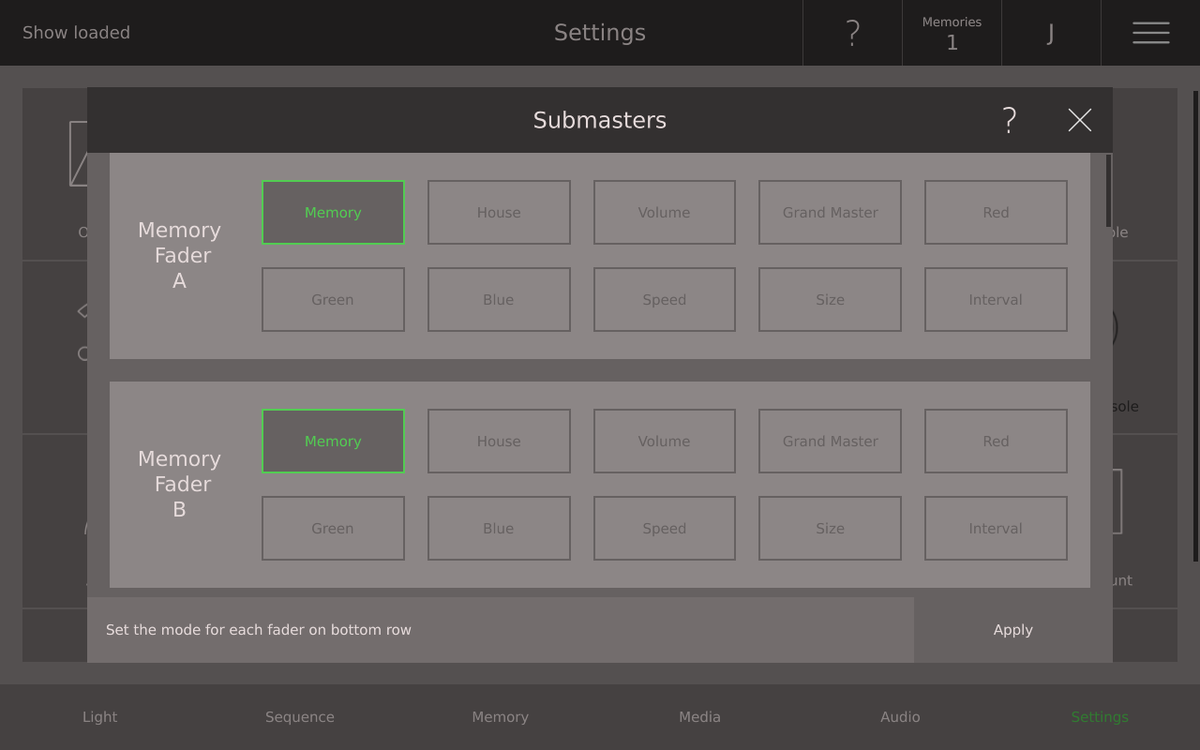
It is possible to assign certain special functions to memory faders called submasters. When this is done, all memories for a given memory fader are blocked across all memory fader pages until the submaster is removed again. To use the submasters, the relevant module must be enabled. The available submaster functions are:
Memory: The default mode, where a memory can be saved on each page
House: Whatever is currently saved to that memory fader on the current page is locked and cannot be changed while the House submaster function is set. When the console output is saved, the output from this memory is not saved
Grand Master: The fader is a grand master for the intensity of all devices on the console.
Volume: The fader acts as a volume controller for media, the button as play/pause
Audio: The fader acts as a volume controller for a connected audio device, the button as mute/unmute
Red: Red control for all RGBW lights
Green: Green control for all RGBW lights
Blue: Blue control for all RGBW lights
Speed: Controls the speed of all applicable effects running on the console
Size: Sets the size of all applicable effects running on the console
Sequence: An extra sequence can be created on the memory fader
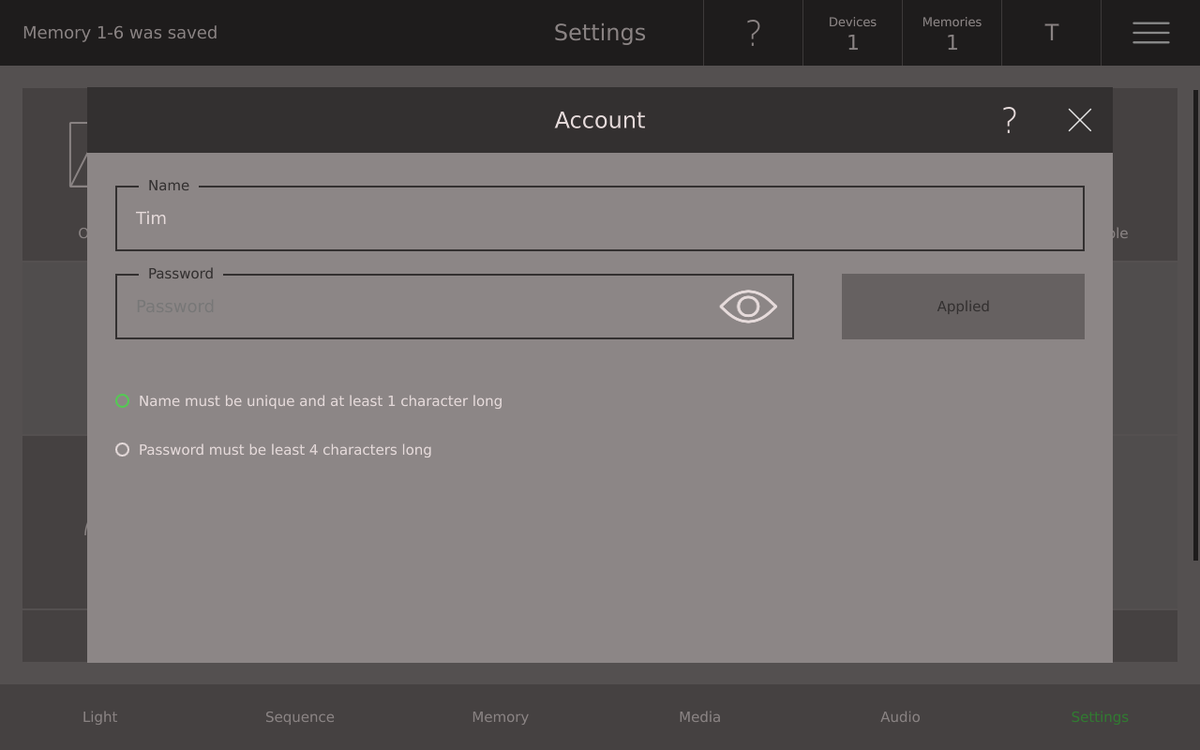
In accounts you can change your password and manage user accounts. What is possible depends if you are signed into settings as a user or as the owner (see below).
When signed in as a user, you can change your password in settings by selecting Settings View / Accounts, entering a new name or password and pressing Apply.
When signed in as the owner you can both change your password and manage the console user accounts.
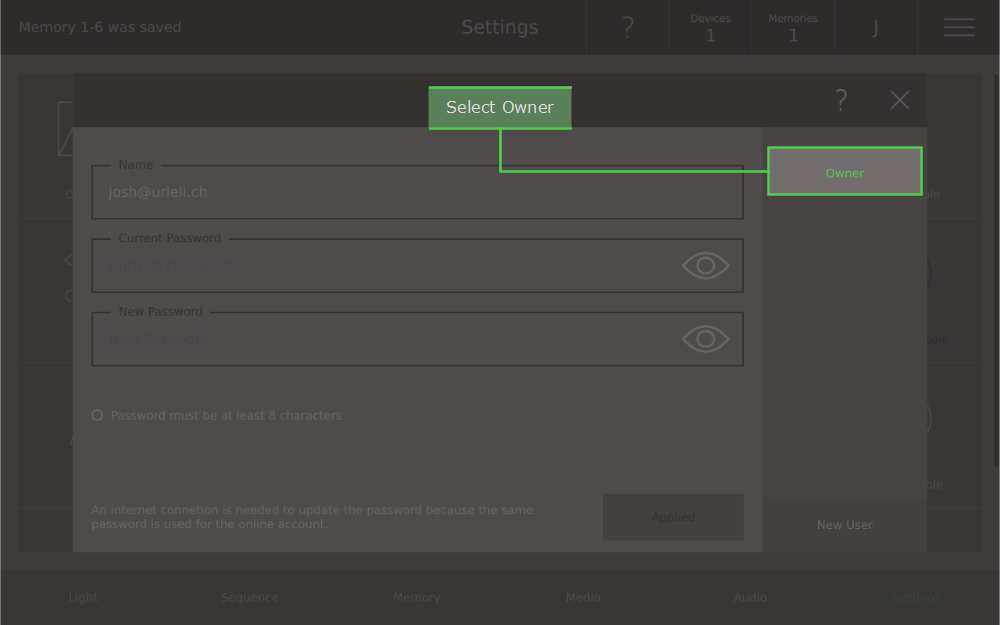
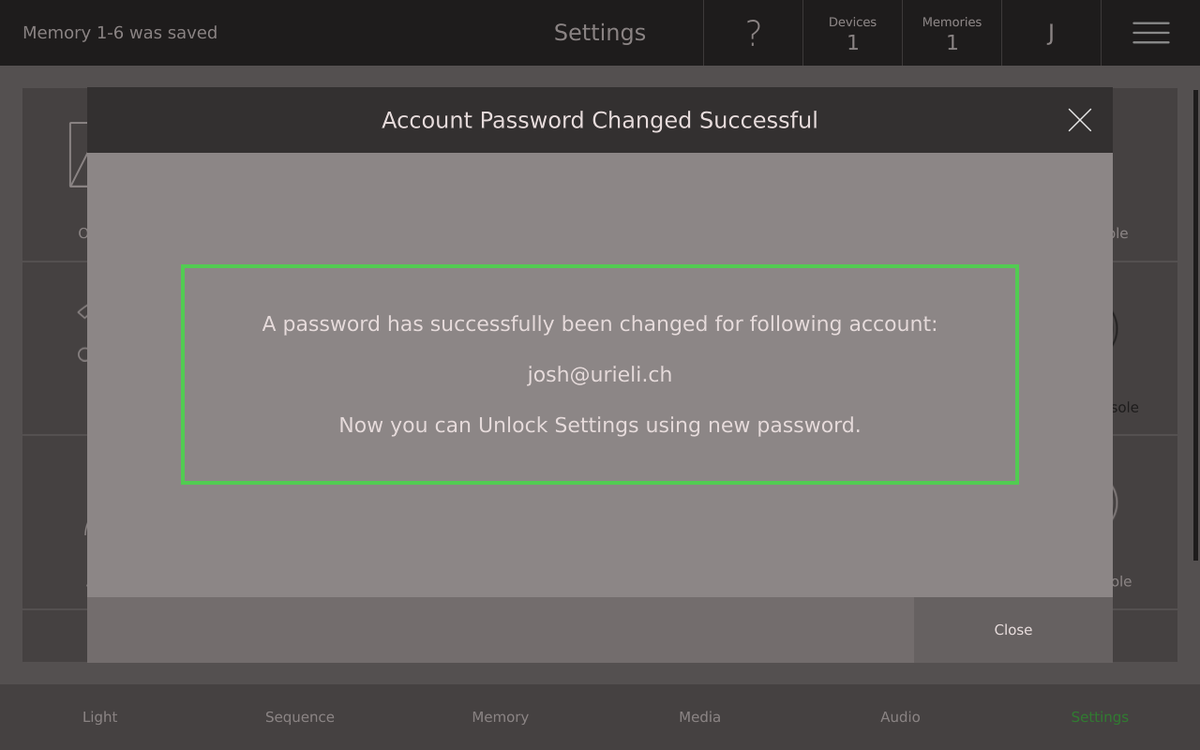
To change your password, select Settings View / Accounts and then Owner. Here you can change the name and password. To change a password the console must be connected to the internet as the password will also be updated on rayconsole.com.
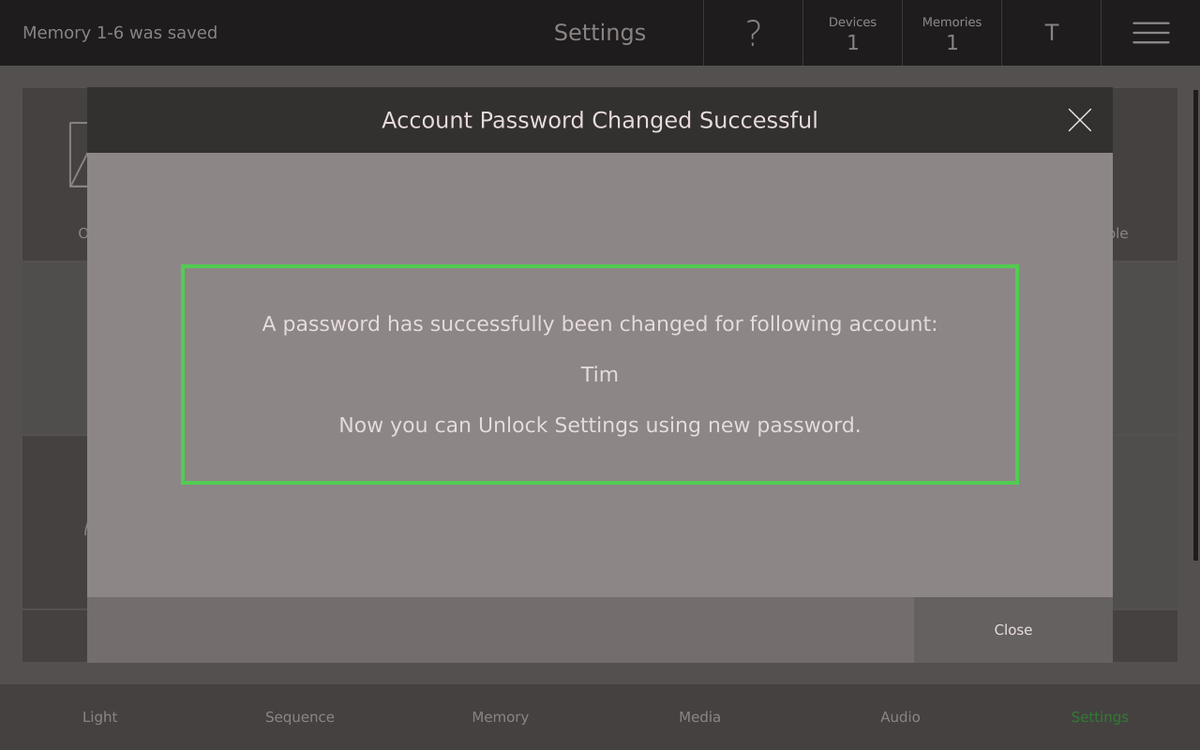
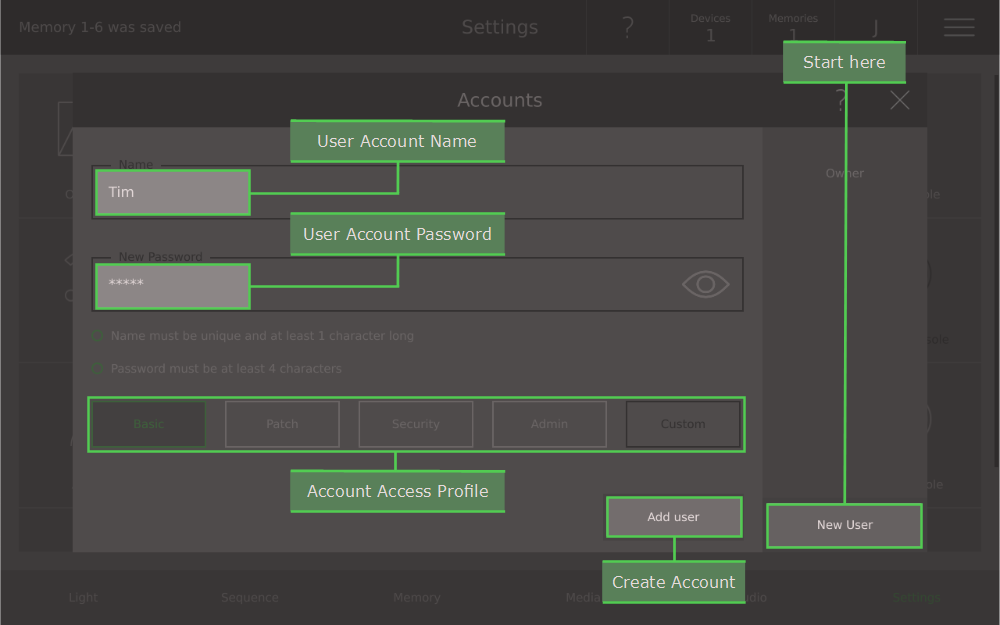
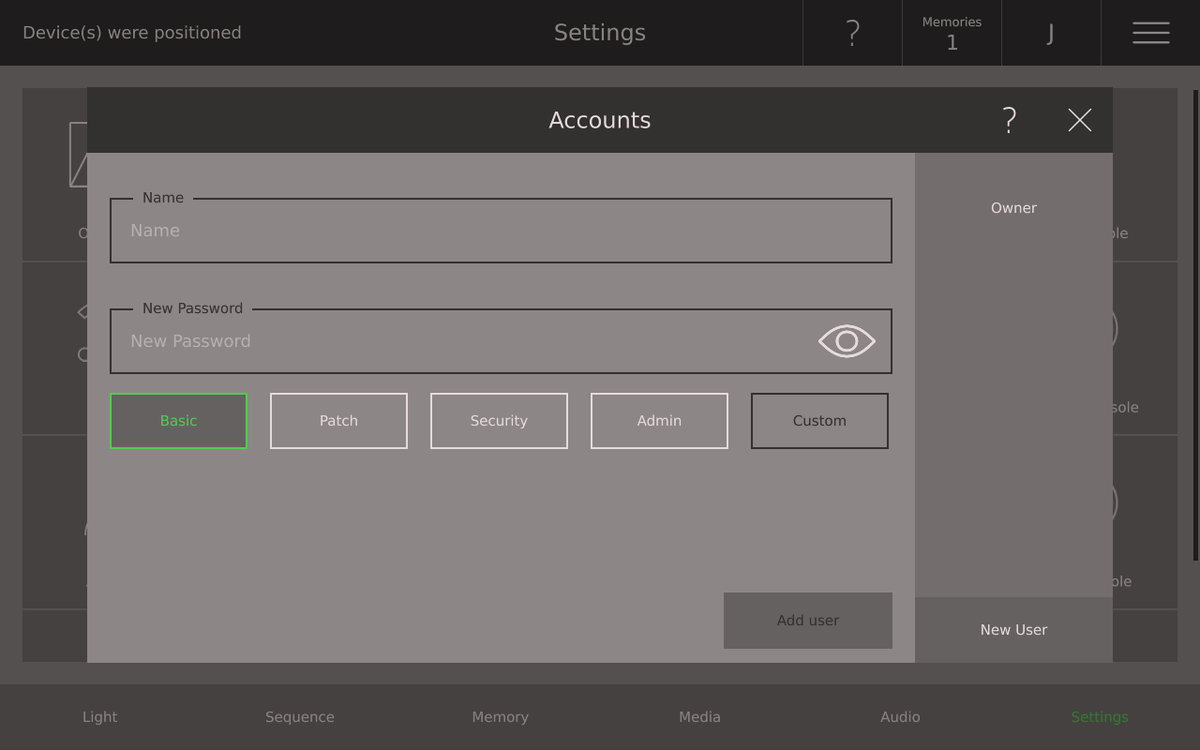
To create a new user, select New User, then give them a name, password and settings access profile, then press Add User. Selecting the user's name on the right hand side shows you the user's settings account details and gives you the options to change anything or delete the account.
The console owner has an account on rayconsole.com that contains one or more consoles. This means that the rayconsole.com account holder is the owner of these consoles. On the consoles themselves, the owner can sign into the settings area using their rayconsole.com account username and password. When signed into settings, the owner has speical administrator controls. The owner can add and remove user accounts (see below) as well resetting the console to factory settings. If the owner forgets their password, they must enter a code received via email to reset their password.
The console owner account can make user accounts. User accounts only exist on the console and are not synced with rayconsole.com. The owner assigns a name, password and a settings access profile that defines what the user can and can't do. If a user forget their password, the owner can change it for them.
| Feature | Basic | Patch | Security | Admin | Owner | |
| Open Show | X | X | X | X | X | |
| Language | X | X | X | |||
| Time Zone | X | X | X | |||
| External Monitor | X | X | X | X | ||
| Lock Console | X | X | X | X | X | |
| Network | X | X | X | X | ||
| Patch | X | X | X | |||
| New Device | X | X | X | |||
| Submasters | X | X | X | |||
| Restore Console | X | X | ||||
| Account | X | X | X | X | X | |
| My Modules | X | X | X | |||
| Update | X | X | X | |||
| Get Modules | X | |||||
| Reset Account | X | |||||
| About | X | X | X | X | X | |
| Protect Shows | X | X | X | |||
| Support | X | X | X | X | X |
In My Modules you can see and manage your purchased and subscribed modules. All purchased and subscribed modules are listed in Settings / My Modules, select the relevant category and then simply tap the Disabled button to enable them. More details can be found in the Modules section, earlier in this manual
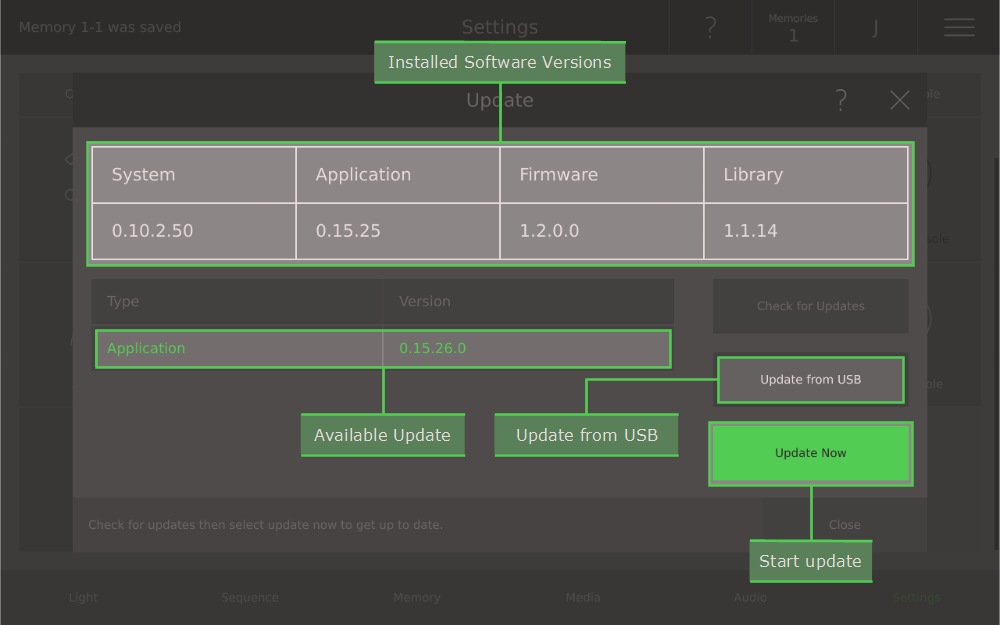
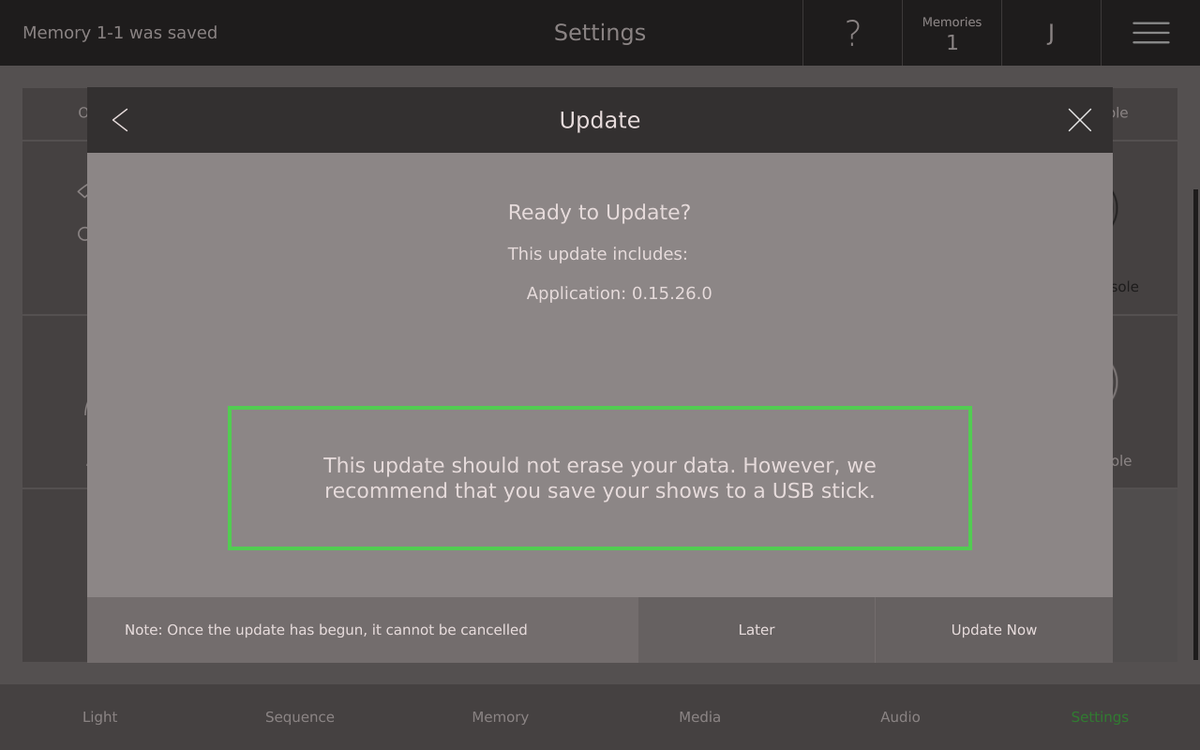

In Update you can update the console software directly from rayconsole.com or via USB. In Settings View / Update you are first given an overview of the currently installed software. Next are listed all the available updates. Press Check for Updates to make sure there are no updates avialable. Press Update Now to carry out the available updates.
You can also update the console via USB. Sign into your rayconsole.com account and go to Account / Console / Details. There you will find the latest update files for your console. Download the files and put them in the folders RayConsole / Updates on your device. Next insert your USB storage device into one of the console's USB ports and then select Update from USB. The updates will now be listed and you can press Update Now to carry out the available updates. The USB storage device must be formatted as FAT32 and there is no limit to the storage capacity of the device.
Checking for updates does not require much data and can easily be done using a hotspot. Running the update itself can require a download of around 1 GB. Therefore we recommend using a WiFi or ethernet connection. If this is not available, please download the software onto a USB storage device and install it via USB.
The components of the Ray Console software are:
System - This is the entire operating system of the console and includes all other components as well
Application - This is the main software that runs on the console and also includes the firmware and library
Firmware - This is the software that runs on the low-level hardware
Library - This is the Ray Console Device Template Library that is available to you when patching devices
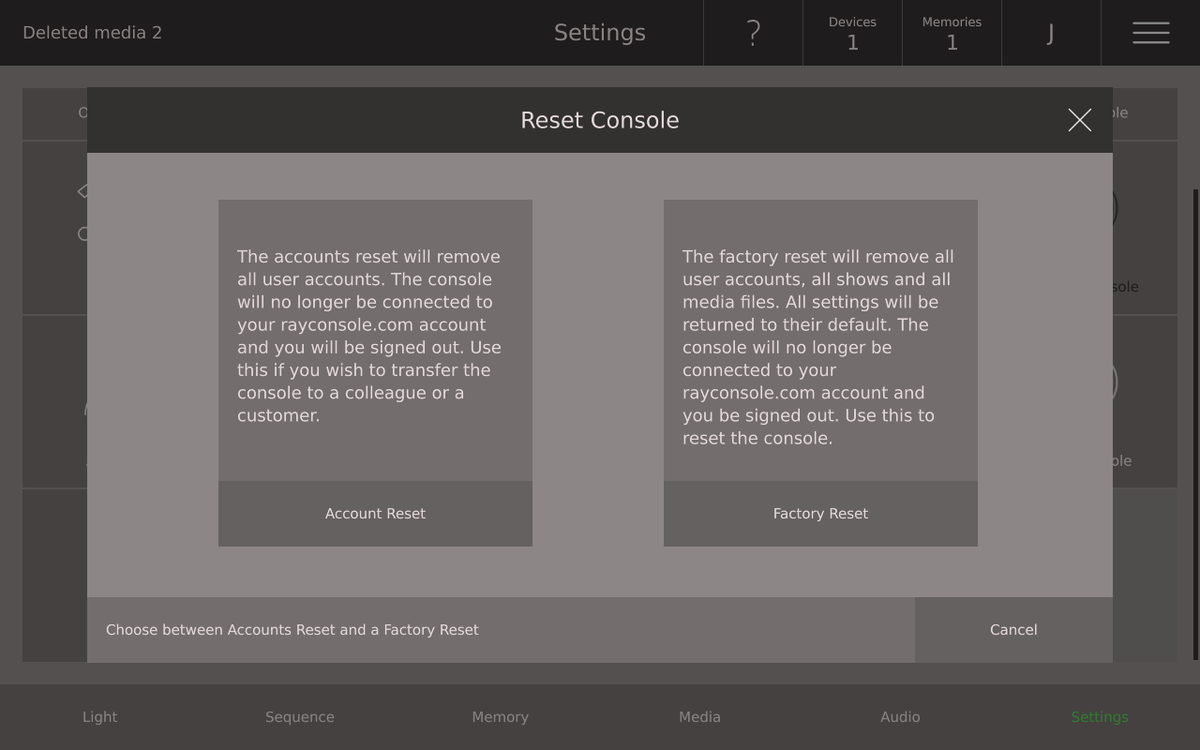
To reset the console select Settings / Reset Console. There are two options, an account reset and a factory reset. Both resets can be done by the console owner or a vendor and it cannot be reversed.
The Account Reset removes all user accounts. The console will no longer be connected to your rayconsole.com account. After the reset you will be automatically signed out the the settings area. Use this setting if you wish to sell the console or transfer it to a new administrator (owner).
The Factory Reset also removes all user accounts. The console will no longer be connected to your rayconsole.com account. All settings will be returned to their defaults. All shows and template shows will be deleted. Use this if you want to return the console to it's factory configuration.
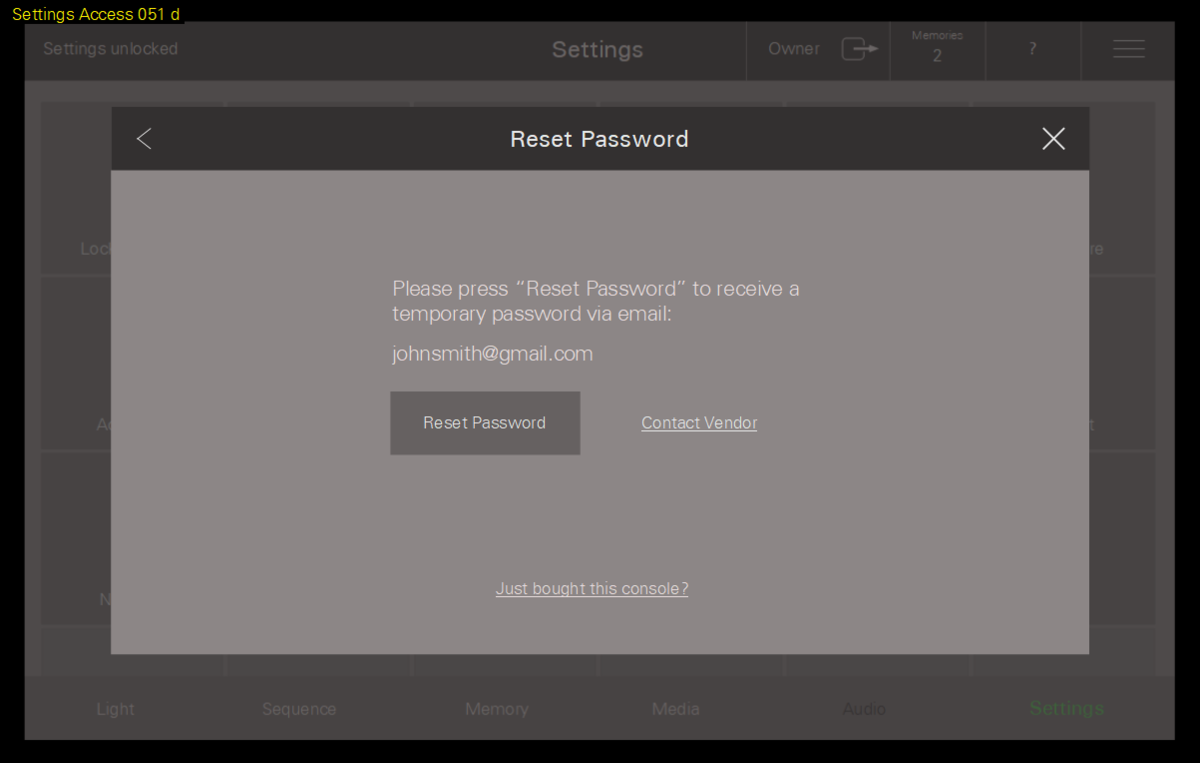
If you forgot your password for your rayconsole.com-account, don't worry. Rayconsole helps you to reset your password and connect to your Ray Console and your account.
Please make sure that the console is connected to the internet. Then tap on the Reset Password Button on the Reset Password Dialogue. Now you receive a temporary password on your registered E-Mail-Adress. To sign in enter now the temporary password and Submit.
Please note: the process of the automatically sended temporary password only work once. The second and all next times the temporary password needs to be requested by the user by tapping on Send another temporary password
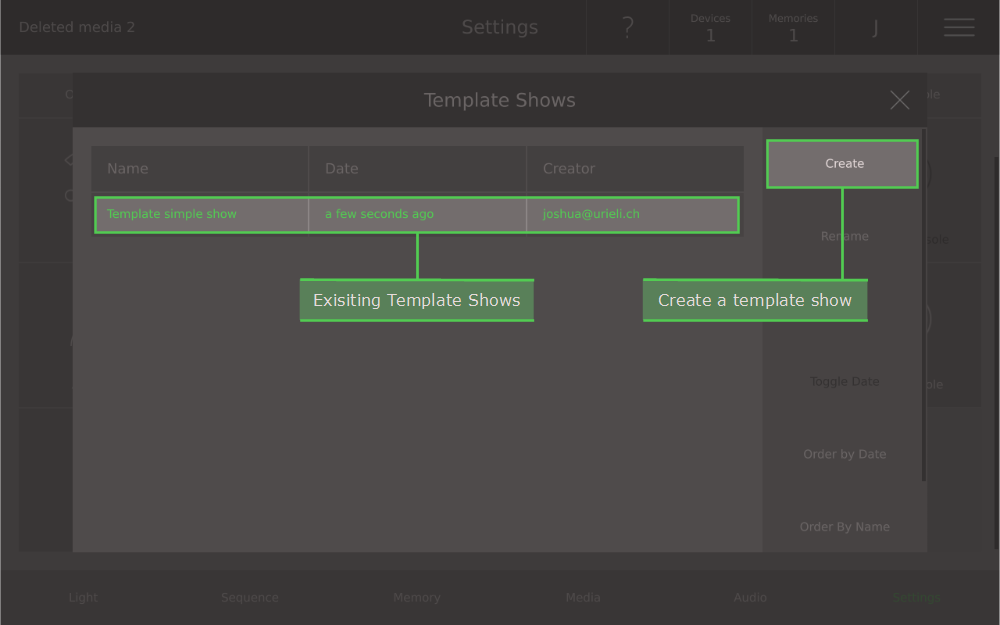

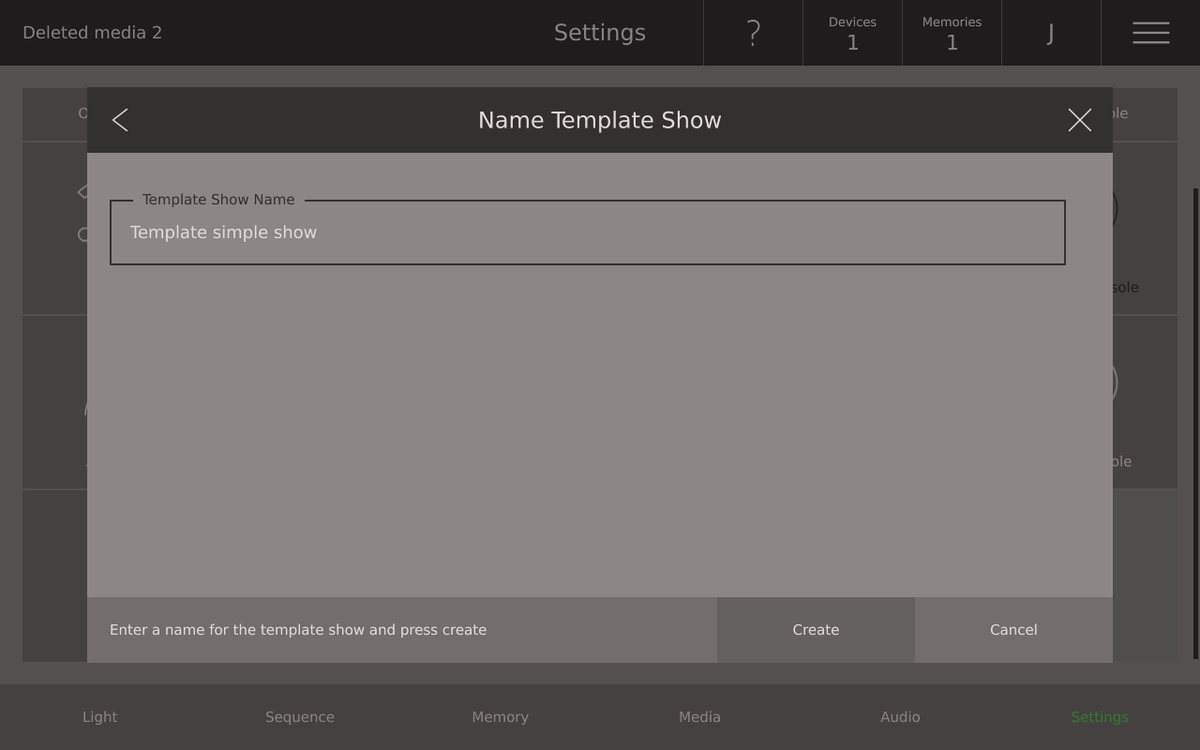
Template shows are shows that cannot be deleted. They can be used as a basic setup for a standard stage configuration so that you can start programming your next show with minimal setup.
To create a template show, first create and save a show with your basic setup. Then go to Settings / Template Shows (Owner or Vendor only) and select Create. Next select the show you have prepared and finally give your template show a name. Your template show will now appear with green text in the Open Show dialogue.
| Device | a device is every kind of light controlled by the console via DMX |
| Step | a saved state for all devices in a sequence |
| Memory | a saved state for all device |
| Sequence | a list of steps saved in the order they will be played |
| Crossfader | two faders for fading between steps |
| Moving Lights | generic term for Moving Heads and Scanners; Devices can position the light beam in different directions. This movement is generated by a motor. |
| Vendor | a local company selling the console and providing you with support |
| Owner | the person or organisation owning the console, they bought the console and administrate users as well as purchase modules |
| User | person using the console, a student, a janitor, light technician |